1 Introduktion til MS Access 2010, 2013, 2016 og 2019 Tutorial
Velkommen til MS Access tutorial. Denne vejledning er designet til at få brugeren i gang med MS Access (fremover blot "Access") på en hurtig måde. De fire grundlæggende moduler i Access er demonstreret:Tabeller, formularer, rapporter og forespørgsler. Først diskuteres et forretningseksempel, som giver en baggrund for udvikling af en simpel database.
Det antages, at brugere af denne vejledning er dygtige til at arbejde med Microsoft Windows XP/Vista/Win7/Win10 osv. og med MS Excel. Dette inkluderer brug af tastatur og mus. Selvstudiet er baseret på Microsoft Access, som er en del af Microsoft Office Professional-pakken, der også inkluderer MS Excel, MS Word og MS Powerpoint.
Denne vejledning dækker MS Access 2007, 2010, 2013, 2016 og 2019, som har en fælles grænseflade ("båndbjælken" øverst), der er forskellig fra tidligere versioner. Hvis du er interesseret i at arbejde med MS Access ’97 eller 2000, så besøg venligst Microsoft Access Tutorial – Dækker MS Access ’97 og 2000-websiden.
Selvstudiet begynder med en kort oversigt over Relationelle databaser . Størstedelen af databasestyringssystemer, der bruges i dag, er baseret på det, der kaldes den relationelle databasemodel. Access er et relationelt databasestyringssystem. Derefter beskriver vi et forretningseksempel og giver en oversigt over den database og de applikationer, vi ønsker at udvikle. I de følgende sektioner giver vi trin-for-trin instruktioner til oprettelse af tabeller, dataindtastningsformularer, rapporter og forespørgsler til applikationen.
1.1 Tilsigtet målgruppe
Denne vejledning er beregnet til studerende, der lige er startet med MS Access-databasestyringssystemet.
1.2 Forudsætningsviden
Denne vejledning forudsætter, at den studerende er fortrolig med den grundlæggende betjening af en personlig computer og Windows 2000, Windows XP, Windows Vista eller Windows 7. Specifikke færdigheder, der kræves til denne øvelse, er:
- Brug af mus og tastatur
- Åbning og lagring af filer på f.eks. harddisken og på USB-hukommelsesnøgle (thumb drive)
- Håndtering af filer generelt, herunder forskellen mellem drevbogstaver, harddisk osv.
- Kører programmer fra Windows Start-menuen
- Minimering, maksimering og ændring af størrelse på vinduer
Eleven skal have en USB-memory stick (thumb drive) eller en anden bærbar hukommelsesenhed tilgængelig til at gemme deres filer, som vil blive oprettet under denne øvelse.
1.3 Kørsel af Microsoft Access på en Apple Mac
Et problem, som nogle studerende kan støde på, er det faktum, at MS Access kun kører under Windows-operativsystemet (såsom Windows XP, Vista eller Windows 7). Hvis du har en MacBook, iMac eller et andet Apple-system, der kører MacOS, der bruger en Intel CPU, er der et par mulige alternativer, du kan prøve. Mange moderne Apple-computere, der bruger Intel CPU, kan køre Windows-operativsystemet. Bemærk, at du skal bruge en lovligt licenseret kopi af Windows-operativsystemet for at gøre dette. Der er to hovedmåder at opnå dette på:
- Du kan konfigurere din Mac til "Dual Boot" både MacOS X og Windows. Et produkt, der kan aktivere dette, er Apple BootCamp-software.
- Du kan køre Windows OS "side om side" med Mac OS X ved hjælp af en "virtuel" computer såsom VirtualBox
Indholdsfortegnelse
- 1 Introduktion til MS Access Tutorial
- 1.1 Tilsigtet målgruppe
- 1.2 Forudsat viden
- 1.3 Kørsel af Microsoft Access på en Apple Mac
- 2 Kort oversigt over relationelle databaser og databaseapplikationer
- 3 Et forretningseksempel
- 4 Start af Microsoft Access
- 4.1 Gennemgang af start af Microsoft Access
- 5 Oprettelse og visning af tabeller
- 5.1 Oprettelse af en tabel ved hjælp af designvisningen
- 5.2 Øvelse:Oprettelse af en tabel
- 5.3 Visning og tilføjelse af data til en tabel
- 5.4 Øvelse:Tilføjelse af data til en tabel
- 5.5 Oprettelse af relationer mellem tabeller
- 5.6 Gennemgang af oprettelse og visning af tabeller
- 6 Oprettelse og kørsel af forespørgsler
- 6.1 Enkeltbordsforespørgsler
- 6.2 Øvelse:Enkeltbordsforespørgsler
- 6.3 Flere tabelforespørgsler
- 6.4 Øvelse:Flere tabelforespørgsler
- 6.5 Gennemgang af oprettelse og afvikling af forespørgsler
- 7 Oprettelse og kørsel af dataindtastningsformularer
- 7.1 Oprettelse af en enkelt tabelformular ved hjælp af guiden
- 7.2 Øvelse:Oprettelse af en enkelt tabelformular
- 7.3 Gennemgang af oprettelse og kørsel af en dataindtastningsformular
- 8 Oprettelse og kørsel af rapporter
- 8.1 Oprettelse af en enkelt tabelrapport ved hjælp af guiden
- 8.2 Øvelse:Oprettelse af en enkelt tabelrapport
- 8.3 Gennemgang af oprettelse og kørsel af en rapport
- 9 Oprettelse og kørsel af en master-/detaljeformular (formular med en underformular)
- 10 Oprettelse og drift af et omstillingsbord
- 11 Oprettelse og kørsel af en navigationsformular
- 11.1 Øvelse:Ændring af en navigationsformular
- 11.2 Indstilling af navigationsformularen som standard
- 12 Selvstudieoversigt og avancerede emner
Den næste side giver en kort introduktion til relationelle databaser.
2 Kort oversigt over relationelle databaser og databaseapplikationer
De første databaser implementeret i 1960'erne og 1970'erne var baseret på enten flade datafiler eller de hierarkiske eller netværksforbundne datamodeller. Disse metoder til lagring af data var relativt ufleksible på grund af deres stive struktur og store afhængighed af applikationsprogrammer til at udføre selv den mest rutinemæssige behandling.
I slutningen af 1970'erne, relationel databasemodel som opstod i det akademiske forskningsmiljø blev tilgængelig i kommercielle implementeringer som IBM DB2 og Oracle. Den relationelle datamodel specificerer data gemt i relationer der har nogle relationer blandt dem (deraf navnet relationel ).
I relationelle databaser som Sybase, MySQL, Oracle, IBM DB2, MS SQL Server og MS Access lagres data i tabeller består af en eller flere kolonner (Access kalder en kolonne for et felt ). De data, der er gemt i hver kolonne, skal være af en enkelt datatype såsom tegn (nogle gange kaldet en "streng"), tal eller dato. En samling af værdier fra hver kolonne i en tabel kaldes en post eller en række i tabellen.
Forskellige tabeller kan have den samme kolonne til fælles. Denne funktion bruges til eksplicit at angive en relation mellem to tabeller. Værdier, der vises i kolonne A i én tabel, deles med en anden tabel.
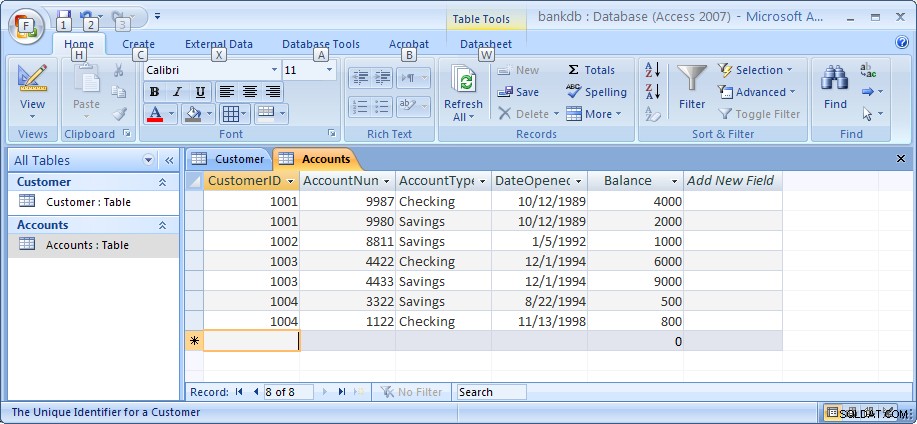
Nedenfor er to eksempler på tabeller i en relationsdatabase for en lokal bank:
Kundetabel
| Kunde-id | Fornavn | Efternavn | Gadeadresse | By | Stat | Zip |
|---|---|---|---|---|---|---|
| Nummer | Karakter | Karakter | Karakter | Karakter | Karakter | Karakter |
| 1001 | Joseph | Smith | 123 Lexington | Smithville | KY | 91232 |
| 1002 | Alberta | Jones | 12 Davis Ave. | Smithville | KY | 91232 |
| 1003 | Nathanial | Økse | 443 Kværn Ln. | Broadville | GA | 81992 |
| 1004 | Paulina | Builder | 661 Parker Rd. | Streetville | GA | 81990 |
Kontotabel
| Kunde-id | Kontonummer | Kontotype | Åbningsdato | Saldo |
|---|---|---|---|---|
| Nummer | Nummer | Karakter | Dato | Nummer |
| 1001 | 9987 | Tjekker | 10/12/1989 | 4000,00 |
| 1001 | 9980 | Besparelser | 10/12/1989 | 2000,00 |
| 1002 | 8811 | Besparelser | 01/05/1992 | 1000,00 |
| 1003 | 4422 | Tjekker | 12/01/1994 | 6000,00 |
| 1003 | 4433 | Besparelser | 12/01/1994 | 9000,00 |
| 1004 | 3322 | Besparelser | 22/08/1994 | 500,00 |
| 1004 | 1122 | Tjekker | 13/11/1988 | 800,00 |
Kundetabellen har 7 kolonner (kunde-id, fornavn, efternavn, adresse, by, stat og postnummer) og 4 rækker (eller registreringer) med data. Kontitabellen har 5 kolonner (kunde-id, kontonummer, kontotype, åbningsdato og saldo) med 7 rækker med data.
Hver af kolonnerne er i overensstemmelse med en af tre grundlæggende datatyper :Tegn, tal eller dato. Datatypen for en kolonne angiver typen af dataværdier, der kan gemmes i den kolonne.
- Tal – må kun gemme tal, eventuelt med et decimaltegn. Kan være positiv eller negativ.
- Tegn – kan gemme tal, bogstaver og tegnsætning. Access kalder denne datatype Tekst .
- Dato – må kun gemme data og klokkeslæt.
I nogle databaseimplementeringer findes andre datatyper såsom billeder (til billeder eller andre data). De tre ovenstående datatyper er dog oftest brugt.
Bemærk, at de to tabeller deler kolonnen Kunde-ID, og at værdierne i kolonnen Kunde-id i tabellen Kunde er de samme som værdierne i kolonnen Kunde-id i tabellen Konti. Dette forhold giver os mulighed for at specificere, at kundens Nathanial Axe har både en check- og en opsparingskonto, der begge blev åbnet samme dag:1. december 1994.
Et andet navn givet til et sådant forhold er Master/Detail . I et master-/detaljeforhold kan en enkelt masterpost (såsom Customer 1003, Nathanial Axe) have mange detaljeposter (de to konti) tilknyttet.
I et Master/Detalje-forhold er det muligt for en Master-record at eksistere uden nogen detaljer. Det er dog umuligt at have en detaljepost uden en matchende masterpost. For eksempel kan en kunde ikke nødvendigvis have nogen kontooplysninger overhovedet. Alle kontooplysninger skal dog være tilknyttet en enkelt kunde.
Hver tabel skal også have en speciel kolonne kaldet Nøglen der bruges til entydigt at identificere rækker eller poster i tabellen. Værdier i en nøglekolonne (eller -kolonner) må aldrig duplikeres. I ovenstående tabeller er kunde-id nøglen til kundetabellen, mens kontonummer er nøglen til kontitabellen.
3 Et forretningseksempel
I dette afsnit vil vi skitsere et forretningseksempel, der vil blive brugt som grundlag for eksemplerne i hele vejledningen. I organisationer udføres opgaven med at analysere virksomheden og bestemme den passende databasestruktur (tabeller og kolonner) typisk af Systemanalytikere . En systemanalytiker vil indsamle information om, hvordan virksomheden fungerer, og vil danne en model af kravene til datalagring. Ud fra denne model vil en databaseprogrammør oprette databasetabellerne og derefter arbejde sammen med applikationsudviklerne for at udvikle resten af databaseapplikationen.
Til denne tutorial vil vi overveje en simpel bankvirksomhed. Banken har mange kunder, der åbner og vedligeholder en eller flere konti. For hver kunde opbevarer vi deres navn og adresse. Vi tildeler dem også et unikt kunde-id. Vi tildeler denne unikke identifikator både for nemheds skyld og for nøjagtighedens skyld. Det er meget nemmere at identificere en enkelt kunde ved hjælp af deres kunde-id i stedet for at slå deres fulde navn og adresse op. Derudover er det muligt for banken at have to kunder med samme navn (f.eks. Bill Smith). I sådanne tilfælde kan det unikke kunde-id altid bruges til at skelne dem fra hinanden.
På lignende måde tildeles alle konti et unikt kontonummer. En konto kan enten være en checkkonto eller en opsparingskonto. Opsparingskonti forrentes, men de eneste tilladte transaktioner er ind- og udbetalinger. Checkkonti forrentes ikke. Vi fastholder datoen, hvor kontoen blev åbnet. Dette hjælper os med at spore vores kunder og kan være nyttigt til markedsføringsformål. Endelig bevarer vi den aktuelle saldo på en konto.
I det foregående afsnit gav vi strukturen og nogle eksempeldata for kundetabellen og kontitabellen. Disse vil blive brugt til at understøtte datalagringsdelen af vores bankapplikation.
Databaseapplikationer
I enhver databaseapplikation kræver hver af tabellerne et middel til at få data ind i dem og til at hente og ændre dataene på et senere tidspunkt. Den primære måde at få data ind i tabeller er at bruge dataindtastningsformularer. De primære måder at få data tilbage fra tabeller eller til at vise data i tabeller er at bruge forespørgsler eller rapporter. I en komplet databaseapplikation er alle formularer og rapporter knyttet sammen i en Navigationsformular - en enkelt side, der vil have links til hver af applikationens dele. En stor databaseapplikation kan have snesevis af dataindtastningsformularer og rapporter.
Til denne øvelse vil vi oprette en dataindtastningsformular for hver tabel, en forespørgsel for hver tabel og en rapport for hver tabel.
I de følgende afsnit vil vi først introducere, hvordan man starter Access, og hvordan man opretter en ny database.
4 Start af Microsoft Access
Som med de fleste Windows-programmer, kan Access udføres ved at navigere i Start-menuen i nederste venstre hjørne af Windows-skrivebordet.
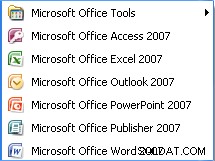
For at starte Access skal du klikke på Start-knappen, derefter menuen Programmer, gå til Microsoft Office-menuen og til sidst klikke på menupunktet Microsoft Access. Menuen MS Office Professional er vist nedenfor.
Bemærk, at dette arrangement af menuer kan variere afhængigt af, hvordan MS Office blev installeret på den pc, du bruger.
Når Access kører, vises en startskærm:
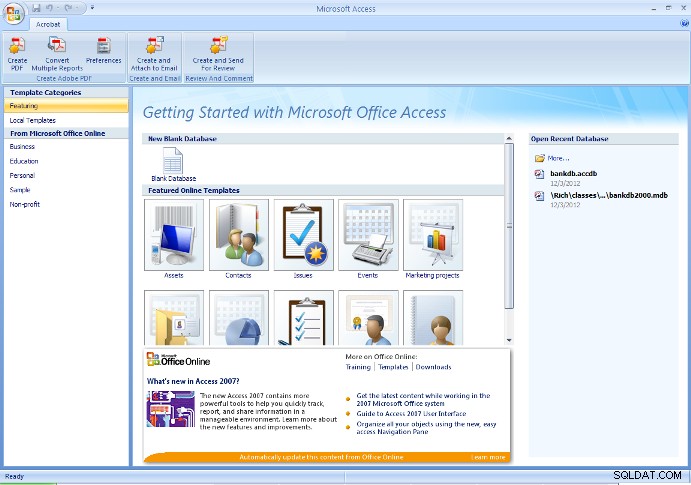
Fra denne indledende skærm kan brugeren oprette en ny database (enten tom eller med nogle tabeller oprettet med databaseguiden), eller åbne en eksisterende database.
Generelt, første gang man starter et projekt, bør der oprettes en ny, tom database. Efter det tidspunkt skal du bruge Åbn eksisterende database mulighed for at genåbne den tidligere oprettede database.
Advarsel – Hvis du tidligere har oprettet en database og derefter opretter den igen med samme navn, vil du overskrive alt arbejde, du har udført.
Til formålet med denne øvelse, hvis du gennemgår disse trin for første gang, skal du vælge muligheden for at oprette en ny, tom database som vist i ovenstående figur.
I Access 2007 skal du klikke på den runde Office-knap i øverste venstre hjørne og vælge Ny fra rullemenuen. Udfyld Filnavn som bankdb.accdb og klik på knappen Opret for at oprette databasen som i figuren nedenfor.
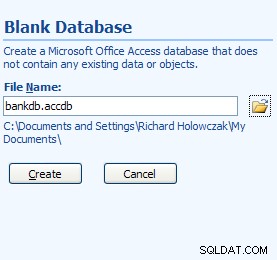
Ny databaseskærm til Access 2007
I ovenstående filnavn er bankdb det navn, der er valgt til denne særlige database, og .accdb er filtypenavnet givet for Microsoft DataBase 2007, 2010 og 2013 filer.
Det er tilrådeligt at holde navnet på databasen (bankdb i ovenstående eksempel) relativt kort og ikke bruge mellemrum eller anden tegnsætning i navnet på databasen. Navnet på databasen skal også afspejle databasens indhold.
Når den nye database er oprettet, vises følgende hoved Access-skærmbillede:
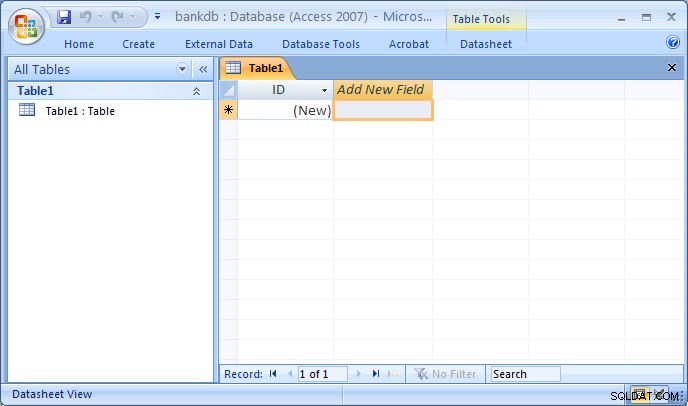
Skærmlayoutet for MS Access 2007 er væsentligt anderledes end tidligere versioner. De fleste af fanerne langs toppen af skærmen er blevet omarrangeret. Derudover skifter standardhovedskærmen efter oprettelse af en ny database automatisk til designvisningen for at oprette en ny tabel.
Følgende faner vises øverst på skærmen:
- Fanen Startside – Kontrolelementer til at ændre skrifttyper, udføre forespørgsler, kopiere/indsætte/klippe data osv.
- fanen Opret – Kontrolelementer til oprettelse af tabeller, formularer, rapporter osv.
- Fanen Eksterne data – Kontroller til indlæsning af data fra andre datakilder til MS Access.
- Fanen Databaseværktøjer – Kontroller til styring af databaser (sikkerhed, omstillingsbord osv.)
- fanen Design – Dette vises, når du designer en ny tabel, formular, rapport osv.
Bemærk, at grænsefladerne til Access 2007, 2010 og 2013 alle er ens, selvom den version, du bruger, kan se lidt anderledes ud end billederne inkluderet i denne øvelse.
4.1 Gennemgang af at starte Microsoft Access
Sådan starter du Microsoft Access:
- Brug knappen Start på proceslinjen for at åbne:Programmer -> MS Office -> Microsoft Access
- For at oprette en ny database skal du vælge Tom database og angiv et nyt filnavn til databasen. Sørg for at bruge et beskrivende navn til den nye database. Klik på knappen OK for at oprette den nye database.
- For at åbne en eksisterende database skal du vælge Åbn en eksisterende database , fremhæv Flere filer... og klik på OK-knappen. Naviger derefter til drevet, marker den eksisterende databasefil på harddisken eller USB-drevet, og klik på OK-knappen igen for at åbne databasen.
For at afslutte Access skal du trække menuen Filer (eller Office-menuen) ned og vælge menupunktet Afslut.
5 Oprettelse og visning af tabeller
Tabeller er hovedenhederne for datalagring i Access. Husk, at en tabel består af en eller flere kolonner (eller felter ) og at en given kolonne kan forekomme i mere end én tabel for at angive en relation mellem tabellerne.
Fra det tidligere diskuterede forretningseksempel konkluderede vi, at to tabeller ville være tilstrækkelige til at gemme data om Kunder og deres bank-konti . Vi giver nu trin-for-trin instruktionerne til at oprette disse to tabeller i Access.
Der er en række måder at oprette en tabel i Access. Adgang giver guider der guider brugeren gennem oprettelsen af en tabel ved at foreslå navne til tabeller og kolonner. Den anden hovedmåde at oprette en tabel på er ved at bruge Designvisning for manuelt at definere kolonnerne (felterne) og deres datatyper.
Mens brug af guiderne er en hurtig måde at oprette tabeller på, har brugeren mindre kontrol over kolonnenavne (felter) og datatyper. I denne øvelse vil vi beskrive trinene til at oprette en tabel ved hjælp af Designvisning . Eleverne opfordres til at eksperimentere på egen hånd med at bruge guiden Opret tabel.
5.1 Oprettelse af en tabel ved hjælp af designvisningen
For at oprette en tabel i Access ved hjælp af Design View skal du udføre følgende trin:
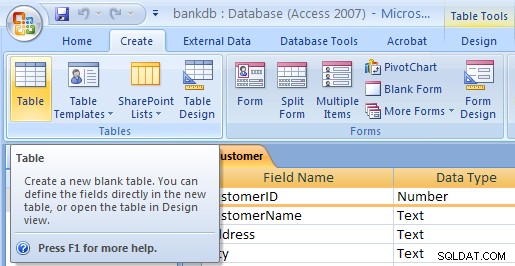
- I Access 2007, 2010 og 2013 skal fanen Opret ny tabel allerede være fremhævet, og en ny tabel med navnet tabel1 skal oprettes. Hvis dette ikke er tilfældet, skal du klikke på Opret fanen og klik på Tabel ikon. Træk derefter Vis ned menuen og vælg Designvisning .

- Tabeldesignvisningen vises. Udfyld Feltnavnet , Datatype og Beskrivelse for hver kolonne/felt i tabellen. Kunde-id-feltet er udfyldt nedenfor:
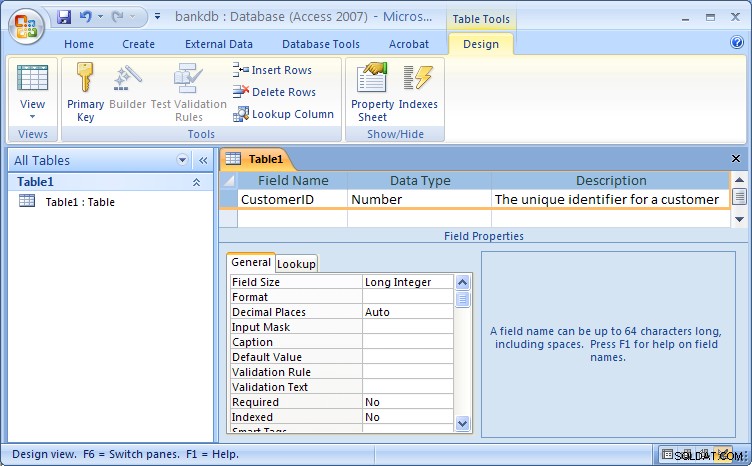
Tabeldesignvisning for Access 2007Bemærk, at standardnavnet for tabellen er Tabel1 . I et senere trin vil vi tildele et passende navn til denne tabel.
Udfyld oplysningerne for felterne som følger:
Feltnavn Datatype Beskrivelse Kunde-id Nummer Den unikke identifikator for en kunde Fornavn Tekst Kundens fornavn Efternavn Tekst Kundens efternavn Gadeadresse Tekst Kundens gadeadresse By Tekst Kundens by Tilstand Tekst Kundens hjemland Zip Tekst Kundens postnummer En figur, der viser designvisningen med den nye tabeldefinition udfyldt, er vist nedenfor:

Det næste trin er at definere nøglen til tabellen og gemme tabellen.
- Nu hvor alle felterne er defineret for tabellen, skal der defineres en primærnøgle. Husk, at den primære nøgle vil blive brugt til entydigt at identificere en post i tabellen (i dette tilfælde en kunde). Fremhæv Kunde-id feltet og klik på knappen Primær nøgle på knaplinjen
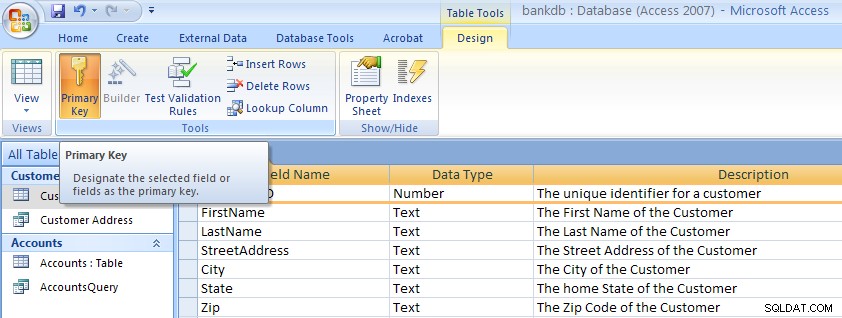 Bemærk, at der vises en lille nøgle ved siden af feltnavnet i venstre side.Bemærk:For at fjerne en primær nøgle , gentag blot denne procedure for at slå den primære nøgle fra.
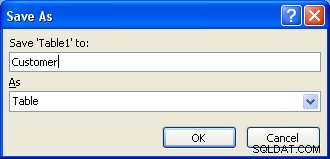
- Som et sidste trin skal tabellen gemmes. Træk Office-menuen ned og vælg menupunktet Gem som. Der vises en dialogboks, hvor navnet på den nye tabel skal angives. Bemærk, at Access giver et standardnavn som f.eks. Tabel1 eller Tabel2 . Indtast blot dette standardnavn med navnet på tabellen. For dette eksempel skal du navngive tabellen:Kunde Klik derefter på knappen OK.
På dette tidspunkt er den nye kundetabel blevet oprettet og gemt.
En note om navngivning af felter (kolonner) i MS Access
Når du definerer felterne (kolonnerne) for en tabel, er det vigtigt at bruge feltnavne, der giver en klar forståelse af kolonnens dataindhold. Indikerer feltet CNO for eksempel et kundenummer eller et containernummer ?
Feltnavne i Access kan være op til 64 tegn lange og kan indeholde mellemrum. Men brugen af mellemrum i feltnavne og tabelnavne frarådes på det kraftigste . Hvis du ønsker at gøre feltnavne nemmere at læse, kan du overveje at bruge et understregningstegn til at adskille ord. Vær dog sikker på, at der ikke vises mellemrum før eller efter understregningen.
Følgende tabel opsummerer nogle forskellige måder at give feltnavne på:
| Beskrivelse | Dårlig | Godt |
|---|---|---|
| Unik identifikator for en kunde | CID | CustomerID eller Customer_ID |
| Beskrivelse af et produkt | PDESC | Produktbeskrivelse |
| Medarbejders hjemmetelefonnummer | Employee_home_telephone_number | Hjemmetelefon |
| Bankkontonummer | BA# | Kontonummer |
5.2 Øvelse:Oprettelse af en tabel
Opret konti tabel ved at følge de samme trin, som bruges til at oprette kundetabellen.
- Klik på fanen Opret, og klik derefter på Tabel knap.
- Træk menuen Vis ned, og vælg Design. Tabeldesignvisningen vises. Udfyld Feltnavnet , Datatype og Beskrivelse for hver kolonne/felt i tabellen Konti.
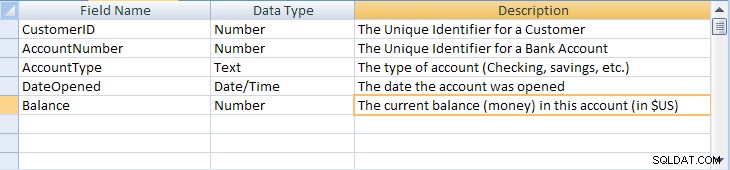
Feltnavn Datatype Beskrivelse Kunde-id Nummer Den unikke identifikator for en kunde Kontonummer Nummer Den unikke identifikator for en bankkonto Kontotype Tekst Kontotypen (kontrol, opsparing osv.) Åbnet dato Dato Datoen kontoen blev åbnet Saldo Nummer Den aktuelle saldo (penge) på denne konto (i USD) En figur, der viser designvisningen med den nye tabeldefinition udfyldt, er vist nedenfor:
- Definer en primær nøgle til tabellen Konti. Klik på Kontonummer felt med Højre museknap og vælg Primær nøgle fra pop op-menuen.
- Gem den nye kontotabel ved at trække ned i menuen Filer og vælge menupunktet Gem. Udfyld navnet på tabellen:Konti Klik derefter på knappen OK.
Bemærk, at der er en række yderligere trin, man kan tage for at forbedre og udsmykke tabeller i MS Access, herunder angivelse af standardværdier, oprettelse af opslagsværdier og maskering af datainput for at følge et specifikt mønster. Detaljerne er ikke vigtige for denne aktuelle selvstudie, men hvis du er interesseret, så tjek siden Advanced MS Access Table Design, der er linket her.
5.3 Visning og tilføjelse af data til en tabel
Data kan tilføjes, slettes eller ændres i tabeller ved hjælp af en simpel regnearkslignende visning. For at få denne visning af en enkelt tabels data frem, skal du fremhæve tabellens navn og derefter dobbeltklikke på tabellens navn.
I denne visning af kundetabellen, vist i figuren nedenfor, vises felterne (kolonnerne) øverst i vinduet, og rækkerne eller posterne vises nedenfor. Denne visning svarer til, hvordan et regneark ville være designet.
Bemærk nederst i vinduet, hvor mange poster vises. I dette tilfælde, da tabellen lige blev oprettet, vises der kun én tom post.
For at tilføje data til tabellen skal du blot indtaste værdier for hvert af felterne (kolonner). Tryk på tabulatortasten for at flytte mellem felter i en post. Brug piletasterne op og ned til at flytte mellem poster. Indtast dataene som angivet nedenfor:
| Kunde-id | Fornavn | Efternavn | Gadeadresse | By | Stat | Zip |
|---|---|---|---|---|---|---|
| 1001 | Joseph | Smith | 123 Lexington | Smithville | KY | 91232 |
| 1002 | Alberta | Jones | 12 Davis Ave. | Smithville | KY | 91232 |
| 1003 | Nathanial | Økse | 443 Kværn Ln. | Broadville | GA | 81992 |
| 1004 | Paulina | Builder | 661 Parker Rd. | Streetville | GA | 81990 |

For at gemme de nye data skal du trække ned i Office-menuen og vælge Gem.
For at navigere til andre poster i tabellen skal du bruge navigationslinjen nederst på skærmen:
For at ændre eksisterende data skal du blot navigere til registreringen af interesse og fane til det relevante felt. Brug piletasterne og slette- eller tilbagetasterne til at ændre de eksisterende data.
For at slette en post, skal du først navigere til registreringen af interesse. Træk derefter menuen Rediger ned og vælg menupunktet Slet.
For at lukke tabellen og vende tilbage til hovedskærmbilledet Access, skal du trække ned i menuen Filer og vælge menupunktet Luk.
5.4 Øvelse:Tilføjelse af data til en tabel
Til denne øvelse skal du åbne kontitabellen og tilføje data for de syv konti vist i afsnit 2. Sørg for at indtaste dataene nøjagtigt som vist, inklusive store bogstaver af data i feltet Kontotype. skriv f.eks. Besparelser i stedet for besparelser eller SPARING.
Bemærk, at når du indtaster datoerne, skal du indtaste de fulde fire cifre for året. Som standard viser Access alle 4 cifre i året (ældre version af Access viste kun to cifre).
Sørg for at gemme dataene, når du er færdig. Figuren nedenfor viser kontitabellen og data, som den skal fremstå, når du er færdig med denne øvelse.
På dette tidspunkt i selvstudiet har vi oprettet to tabeller, kunder og konti, og tilføjet data til hver enkelt. I de efterfølgende afsnit vil vi dække, hvordan du forespørger og rapporterer om dataene i tabellerne, og hvordan du opretter en brugervenlig dataindtastningsformular ved hjælp af Access-guiderne.
Bemærk:Min vejledning om MS Access Advanced Table Design kan findes på dette link. Du ønsker måske at tjekke det ud, når du har gennemført resten af denne øvelse.
5.5 Oprettelse af relationer mellem tabeller
Husk, at en af de vigtigste egenskaber ved relationelle databaser er, at alle tabeller er relateret til hinanden. I Bankdatabasen er Kundetabellen indtil videre relateret til Kontotabellen i kraft af, at KundeID-feltet optræder i begge tabeller. Access har et middel til at gøre dette forhold eksplicit ved hjælp af skærmbilledet Relationer. Access bruger disse oplysninger, når de designer rapporter, formularer og forespørgsler, der kræver, at mere end én tabel vises.
For at komme i gang skal du sørge for, at både kontitabellen og kundetabellen er lukket. Adgang vil standse oprettelsen af eventuelle relationer, hvis bordet i øjeblikket er åbnet. For at lukke en tabel skal du enten højreklikke på tabelnavnet i fanen over tabellen og vælge menupunktet Luk, eller klikke på det lille X til højre over tabellen.

Vis derefter Relations-skærmen ved at klikke på fanen Databaseværktøjer og klik derefter på Relations-knappen som vist nedenfor. 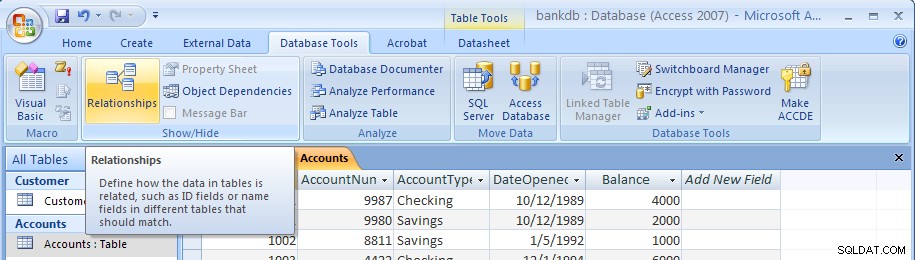
Den tomme relationsskærm vises som følger:
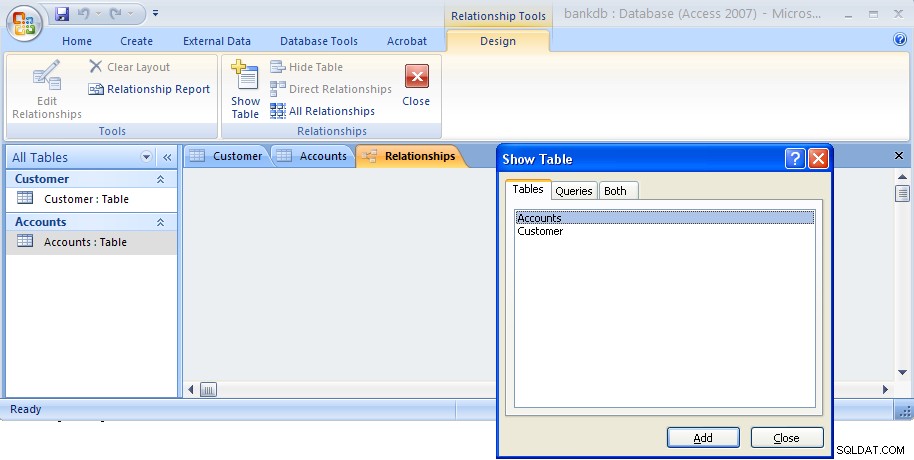
Dialogboksen Vis tabel vises som standard. Fremhæv både kundetabellen og kontitabellen som vist nedenfor, og klik derefter på knappen Tilføj.

Klik derefter på knappen Luk for at lukke denne dialogboks. Skærmbilledet Relationer vil nu dukke op igen med de to tabeller vist som nedenfor:
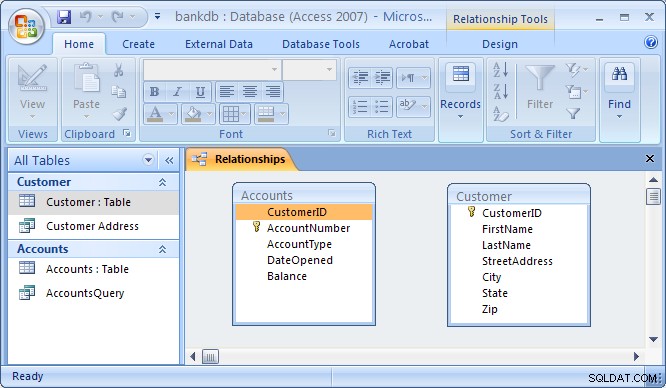
For at forbinde Kunder-tabellen med Konti-tabellen for at danne en relation, skal du klikke på Kunde-id-feltet i Kunde-tabellen og trække det over på Kunde-ID-feltet i Konti-tabellen. Når du slipper museknappen, vises dialogboksen Rediger relationer som nedenfor:
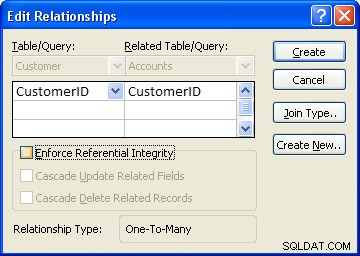
Access vil gøre sit bedste for at bestemme relationstypen (næsten altid vil den vælge En-til-mange ). I dette eksempel ved Access, at Kunde-ID er en nøgle i kundetabellen, så det vælger dette felt som "En"-siden. Dette gør kontotabellen til "Mange"-siden som Én customer may have Many accounts.
One additional step to be taken is the check off the box labeled “Enforce Referential Integrity”. This option puts constraints into effect such that an Accounts record can not be created without a valid Customer record, and Access will also prevent a user from deleting a Customer record if a related Accounts record exists. At this point, click on the Create button to create the relationship. The Relationships screen should reappear with the new relationship in place as follows:
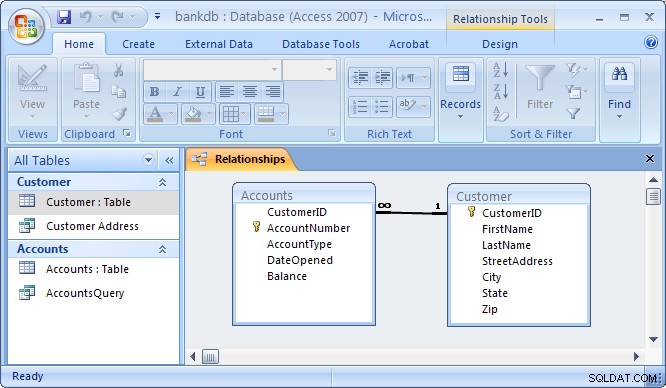
Note the symbols “1” (indicating the “One” side) and the infinity symbol (indicating the “Many” side) on the relationship. Close the relationships screen and select Yes to save the changes to the Relationships layout.
If the relationship does not appear in the above fashion, highlight it and press the delete key to delete it. Then go back to the table design view and make certain that the CustomerID field is designated as the key of the Customers table. Then go back to the Relationships screen and try to recreate the relationship.
5.6 Review of Creating and Viewing Tables
Creating a new table requires the following steps:
- Click on the Tables tab on the Access main screen
- Click on the New button.
- Choose the Design View and click the OK button.
- Fill in the name, data type and description of each of the fields in the table.
- Designate a primary key by clicking on one of the fields with the right mouse button and then choose Primary Key from the pop-up menu.
- Save the table by pulling down the File menu and choosing Save.
- Close the new table by pulling down the File menu and choosing Close.
To change the design of an existing table (e.g., to add, change or delete a field):
- Click on the Tables tab on the Access main screen
- Highlight the name of the table to be modified and click on the Design button.
- Make the necessary changes.
- Save the table by pulling down the File menu and choosing Save.
- Close the table by pulling down the File menu and choosing Close.
To add, delete or change data in an existing table:
- Click on the Tables tab on the Access main screen
- Highlight the name of the table to be modified and click on the Open button.
- Make the necessary changes to the data.
- Save the table data by pulling down the File menu and choosing Save.
- Close the table by pulling down the File menu and choosing Close.
To create or edit relationships between tables:
- Pull down the Tools menu and select the Relationships menu item.
- To display tables, right click and choose Add Tables
- To create new relationships, drag a key field from one table and drop it on the associated field in another table
- To edit an existing relationship, double click on the relationship line.
- To delete an existing relationship, click on the relationship line and press the delete key.
6 Creating and Running Queries
Queries are a fundamental means of accessing and displaying data from tables. Queries can access a single table or multiple tables. Examples of queries for our bank database might include:
- Which Customers live in Georgia ?
- Which Accounts have less than a $500 balance ?
- What is the total amount of money deposited by each Cusomter?
- Which Checking account has the largest balance?
Queries can be used to carry out other tasks such as for creating formatted reports and data entry forms, and for exporting subsets of data to Excel or another software program.
In this section, we show how to use the Access Wizards to create queries for a single table and for multiple tables.
6.1 Single Table Queries
In this section, we demonstrate how to query a single table. Single table queries are useful to gain a view of the data in a table that:
- only displays certain fields (columns) in the output
- sorts the records in a particular order
- performs some statistics on the records such as calculating the sum of data values in a column or counting the number of records, or
- filters the records by showing only those records that match some criteria. For example, show only those bank customers living in GA.
Creating a query can be accomplished by using either the query design view or the Query wizard. In the following example, we will use the query wizard to create a query.
To create a new query, click on the Create tab. Then click on the Query wizard button.
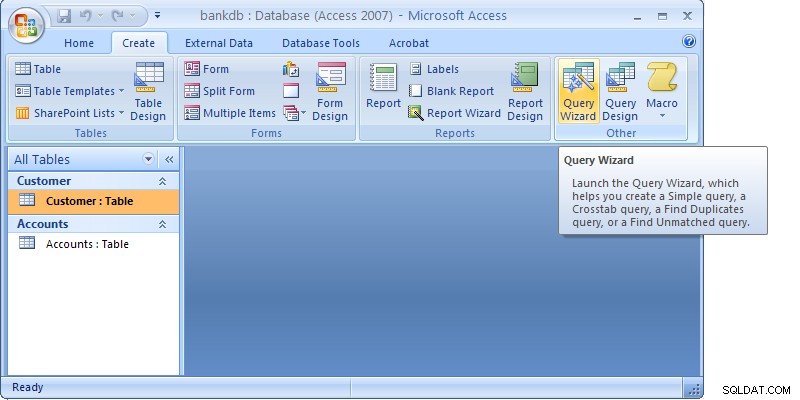
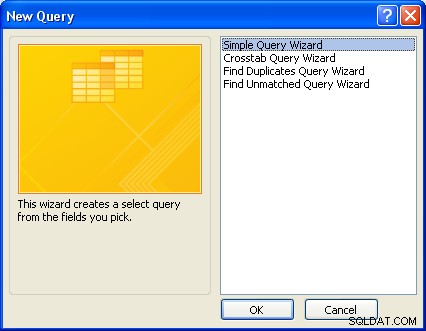
When the Query wizard appears, highlight the Simple Query Wizard selection and click on the OK button.
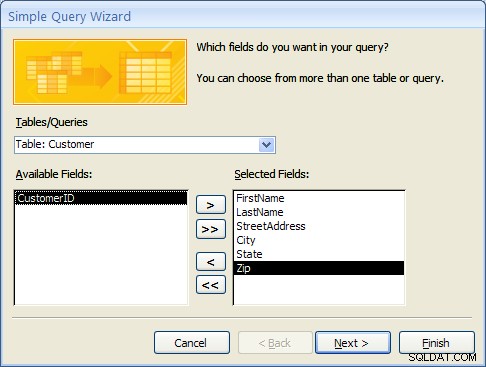
The first step in the Simple Query wizard is to specify the table for the query and which fields (columns) should be displayed in the query output. Three main sections of this step are:
- Tables/Queries – A pick list of tables or queries you have created.
- Available Fields – Those fields from the table that can be displayed.
- Selected Fields – Those fields from the table that will be displayed.
For this example, pull down the Tables/Queries list and choose the Customer table. Notice that the available fields change to list only those fields in the Customer table. This step is shown below:

From the list of Available fields on the left, move the FirstName, LastName, StreetAddress, City and State fields over to the Selected Fields area on the right. Highlight one of the fields and then click on the right arrow button  in the center between the two areas. Repeat this for each of the four fields to be displayed. When done with this step, the wizard should appear as below:
Click on the Next button to move to the next and final step in the Simple Query wizard.
In the final step, give your new query a name. For this example, name the query:Customer Address
At this point, the wizard will create the new query with the option to either:
- Open the query to view information – that is, the wizard will execute the query and show the data.
- Modify the query design – the wizard will switch to the Design View to allow further modification of the query.
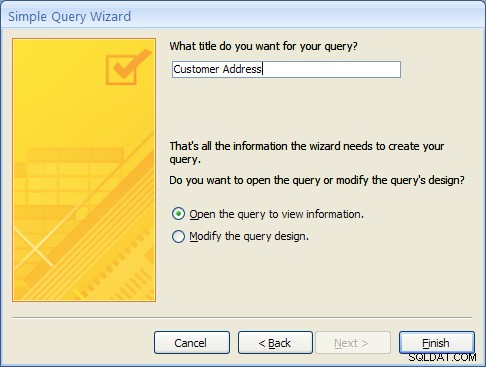
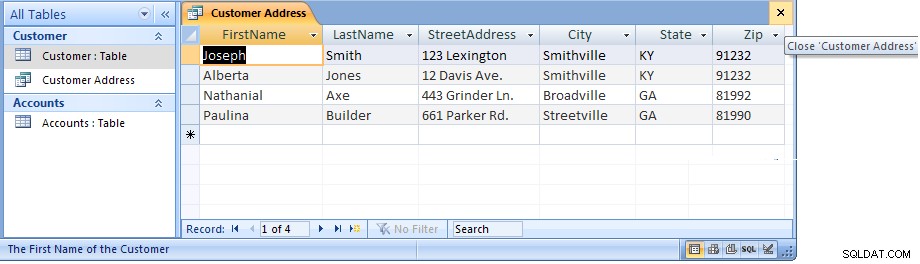
For this example, choose Open the query to view information and click on the Finish button. When this query executes, only the customer’s name, address, city and state fields appear, however, all of the rows appear as shown in the figure below:

Close this query by clicking on the X in the upper right corner of the query results as shown in the figure below:
The Access main screen showing the Queries tab should appear. Note the new query Customer Address appears under the Customers table.
6.1 Single Table Queries (Continued)
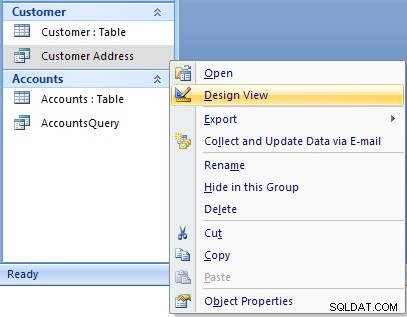
In the following example, we will modify the Customer Address query to only display customers in a certain state. To accomplish this, we will make use of the Query Design View.
Open up the Customer Address query in the design view by right-clicking on the name of the query. Then select the Design View menu item as shown below.
The design view will appear as in the figure below:
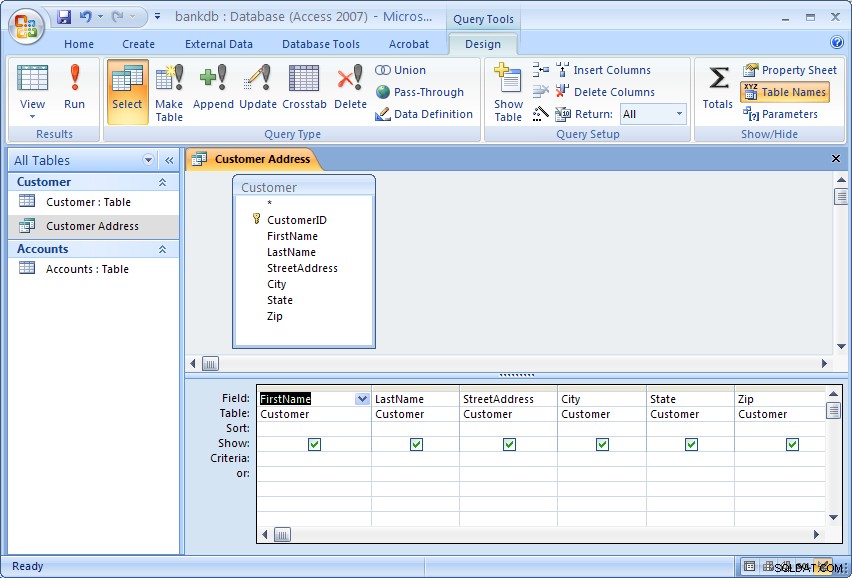
The Query Design view has two major sections. In the top section, the table(s) used for the query are displayed along with the available fields. In the bottom section, those fields that have been selected for use in the query are displayed.
Each field has several options associated with it:
- Field – The name of the field from the table
- Table – The table the field comes from
- Sort – The order in which to sort on this field (Ascending, Descending or Not Sorted)
- Show – Whether or not to display this field in the query output
- Criteria – Indicates how to filter the records in the query output.
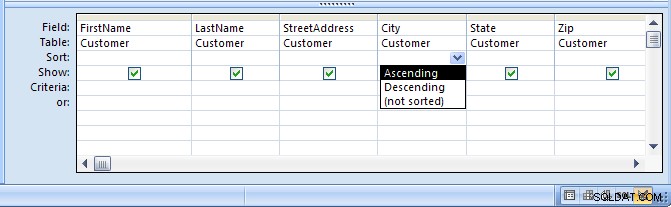
For this example, we will filter the records to only display those customers living in the State of Georgia (GA). We will also sort the records on the City field.
To sort the records on the City field, click in the Sort area beneath the City Mark. Choose Ascending from the list as shown in the figure below:
To filter the output to only display Customers in Georgia, click in the Criteria area beneath the State field and type the following statement: ='GA'
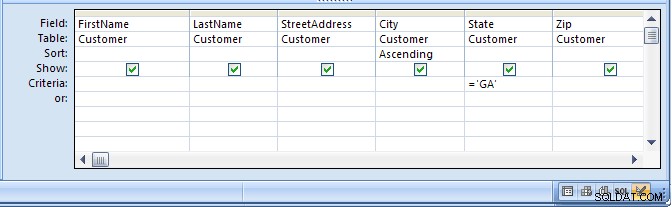
The ='GA' statement tells Access to only show those records where the value of the State field is equal to ‘GA’. Note the use of single quotes to surround the characters.
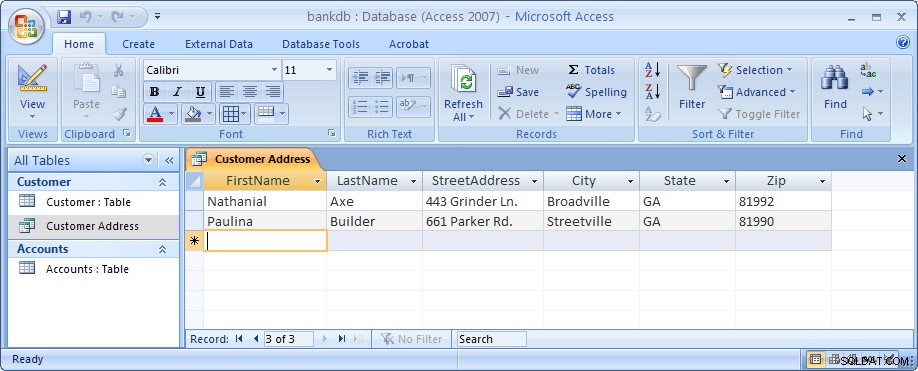
Run the query by clicking on the Run button (with the large red exclamation point). The output is shown in the figure below:
Finally, save and close this query to return to the Access main screen.
6.2 Exercise:Single Table Queries
For this exercise, use the Simple Query wizard to create a query on the Accounts table showing just the AccountNumber, AccountType and Balance fields.
- From the Access main screen, click on the Create tab. Then click on the Query Wizard button.
- Choose the Simple Query wizard option and click on the OK button.
- Under Table/Queries:choose the Accounts table. Then move the AccountNumber, AccountType and Balance fields over to the Selected fields area. Then click the Next button.
- In the next panel, you will be asked to choose between a detail or summary query. Choose detailed query and click on the Next button.
- Name the new Query :AccountsQuery and click on the Finish button.
The output is shown below:

Close this query by pulling down the Office menu and choosing Close.
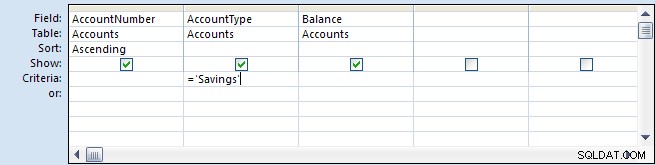
In the next part of the exercise, we will modify the query to sort the output on the account number and only display the Savings accounts.
- From the Queries tab on the Access main screen, highlight the AccountsQuery and click on the Design button.
- Change the Sort order for the AccountNumber field to Ascending.Add the following statement to the Criteria:are under the AccountType field:=‘Savings’
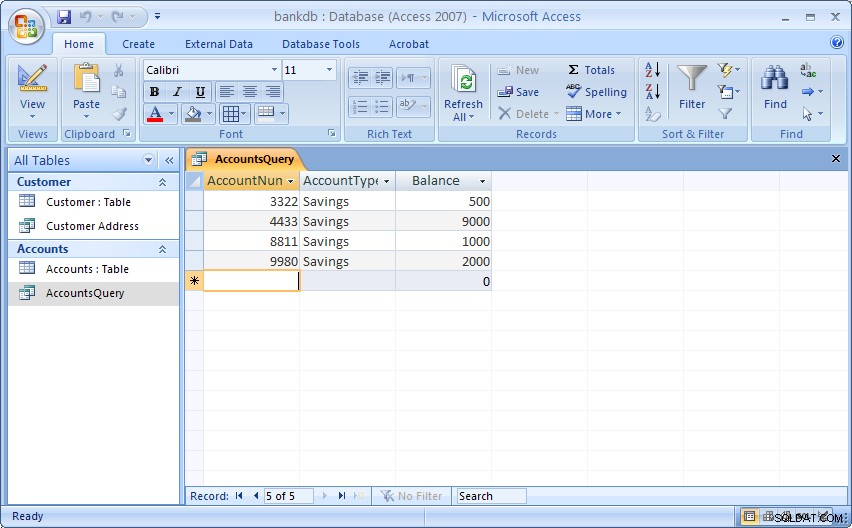
- Run the query by double-clicking on the AccountsQuery name. The output is shown below:
- Finally, save and close the query to return to the Access main screen.
6.3 Multiple Table Queries
Up to this point, queries involving only one table have been demonstrated. It is almost a given that queries will need to involve more than one table. For this example, assume that a manager would like to see a list of all of the customers and the type of account(s) that each one maintains at the bank. Such a query requires data from both the Customers table as well as the Accounts table. In such queries, Access will rely on the Relationships established between tables to guide how the data will be assembled to satisfy the query.
Before proceeding with these next instructions, make certain the One-to-Many relationship between the Customers and Accounts table has been created (see section 5.5 Creating Relationships for a review of this process).
To start the process of creating a multiple table query, highlight the Create tab and click on the Query Wizard button to create a new query. Select the “Simple Query Wizard” option as was done previously.
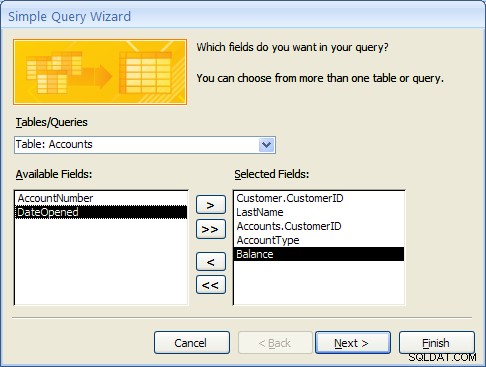
When the simple query wizard appears, select the CustomerID and LastName fields from the Customers table, then switch the Tables/Queries selection to the Accounts table and select the CustomerID, AccountType and Balance fields from the Accounts table. The result from this step is down below:
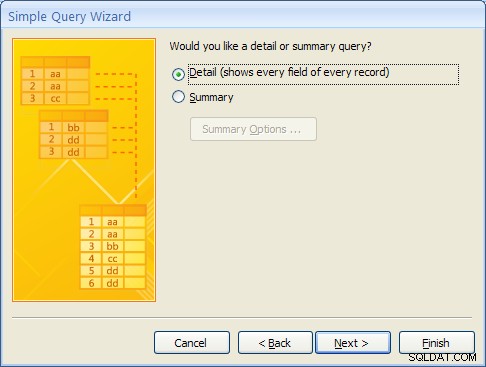
Click the Next button to continue. In the next step of the wizard, an option will appear to provide some level of Summary. For this example, leave the default at “Detail …” as shown below and then click on the Next button.
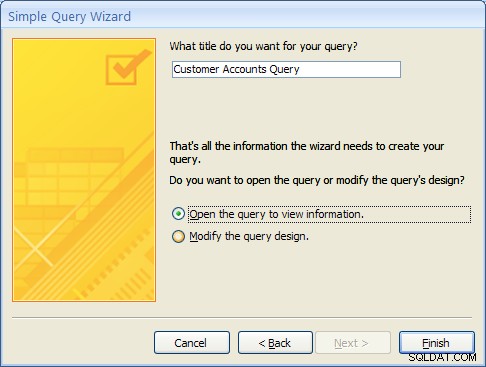
In the final step of the wizard, name the query “Customer Accounts Query” and click on the Finish button. The multiple table query results should appear as follows:
MS Access knows how to line up (or “join”) the accounts table to the Customer table for this query due to the relationship that was created when the tables were first defined.
As with single table queries demonstrated previously, one can change the query definition in design view by adding filters (e.g., show account information for all customers in ‘GA’).
6.4 Exercise:Multiple Table Queries
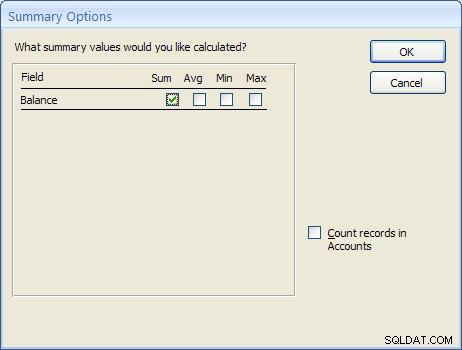
For this exercise, create a new query called “Accounts Summary Query” that joins the Customers table (include the CustomerID and LastName fields) with the Accounts table (include the Balance field only). In the second step of the wizard, click on the Summary choice (instead of Details) and then click on the Summary Options… button. Check off all of the Summary option boxes such as Sum , AVG , Min and Max as shown in the figure below:
The resulting query should appear as follows:
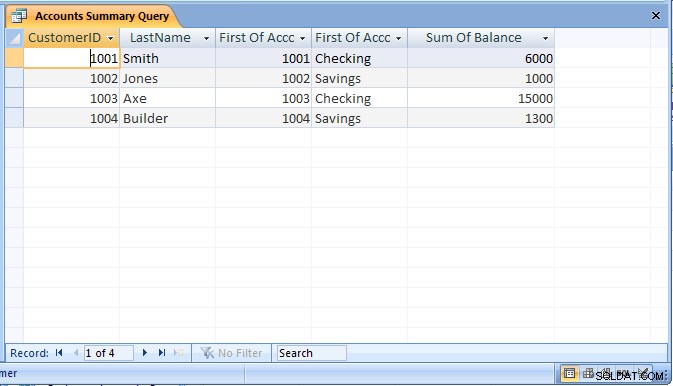
Be sure to save the query as “Accounts Summary Query”.
6.5 Review of Creating and Running Queries
In this section, the basic steps for creating and running queries were introduced. The query wizard can be used to create simple queries that access a single table. It is also possible to then modify the query to sort or filter the records.
Creating a query using the query wizard:
- From the Access main screen, click on the Queries tab. Then click on the New button.
- From the Queries tab on the main Access screen, click on the New button and choose the Simple Query wizard option.
- Under Table/Queries:choose the appropriate table for the query and then indicate which fields in the table will appear in the query output.If querying more than one table, change the Table/Queries:selection to display additional tables and select the necessary fields.
- If the table contains numeric fields, either detailed or summary information may be specified for the query.
- Finally, name the new query and click on the Finish button.
As a final note, Forms and Reports can be created based on existing queries.
7 Creating and Running a Data Entry Form
Data entry forms are the primary means of entering data into tables in the database. In a previous section, we described how to add data to a table using a spreadsheet-like view of the data. Data entry forms offer a more user-friendly interface by adding labels for each field and other helpful information.
Access provides several different ways of creating data entry forms. These include:
- Creating the forms by hand using a Design View
- Creating a default form based on all of the fields available in a table or a query
- Creating a form based on a number of different wizards that walk the user through the forms creation process.
As with queries, a data entry form can be based on a single table or it can work on multiple tables at the same time.
In this section, we cover the basic steps for using a wizard to create a data entry form based on a single table. After this exercise, a multiple-table form is demonstrated.
7.1 Creating a Single Table Form using the Wizard
In this example, we will create a simple data entry form for the Customer table. To begin the process, click on the Create tab on the Access main screen. As with the other components in Access, there are buttons for creating a New form, Open an existing form and Design an existing form. For this example, click on the New button to create a new form.
Several buttons for creating a new form will appear. For this tutorial, choose the Form wizard.
In the first step of the Form wizard, we need to specify the fields from the Customer table that will appear on the form. In this case, we want all of the fields to appear. Move each of the fields from the Available Fields side over to the Selected Fields side as in the following figure. Then click on the Next button.

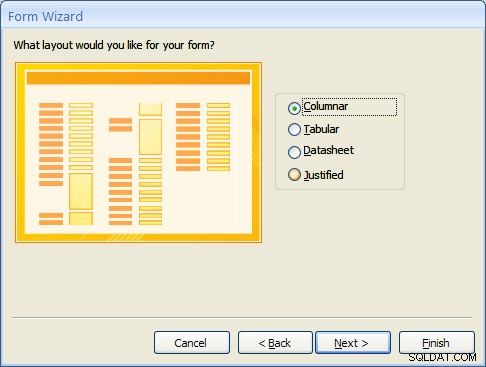
Forms can have several different layouts or arrangement of the labels and fields on the screen.
- Columnar – Places the labels to the left of each field. This is similar to a paper form. This layout is suitable for viewing data one record at a time.
- Tabular – Places the field labels at the top of the screen and the records are displayed below. This is similar to how a spreadsheet would display the data and is suitable for displaying multiple records of data at a time.
- Datasheet – The data appears in the same fashion as when viewing or adding data to a table.
- Justified – Places the labels above each field with the fields spread out on the form. This is suitable for viewing a single record at a time as with the columnar layout.
For this example, choose the columnar layout as shown in the figure below and click on the Next button.
At this point, MS Access 2007 and 2010/2013 versions are a bit different. Access 2007 will show several sample display styles that determine how the form will appear, including elements such as fonts, colors and the background used in the form. Access 2010 and 2013 skips this step in this wizard and provides styles that can be applied to the form in Design mode. For this example, for MS Access 2007, select the Office style as shown below and click on the Next button.

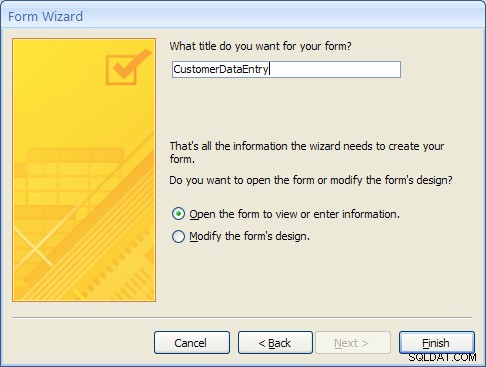
As a final step, give this new form the name:CustomerDataEntry and then click on the Finish button as shown below:
The new form will be created by the wizard and then opened. It should appear as in the figure below:
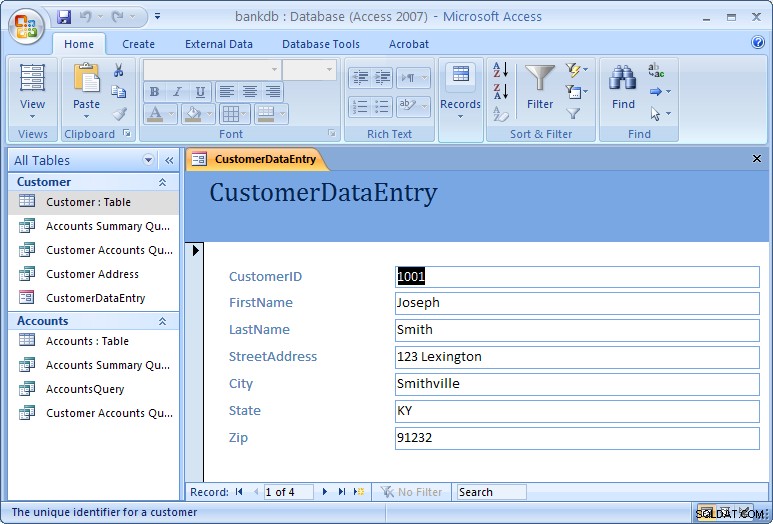
Use the tab key to navigate between fields in the form. To move to the next or previous record, use the record navigation bar at the bottom of the form:
The buttons on the navigation bar perform the following functions:
 | Go to the first record. |
 | Go to the previous record. |
 | Go to the next record. |
 | Go to the last record.  Go past the last record to add a new record. Go past the last record to add a new record. |
To close the form and return to the Access main screen, pull down the File menu and choose Close.
To open the form at any time, highlight the form name under the Forms tab on the Access main screen and click on the Open button.
One quick final note on forms. When the form is created, MS Access looks at how the table is designed and creates the form based on the properties of the table. If you make any changes to the table, you will need to re-create the form again in order to see those table changes reflected in the form. One example where this might happen is is if you change a column in your table from a text box to a combo box, or if you add or remove any columns from your table.
7.2 Exercise:Creating a Single Table Form
For this exercise, we will create a data entry form for the Accounts table created in a previous exercise.
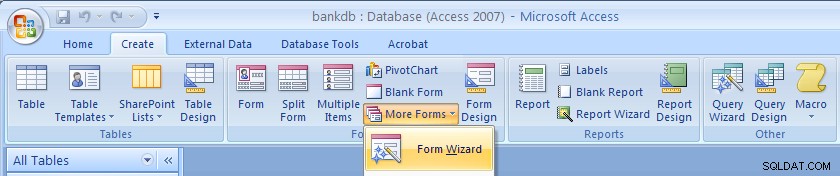
- Click on the Create tab on the Access main screen and then click on the More Forms… button and the “Forms Wizard” to create a new form.
- Select the Accounts table and all of the available fields and click on the Next button.
- Choose a Tabular layout and click on the Next button.
- For Access 2007 choose the Office style and click on the Next button.
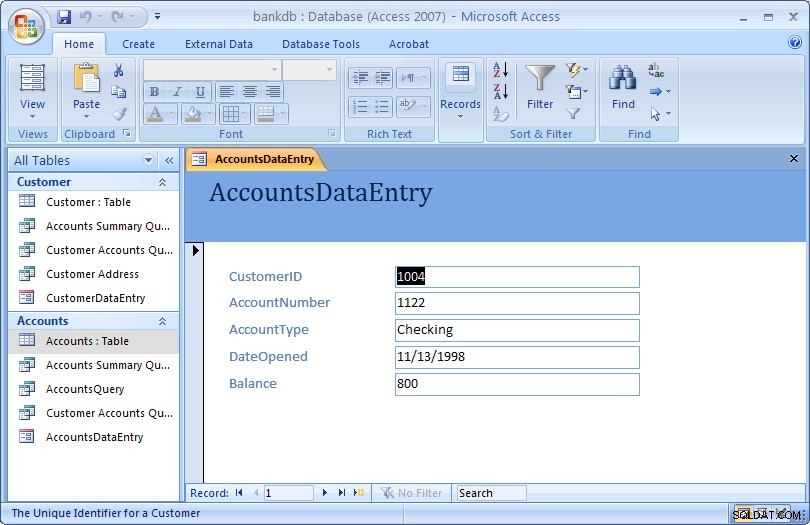
- Name the form:AccountsDataEntry Then click on the Finish button to create, save and view the new form.
The new form is shown in the figure below:
Close the form and return to the Access main screen, by pulling down the File (or Office) menu and choosing Close.
7.3 Review of Creating and Running a Data Entry Form
The basic steps for creating a simple data entry form are:
- Choose a table and a form wizard
- Specify the fields (columns) that will appear in the form
- Specify the layout for the form
- Specify the style (fonts/colors, etc.) for the form
- Save, create and run the new form
In this section we covered the basic steps required to create and run a data entry form. Access provides wizards which are adept at building simple forms with a minimal amount of work. More advanced work on forms would concentrate on using the Design View to change a form’s appearance and to add or remove fields and labels once a form is created. A more advanced tutorial on MS Access Forms Design is linked here.
8 Creating and Running a Report
Reports are similar to queries in that they retrieve data from one or more tables and display the records. Unlike queries, however, reports add formatting to the output including fonts, colors, backgrounds and other features. Reports are often printed out on paper rather than just viewed on the screen. They can also be attached to e-mail and exported and posted as web pages.
As with data entry forms, there are a number of ways to create reports in MS Access:
- A report can be created “by hand” in Design view
- A default report can be created automatically based on all of the firleds for a given table.
- A report can be created using the Create Report wizard.
In this section, we cover how to create simple reports using the Report wizard.
8.1 Creating a Single Table Report using the Wizard
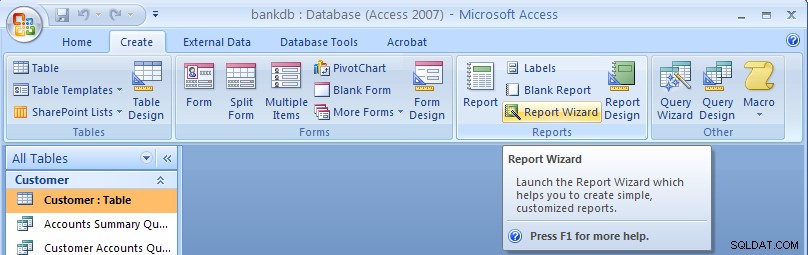
In this example, we will create a simple report for a single table using the Report wizard. As with the Queries and Forms, we begin by selecting the Create tab from the Access main screen.
To create a new report, click on the Report Wizard button.
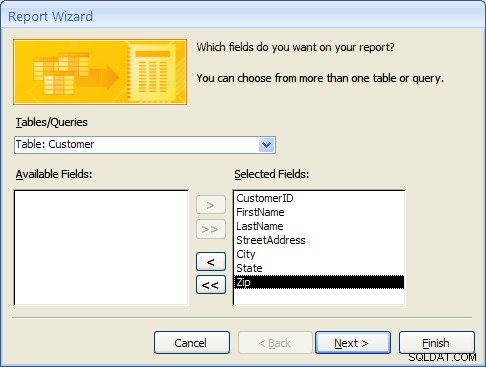
In the next step of the Report wizard, is used to specify the fields from the Customer table that will appear on the report. In this case, we want all of the fields to appear. Move each of the fields from the Available Fields side over to the Selected Fields side as in the following figure. Then click on the Next button.
In the next step, we have the opportunity to add Grouping Levels to the report. A grouping level is where several records have the same value for a given field and we only display the value for the first records. In this case, we will not use any grouping levels so simply click on the Next button as shown below.
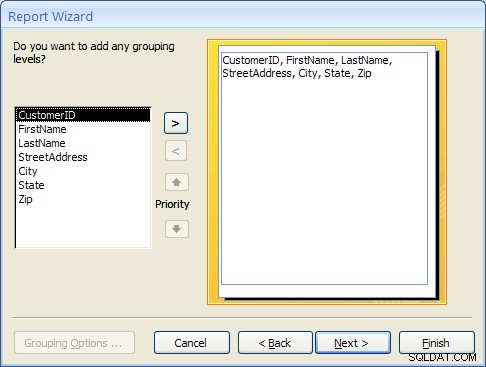
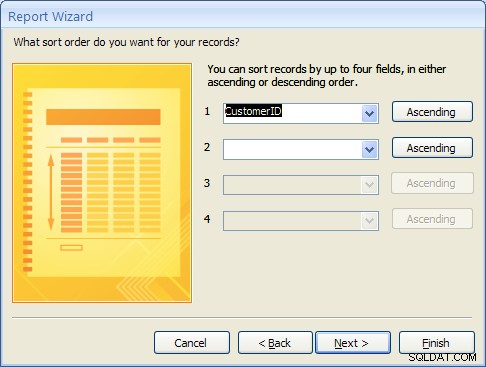
In the next step, the sorting order of the report can be specified. For this example, we will sort the records on the CustomerID field. To achieve this, pull down the list box next to the number 1:and choose the CustomerID field as shown in the figure below. Then click on the Next button.
8.1 Creating a Single Table Report using the Wizard (Continued)
The next step is to specify the layout of the report. The three options are:
- Columnar – Places the labels to the left of each field. This is similar to a paper form.
- Tabular – Places the field labels at the top of the report page and the records are displayed below. This is similar to how a spreadsheet would display the data.
- Justified – Places the labels above each field with the fields spread out on the report page.
Generally, reports use the tabular layout. For this example, choose Tabular layout and set the page Orientation to Landscape so that all of the fields will fit across one page. This is shown in the figure below. Click on the Next button to continue.

In the next step, the style of the report can be selected. For this example, choose the Office style and click on the Next button to continue.

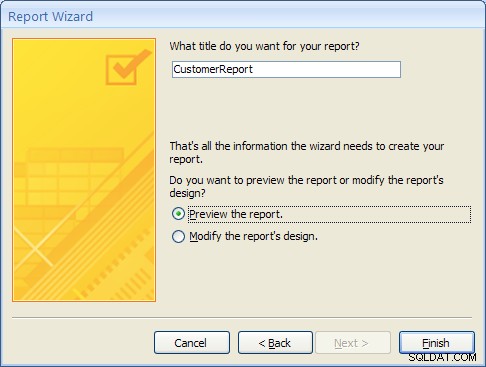
Finally, give a name for the new report:CustomerReport and then click on the Finish button to create, save and display the new report.
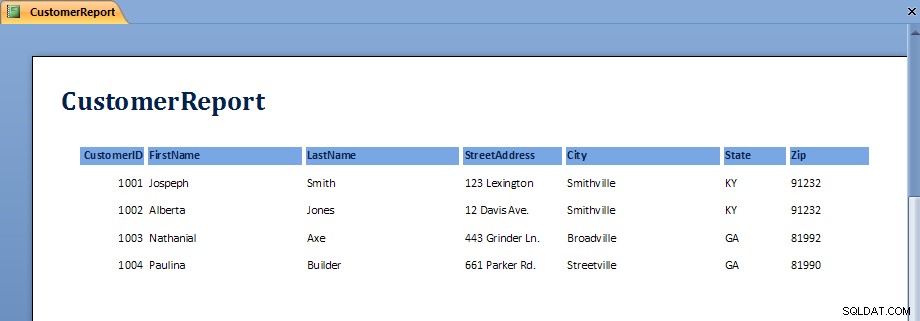
The output from the report is shown in the figure below. Note that on some screens, the last field, Zip, may not display without scrolling over to the right.
Once the report is displayed, it can be viewed, printed or transferred into Microsoft Word or Microsoft Excel. The button bar across the top of the screen has the following functions:
 | Print the report |
 | Zoom into a region of the report |
 | Display the report as one, two or multiple pages |
 | Zoom into or out of the report |
 | Transfer the report into MS Word |
 | Close the report |
To close the report and return to the Access main screen, click on the Close button.
8.2 Exercise:Creating a Single Table Report
For this exercise, we will create a report showing all of the Accounts information.
- From the Access main screen, click on the Create tab and Click on the Report wizard.
- Select all of the fields in the Accounts table by moving them all over to the Selected Fields side and then click Next
- Group the report by CustomerID by clicking on the CustomerID field and then clicking on the right arrow button. This is shown in the following figure:
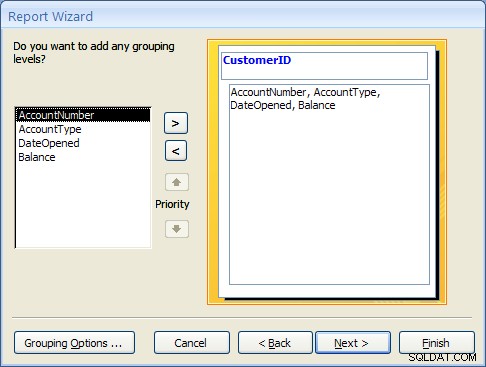
Click on the Next button to continue. - Choose to sort the report on the AccountNumber Mark. Note that a new button will appear called Summary Options.
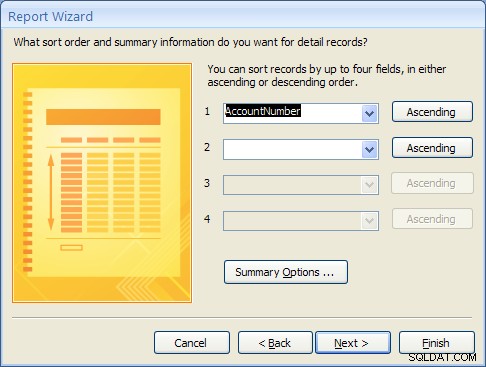
Click on the Summary Options button. Choose the Balance field and select the Sum option. Choose the option to show both Detail and Summary data. Then click on the OK button.

Click on the Next button. - Choose a Block layout and click on the Next button.
- Choose the Corporate style and the click on the Next button.
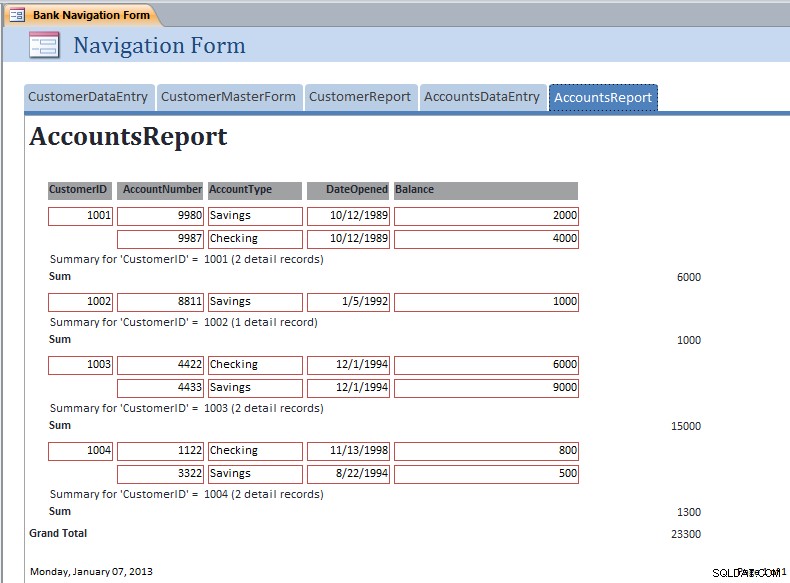
- Finally, name the report:AccountsReport and click on the Finish button to create, save and run the report.
The output from the AccountsReport is shown below:
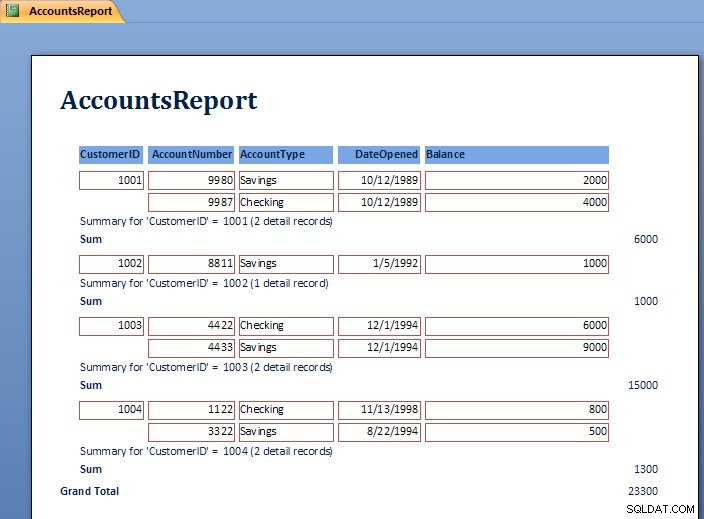
Note the Grouping at the level of the CustomerID and the Sum for each customer’s balances.
To close the report and return to the Access main screen, pull down the File menu and choose Close.
8.3 Review of Creating and Running a Report
As can be seen in the report exercise, there are many ways to create reports to show summation, sorting and layout of the data. Further study of Reports will show how to modify the layout using the Design View. Students are encouraged to work with the Report wizards to create different styles and types of reports.
9 Creating and Running a Master/Detail Form
Master/Detail forms are used to display data from two tables at the same time. MS Access calls the “details” a “subform”. The forms are linked according to the relationship between the tables. Recall that in the example database, the CustomerID is used to link the Customer table (Master) to the Accounts table (Detail). In this section a master / detail form for the Customer and Accounts tables will be created.
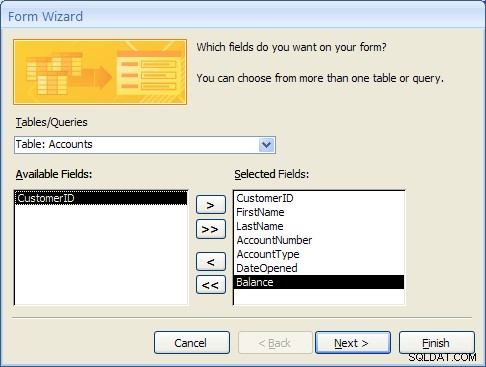
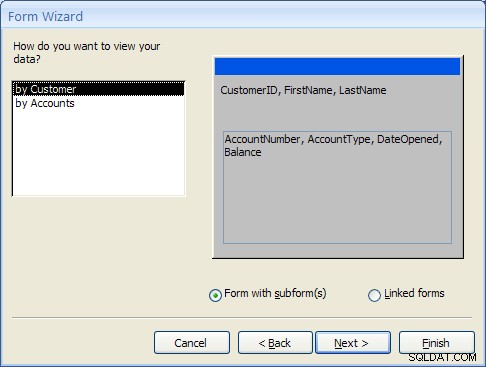
- From the Access main screen, click on the Create tab and Click on the “More Forms…” section and finally the “Forms Wizard”.Select the Customer table first and move the CustomerID, FirstName and LastName fields to the Selected Fields list.Next, select the Accounts table and move the AccountNumber, AccountType, DateOpened and Balance fields to the Selected Fields list as shown below.
Click the Next… button to move to the next step. - At this point MS Access detects that this form will involve data from two different tables. The first prompt asks how the form should be organized at the top or “Master” level. The “by Customer” selection should be highlighted.The second prompt asks how the forms should be created. For this example, select “Form with Subform(s)” as shown below and click the Next… button to move to the next step.
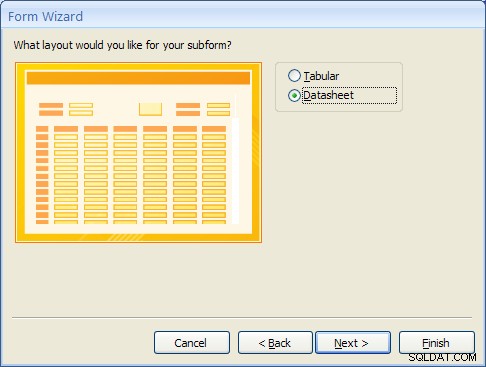
- The Subform is the form that will display the detailed data from the Accounts table. Selecting the “Datasheet” layout will make it easy for the user to view the multiple accounts a Customer may have. Select “Datasheet” and click the Next… button to move to the next step.
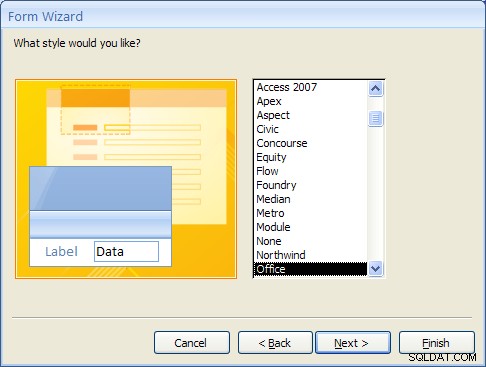
- For Access 2007, select the Office style and click the Next… button to move to the next step. (This step will not appear in MS Access 2010 or 2013).
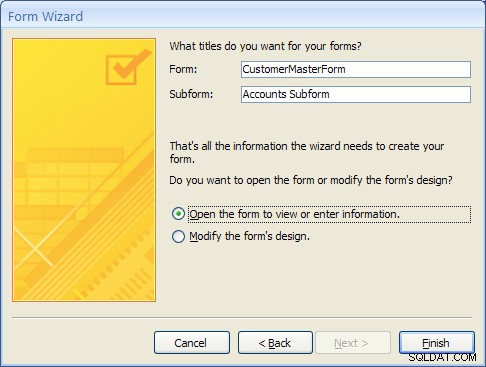
- Finally, give the main form the name “CustomerMasterForm” and the Subform the name “Accounts Subform”.
- After clicking on the Finish button the new Master/Detail form will appear as shown below.
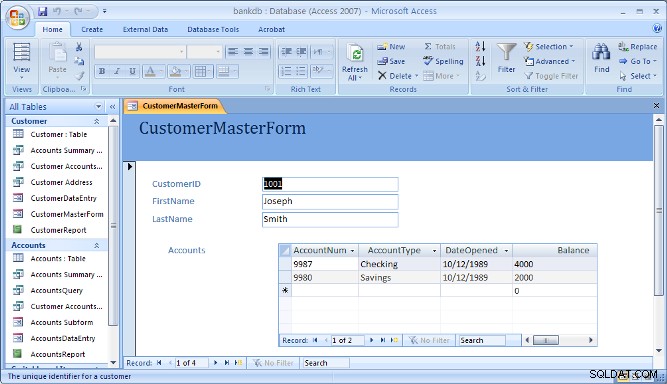
Note that the navigation bar at the bottom of the form is used to navigate through the records in the Master (or top) part of the form.
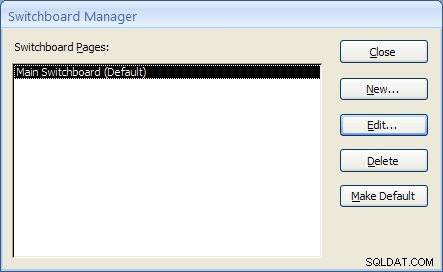
10 Creating and Running a Switchboard
A Switchboard is a type of form that displays a menu of items that a user can click on to launch data entry forms, reports, queries and other actions in the database. A switchboard is typically created after all of the forms and reports for a database application have been completed. It can be used to guide the user to an appropriate set of forms and reports.
Note that starting with Access 2010, Switchboards are not available by default (you will need to add this to the ribbon bar manually using the Options). Access 2010 and 2013 make use of the Navigation Forms.
In this section, a default switchboard will be created.
- From the Access main screen, click on the Database Tools tab and Click on the Switchboard Manager as shown in the figure below.

If this is the first switchboard made for this database, you will be prompted to create a new one as shown below. Click the Yes button.

- The Switchboard manager will appear as shown below:
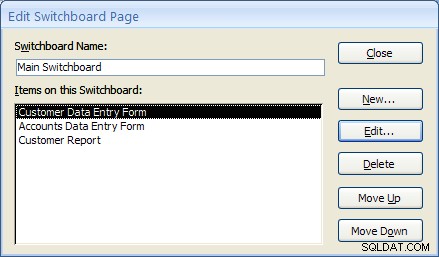
- Click on the Edit menu to edit the “Main Switchboard”. The Edit Switchboard Page will appear as shown below:
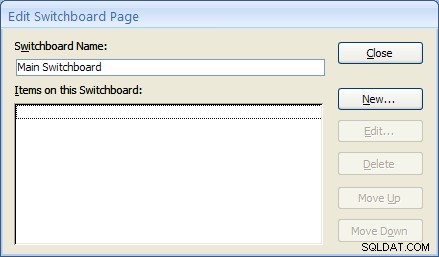
- Add a new switchboard item by clicking on the New… button. The Edit Switchboard Item form will appear as shown below. Fill in the fields as follows:
Text: Customer Data Entry Form Command: Select Open Form in Edit Mode from the drop down list. Form: Select the “CustomerDataEntry” form from the drop down list. 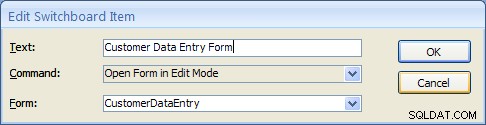
Click on the OK button to save this new Switchboard item.
- Repeat the above step two more times to add Switchboard items for the Accounts DataEntry form and the Customer Report.
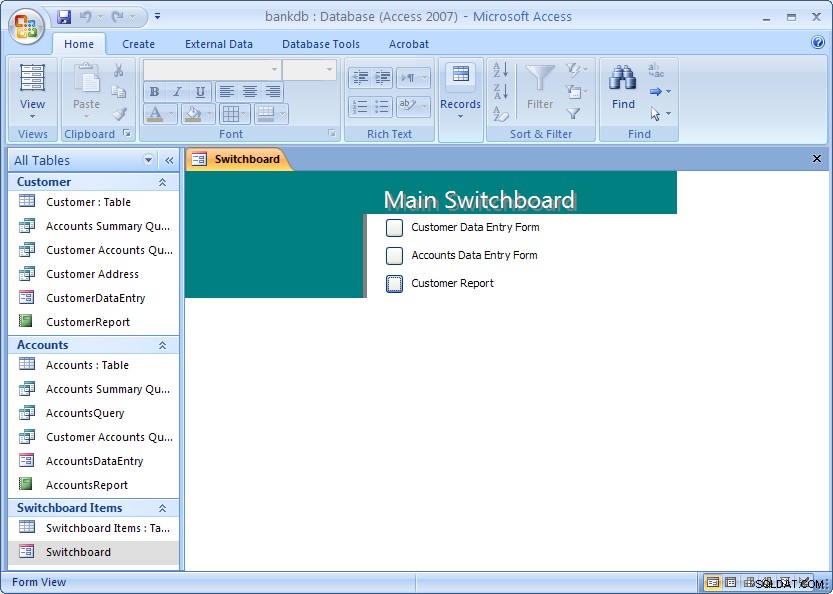
Once completed, click the Close button. Then click the Close button once more to close the Switchboard manager. - From the main MS Access screen look for a new section labeled Switchboard items. To view the switchboard, double-click on name “Switchboard”.
The next section covers creating a Navigation Form which is the recommended navigation screen for MS Access 2007, 2010 and newer versions.
11 Creating and Running a Navigation Form
MS Access 2010 introduced a new form called a Navigation Form. Navigation forms take the place of Switchboards but provide much the same functionality. Namely, they are designed to give the user the ability to run forms and reports without having to hunt through all of the different menus and lists objects. Typically a database application will have one main Navigation form that will appear when the database is opened.
In this section, the basic steps for creating and running a Navigation Form in MS Access 2010 will be demonstrated.
A Navigation Form is another type of form in MS Access 2010 and 2013
- To get started, click on the Create tab on the Access 2010 or 2013 ribbon bar. Under the section for Forms look for the item labeled Navigation Form. Note that this may be located on the button labeled Other Forms.
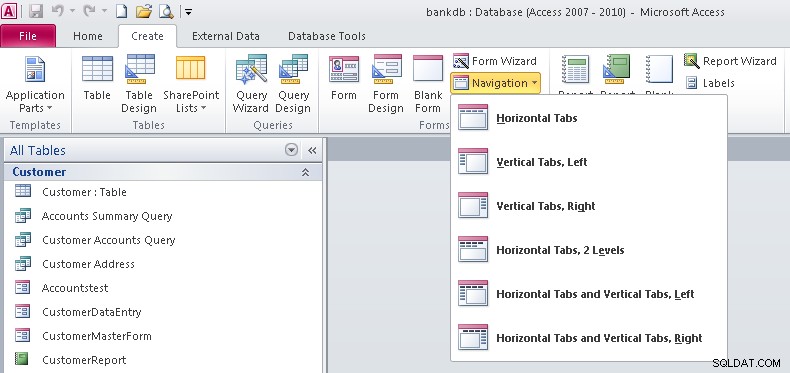
- Note that there are 6 different default styles of Navigation Forms. Each one places the buttons in a different configuration on the screem. Buttons can be aligned across the top, either side or some combination.For this tutorial select the Horizontal Tabs configuration which appears as the first item on the list.
- At this point a new Navigation Form will be created with a row of tabs across the top. The first tab will be labeled [Add New]
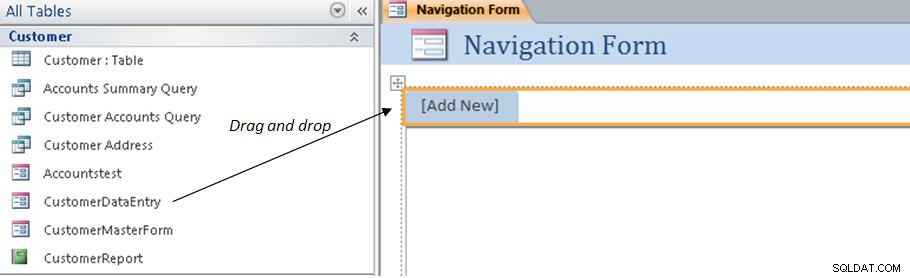
- To add items to the Navigation form, drag the items from the list on the left over to the spot on the Navigation Form labeled [Add New]. This is shown by the arrow in the above figure. For example, drag over the CustomerDataEntry form to the Navigation Form. The result is shown below.
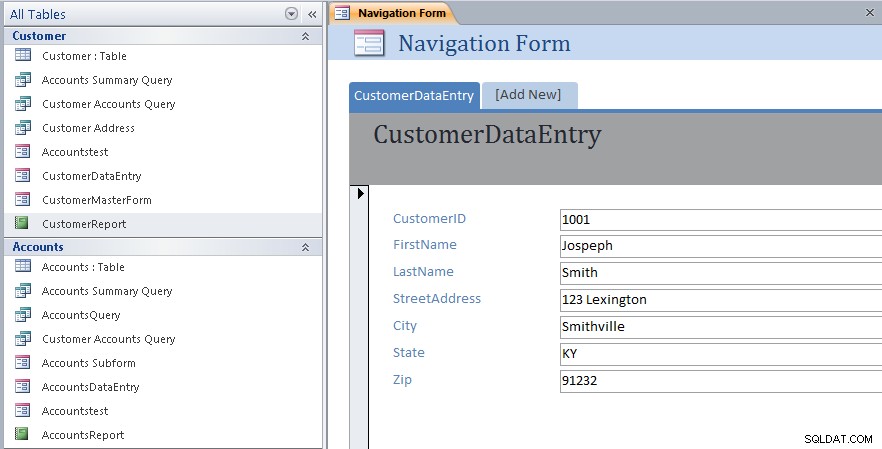
- Next drag and drop the CustomerMasterForm as shown below.

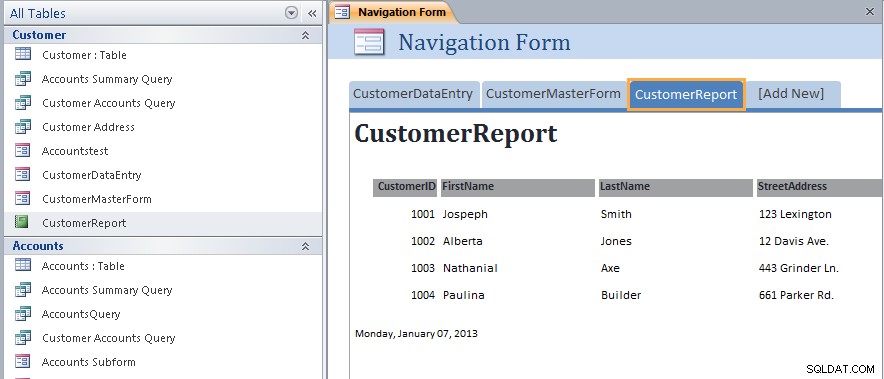
- Next drag and drop the CustomerReport as shown below.
- At this point we have created a new navigation Form and added three items along the top of the page. Save the Navigation Form by right-clicking on the name of the form and choosing Save as shown below:
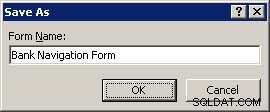
- Name the Navigation Form:Bank Navigation Form and click the OK button.
- Close up the Navigation Form by right-clicking again on the name of the form and choosing Close menu item.At this point the new Navigation Form has been created and saved. The next step will be to view the Navigation Form and navigate the different forms and reports linked to it.
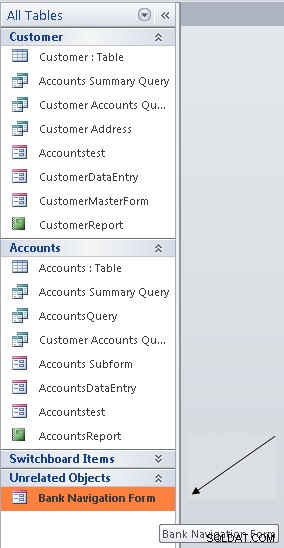
- To view the Navigation Form, look for the Unrelated Objects group on the left side of the screen. Double click on the Bank Navigation Form item as shown below:
The Navigation Form will appear: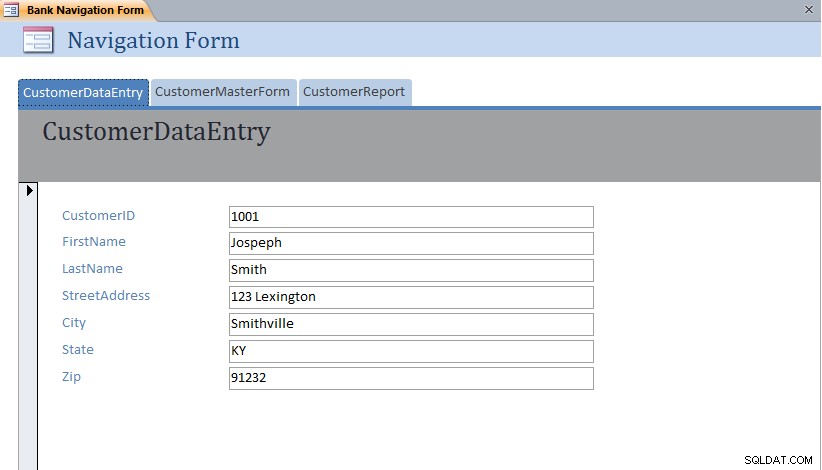 Note that each form or report can be displayed simply by clicking on the different tabs across the top of the Navigation Form.
11.1 Exercise:Modifying a Navigation Form
For this exercise, edit the Bank Navigation Form in Layout View and add the following new items to the Navigation Form:
- AccountsDataEntry
- AccountsReport
The resulting Navigation Form should appear as below with the AccountsReport opened:
11.2 Setting the Navigation Form as the Default
MS Access 2007 and 2010 (as well as earlier versions) have the ability to set a default form that will open up automatically once the MS Access data file is opened. This is especially useful for end users so that they always see the same form when they open up the database.
To set the Default Form, pull down the File menu and select the Options menu item.

The Database Options form will appear. Click on the Current Database item on the left hand side.
Under the Application Options heading, look for the Display Form:prompt and set this to the Bank Navigation Form as shown below:
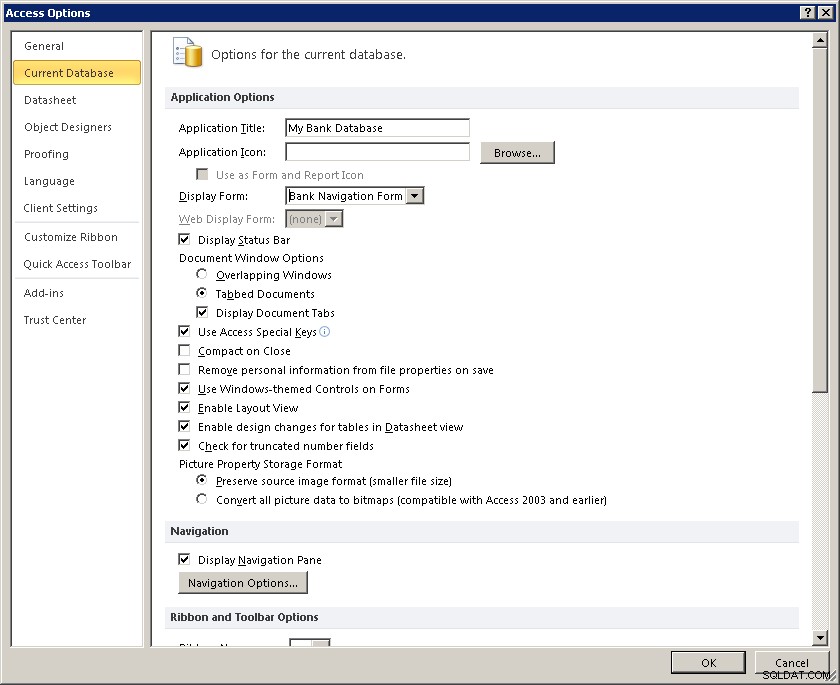
Click on the OK button to close up the Database Options screen.
The next time this database (bankdb.accdb) is opened, the Bank Navigation Form will open up.
12 Tutorial Summary
In this tutorial, we have covered the basics for creating an Access database including tables with data, queries to retrieve data, forms to enter data and reports to display and summarize data.
Students are encouraged to further their Access knowledge and skills by working through more advanced tutorials such as Advanced Access Database Table Design and Advanced Access Forms Design, and by reading the on-line help and Access documentation.
You may also be interested in this tutorial that covers up-sizing the Access database to Microsoft SQL Server using the Microsoft SQL Server Migration Assistant.