Byggeprojekter er uden tvivl en af de mere tilgængelige og effektive måder at lære at programmere på. Reelle projekter kræver, at du anvender forskellige og varierede kodningsevner. De opfordrer dig også til at undersøge emner, der dukker op, mens du løser problemer i udviklingsprocessen. I denne vejledning skal du oprette en kontaktbogsapplikation med Python, PyQt og SQLite.
I dette selvstudie lærer du, hvordan du:
- Opret en grafisk brugergrænseflade (GUI) til din kontaktbogsapplikation ved hjælp af Python og PyQt
- Forbind applikationen til en SQLite-database ved at bruge PyQts SQL-understøttelse
- Administrer kontaktdata ved hjælp af PyQts Model-View-arkitektur
I slutningen af dette projekt har du en funktionel kontaktbog-applikation, der giver dig mulighed for at gemme og administrere dine kontaktoplysninger.
For at få den komplette kildekode til applikationen samt koden for hvert trin, du gennemgår i denne vejledning, skal du klikke på linket nedenfor:
Hent kildekoden: Klik her for at få den kildekode, du skal bruge til at bygge en kontaktbog med Python, PyQt og SQLite i denne vejledning.
Demo:En kontaktbog med Python
Kontaktbøger er en nyttig og meget brugt form for applikation. De er overalt. Du har sikkert en kontaktbog på din telefon og på din computer. Med en kontaktbog kan du gemme og administrere kontaktoplysninger for dine familiemedlemmer, venner, kolleger og så videre.
I denne vejledning skal du kode en kontaktbog GUI-applikation med Python, SQLite og PyQt. Her er en demo af, hvordan din kontaktbog vil se ud og fungere, når du har fulgt trinene i denne vejledning:
Din kontaktbog vil give det minimalt nødvendige sæt funktioner til denne form for applikation. Du vil være i stand til at vise, oprette, opdatere og fjerne oplysningerne på din kontaktliste.
Projektoversigt
For at bygge din kontaktbogsapplikation skal du organisere koden i moduler og pakker og give dit projekt en sammenhængende struktur. I denne øvelse skal du bruge følgende mapper og filstruktur:
rpcontacts_project/
│
├── rpcontacts/
│   ├── __init__.py
│   ├── views.py
│   ├── database.py
│   ├── main.py
│   └── model.py
│
├── requirements.txt
├── README.md
└── rpcontacts.py
Her er en kort oversigt over indholdet af din projektmappe:
rpcontacts_project/er projektets rodmappe. Det vil indeholde følgende filer:requirements.txtleverer projektets kravliste.README.mdgiver generel information om projektet.rpcontacts.pyleverer indgangs-scriptet til at køre programmet.
rpcontacts/er en undermappe, der giver programmets hovedpakke. Det giver følgende moduler:__init__.pyviews.pydatabase.pymain.pymodel.py
Du vil dække hver af disse filer trin for trin i denne vejledning. Navnet på hver fil giver en idé om dens rolle i applikationen. For eksempel views.py vil indeholde koden til at generere GUI af vinduer og dialogbokse, database.py vil indeholde kode til at arbejde med databasen og main.py vil være vært for selve applikationen. Til sidst model.py vil implementere modellen til at administrere dataene i applikationens database.
Generelt vil applikationen have et hovedvindue til at vise, tilføje, fjerne og opdatere kontakter. Det vil også have en dialogboks til at tilføje nye kontakter til databasen.
Forudsætninger
For at få mest muligt ud af dette projekt, vil noget tidligere kendskab til GUI-programmering med Python og PyQt hjælpe. I denne forbindelse skal du kende det grundlæggende i, hvordan du:
- Opret GUI-applikationer med PyQt og Python
- Byg og læg GUI'er med PyQt
- Administrer SQL-databaser med Python og PyQt
- Arbejd med SQLite-databaser
For at friske op på disse emner, kan du tjekke følgende ressourcer:
- Python og PyQt:Opbygning af en GUI-skrivebordsberegner
- Python og PyQt:Oprettelse af menuer, værktøjslinjer og statuslinjer
- PyQt-layouts:Opret professionelt udseende GUI-applikationer
- Håndtering af SQL-databaser med PyQt:Grundlæggende
- Introduktion til Python SQL-biblioteker
- Datastyring med Python, SQLite og SQLAlchemy
Bare rolig, hvis du ikke er ekspert på disse områder, før du starter denne vejledning. Du lærer gennem processen med at få dine hænder beskidte på et rigtigt projekt. Hvis du går i stå, så tag dig god tid og gennemgå de ressourcer, der er linket ovenfor. Gå derefter tilbage til koden.
Kontaktbogsapplikationen, du vil bygge i denne vejledning, har en enkelt ekstern afhængighed:PyQt.
Bemærk: I denne vejledning skal du bruge PyQt version 5.15.2 til at bygge din kontaktbogsapplikation. Version 5.15.2 er påkrævet for at projektet kan fungere på macOS Big Sur.
PyQt version 6.0 blev frigivet den 4. januar 2021. Dette er den første udgivelse af biblioteket, der binder til Qt version 6. Projektet i denne tutorial er dog ikke testet med PyQt 6.0.
Hvis du føler behov for at køre projektet med denne nye version af PyQt, så prøv det. Som et tip bør du pip install PyQt6 og opdater derefter importen til at bruge PyQt6 i stedet for PyQt5 .
For at følge bedste praksis i din udviklingsproces kan du starte med at oprette et virtuelt miljø og derefter installere PyQt ved hjælp af pip . Når du har installeret PyQt, er du klar til at begynde at kode!
Trin 1:Oprettelse af kontaktbogens skelet-app med PyQt
I dette første trin vil du oprette en minimal, men funktionel PyQt GUI-applikation for at danne grundlaget, som du vil begynde at bygge kontaktbogen på. Du vil også oprette den minimalt nødvendige projektstruktur, inklusive projektets hovedpakke og et indgangsscript til at køre applikationen.
Al den kode og alle filer, du tilføjer til kontaktbogsprojektet i denne sektion, er samlet under source_code_step_1/ vejviser. Du kan downloade dem ved at klikke på linket nedenfor:
Hent kildekoden: Klik her for at få den kildekode, du skal bruge til at bygge en kontaktbog med Python, PyQt og SQLite i denne vejledning.
Ved slutningen af dette afsnit vil du være i stand til at køre skelet GUI-applikationen til din kontaktbog for første gang.
Strukturering af kontaktbogsprojektet
For at begynde at kode applikationen skal du gå videre og oprette en ny mappe kaldet rpcontacts_project/ . Dette vil være projektets rodmappe. Opret nu en ny undermappe kaldet rpcontacts/ inde i rpcontacts_project/ . Denne undermappe vil indeholde programmets hovedpakke. Til sidst skal du starte din kodeeditor eller IDE i rodmappen.
For at omdanne en mappe til en pakke skal Python bruge en __init__.py modul for at initialisere pakken. Opret denne fil i rpcontacts/ og tilføj følgende kode til det:
# -*- coding: utf-8 -*-

"""This module provides the rpcontacts package."""

__version__ = "0.1.0"
Denne fil fortæller Python, at rpcontacts er en pakke. Koden i filen kører, når du importerer pakken eller nogle af dens moduler.
Du behøver ikke at sætte nogen kode i en __init__.py fil for at initialisere pakken. En tom __init__.py fil vil gøre arbejdet. Men i dette tilfælde definerer du en konstant på modulniveau kaldet __version__ for at beholde versionsnummeret på din ansøgning.
Oprettelse af programmets hovedvindue
Nu er det tid til at oprette din kontaktbogs hovedvindue. For at gøre det skal du oprette et modul kaldet views.py i dine rpcontacts pakke. Tilføj derefter følgende kode til modulet og gem det:
# -*- coding: utf-8 -*-

"""This module provides views to manage the contacts table."""

from PyQt5.QtWidgets import (
    QHBoxLayout,
    QMainWindow,
    QWidget,
)

class Window(QMainWindow):
    """Main Window."""
    def __init__(self, parent=None):
        """Initializer."""
        super().__init__(parent)
        self.setWindowTitle("RP Contacts")
        self.resize(550, 250)
        self.centralWidget = QWidget()
        self.setCentralWidget(self.centralWidget)
        self.layout = QHBoxLayout()
        self.centralWidget.setLayout(self.layout)
Først importerer du de påkrævede klasser fra PyQt5.QtWidgets . Derefter opretter du Window . Denne klasse arver fra QMainWindow og giver koden til at generere programmets hovedvindue. I initialiseringsmetoden indstiller du vinduets titel til "RP Contacts" , skal du ændre størrelsen på vinduet til 550 med 250 pixels, definer og indstil den centrale widget ved hjælp af QWidget , og endelig definere et layout for den centrale widget ved hjælp af et horisontalt bokslayout.
Kodning og kørsel af applikationen
Da du allerede har et hovedvindue til kontaktbogen, er det tid til at skrive koden til at oprette en funktionel PyQt-applikation ved hjælp af QApplication . For at gøre det skal du oprette et nyt modul kaldet main.py i dine rpcontacts pakke og tilføj følgende kode til den:
# -*- coding: utf-8 -*-
# rpcontacts/main.py

"""This module provides RP Contacts application."""

import sys

from PyQt5.QtWidgets import QApplication

from .views import Window

def main():
    """RP Contacts main function."""
    # Create the application
    app = QApplication(sys.argv)
    # Create the main window
    win = Window()
    win.show()
    # Run the event loop
    sys.exit(app.exec())
I dette modul importerer du sys for at få adgang til exit() , som giver dig mulighed for rent at afslutte programmet, når brugeren lukker hovedvinduet. Derefter importerer du QApplication fra PyQt5.QtWidgets og Window fra views . Det sidste trin er at definere main() som din applikations hovedfunktion.
Inde i main() , instansierer du QApplication og Window . Så kalder du .show() på Window , og til sidst kører du programmets hovedsløjfe eller hændelsesløkke , ved hjælp af .exec() .
Flyt nu op til projektets rodbibliotek rpcontacts_project/ og opret en fil kaldet rpcontacts.py . Denne fil indeholder indgangs-scriptet til at køre programmet. Tilføj følgende kode til filen og gem den:
#!/usr/bin/env python3
# -*- coding: utf-8 -*-
# rpcontacts_project/rpcontacts.py

"""This module provides RP Contacts entry point script."""

from rpcontacts.main import main

if __name__ == "__main__":
    main()
Denne fil importerer main() fra din main.py modul. Derefter implementerer du den traditionelle betingede sætning, der kalder main() hvis brugeren kører dette modul som et Python-script. Start nu programmet ved at køre kommandoen python rpcontacts.py i dit Python-miljø. Du får følgende vindue på din skærm:
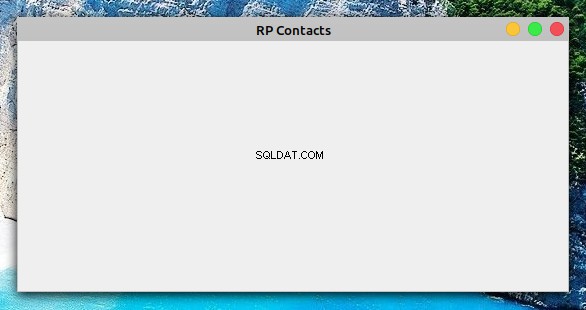
Det er det! Du har oprettet en minimal, men funktionel PyQt GUI-applikation, som du kan bruge som udgangspunkt for at bygge din kontaktbog. På dette tidspunkt skal dit projekt have følgende struktur:
./rpcontacts_project/
│
├── rpcontacts/
│   ├── __init__.py
│   ├── views.py
│   └── main.py
│
└── rpcontacts.py
I dette afsnit har du oprettet den minimalt nødvendige struktur til dit kontaktbogsprojekt ved hjælp af Python-moduler og -pakker. Du har bygget programmets hovedvindue og sammensat koden for at skabe en PyQt GUI-applikation. Du har også kørt applikationen for første gang. Dernæst begynder du at tilføje funktioner til din GUI.
Trin 2:Opbygning af kontaktbogens GUI med Python
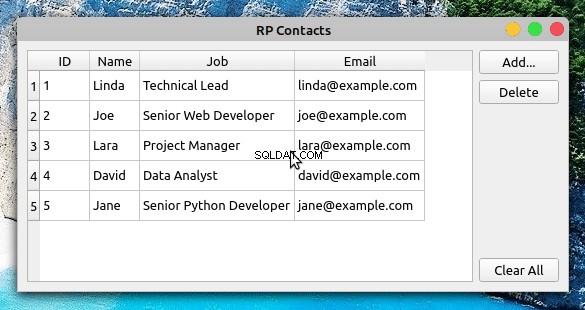
Nu hvor du har bygget skelettet af din kontaktbogsapplikation, kan du begynde at kode hovedvinduets GUI. I slutningen af dette afsnit har du gennemført de nødvendige trin for at oprette GUI'en til din kontaktbog ved hjælp af Python og PyQt. GUI'en vil se sådan ud:
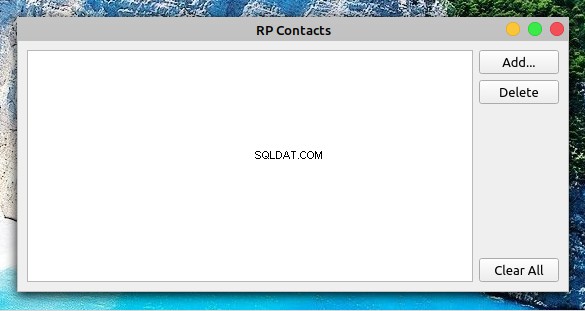
I midten af vinduet har du en tabelvisning til at vise din kontaktliste. I højre side af formularen har du tre knapper:
- Tilføj for at tilføje en ny kontakt til listen
- Slet for at fjerne en valgt kontakt fra listen
- Ryd alle for at fjerne alle kontakter fra listen
Al den kode og alle filer, du vil tilføje eller ændre i dette afsnit, er samlet under source_code_step_2/ vejviser. Du kan downloade dem ved at klikke på linket nedenfor:
Hent kildekoden: Klik her for at få den kildekode, du skal bruge til at bygge en kontaktbog med Python, PyQt og SQLite i denne vejledning.
Gå tilbage til views.py modul og opdater koden for Window for at generere ovenstående GUI:
 1# -*- coding: utf-8 -*-
 2# rpcontacts/views.py
 3
 4"""This module provides views to manage the contacts table."""
 5
 6from PyQt5.QtWidgets import (
 7    QAbstractItemView,
 8    QHBoxLayout,
 9    QMainWindow,
10    QPushButton,
11    QTableView,
12    QVBoxLayout,
13    QWidget,
14)
15
16class Window(QMainWindow):
17    """Main Window."""
18    def __init__(self, parent=None):
19        """Initializer."""
20        # Snip...
21
22        self.setupUI()
23
24    def setupUI(self):
25        """Setup the main window's GUI."""
26        # Create the table view widget
27        self.table = QTableView()
28        self.table.setSelectionBehavior(QAbstractItemView.SelectRows)
29        self.table.resizeColumnsToContents()
30        # Create buttons
31        self.addButton = QPushButton("Add...")
32        self.deleteButton = QPushButton("Delete")
33        self.clearAllButton = QPushButton("Clear All")
34        # Lay out the GUI
35        layout = QVBoxLayout()
36        layout.addWidget(self.addButton)
37        layout.addWidget(self.deleteButton)
38        layout.addStretch()
39        layout.addWidget(self.clearAllButton)
40        self.layout.addWidget(self.table)
41        self.layout.addLayout(layout)
Du importerer først nogle ekstra PyQt-klasser til brug i GUI'en. Her er nogle af de mere relevante:
QPushButtonfor at oprette Tilføj , Slet , og Ryd alle knapperQTableViewfor at give den tabellignende visning, der viser kontaktlistenQAbstractItemViewfor at give adgang til adfærdspolitikken for valg af tabelvisning
I denne kode er den første tilføjelse til Window er et kald til .setupUI() i slutningen af __init__() . Dette opkald genererer hovedvinduets GUI, når du kører programmet.
Her er hvad koden inde i .setupUI() gør:
- Linje 27 opretter en
QTableViewforekomst for at vise kontaktlisten. - Linje 28 indstiller
.selectionBehavioregenskab tilQAbstractItemView.SelectRows. Dette sikrer, at når en bruger klikker på en celle i tabelvisningen, vil hele rækken blive valgt. Rækkerne i tabelvisningen indeholder alle oplysninger relateret til en enkelt kontakt på listen over kontakter. - Linje 31 til 33 tilføj de tre knapper til GUI'en:Tilføj , Slet , og Ryd alle . Disse knapper udfører ingen handlinger endnu.
- Linje 35 til 41 oprette og indstille et sammenhængende layout for alle widgets i GUI.
Med disse tilføjelser til Window , kan du køre programmet igen. Vinduet på din skærm vil ligne det vindue, du så i begyndelsen af afsnittet.
Bemærk: Linjenumrene i ovenstående kode og i resten af kodeeksemplerne i denne øvelse er beregnet til at lette forklaringen. De matcher ikke rækkefølgen af linjer i det sidste modul eller script.
I dette afsnit har du kørt alle de nødvendige trin for at oprette GUI'en til din kontaktbogs hovedvindue. Du er nu klar til at begynde at arbejde på, hvordan din applikation vil administrere og gemme dine kontaktdata.
Trin 3:Opsætning af kontaktbogens database
På dette tidspunkt har du oprettet et PyQt-program og dets hovedvindues GUI for at bygge dit kontaktbogsprojekt. I dette afsnit skriver du kode for at definere, hvordan applikationen opretter forbindelse til kontaktdatabasen. For at fuldføre dette trin skal du bruge SQLite til at håndtere databasen og PyQts SQL-understøttelse til at forbinde applikationen til databasen og arbejde med dine kontaktdata.
Kildekoden og filerne, du vil tilføje eller ændre i dette afsnit, er gemt under source_code_step_3/ vejviser. Du kan downloade dem ved at klikke på linket nedenfor:
Hent kildekoden: Klik her for at få den kildekode, du skal bruge til at bygge en kontaktbog med Python, PyQt og SQLite i denne vejledning.
Gå først tilbage til main.py i rpcontacts/ bibliotek og opdater koden for at oprette forbindelsen til databasen:
# -*- coding: utf-8 -*-
# rpcontacts/main.py

"""This module provides RP Contacts application."""

import sys

from PyQt5.QtWidgets import QApplication

from .database import createConnection
from .views import Window

def main():
    """RP Contacts main function."""
    # Create the application
    app = QApplication(sys.argv)
    # Connect to the database before creating any window
    if not createConnection("contacts.sqlite"):
        sys.exit(1)
    # Create the main window if the connection succeeded
    win = Window()
    win.show()
    # Run the event loop
    sys.exit(app.exec_())
I dette tilfælde skal du først importere createConnection() fra database.py . Denne funktion vil indeholde kode til at oprette og åbne en forbindelse til kontaktdatabasen. Du skal oprette database.py og skriv createConnection() i næste afsnit.
Inde i main() , er den første fremhævede linje et forsøg på at oprette en forbindelse til databasen ved hjælp af createConnection() . Hvis applikationen af en eller anden grund ikke er i stand til at oprette en forbindelse, kaldes opkaldet til sys.exit(1) vil lukke programmet uden at oprette et grafisk element og vil indikere, at der er opstået en fejl.
Du skal håndtere forbindelsen på denne måde, fordi applikationen afhænger af, at databasen fungerer korrekt. Hvis du ikke har en funktionel forbindelse, virker din applikation slet ikke.
Denne praksis giver dig mulighed for at håndtere fejl og lukke programmet rent, hvis der opstår et problem. Du vil også være i stand til at præsentere brugeren for relevant information om den fejl, som applikationen løb ind i, da den forsøgte at oprette forbindelse til databasen.
Med disse tilføjelser på plads er det tid til at dykke ned i koden for createConnection() .
Opret forbindelse til databasen med PyQt og SQLite
At forbinde din kontaktbogsapplikation med dens tilknyttede database er et grundlæggende trin i udviklingen af applikationen. For at gøre dette skal du kode en funktion kaldet createConnection() , som vil oprette og åbne en forbindelse til databasen. Hvis forbindelsen lykkes, vil funktionen returnere True . Ellers vil den give information om årsagen til forbindelsesfejlen.
Gå tilbage til rpcontacts/ bibliotek og opret et nyt modul kaldet database.py inden i det. Tilføj derefter følgende kode til det modul:
 1# -*- coding: utf-8 -*-
 2# rpcontacts/database.py
 3
 4"""This module provides a database connection."""
 5
 6from PyQt5.QtWidgets import QMessageBox
 7from PyQt5.QtSql import QSqlDatabase
 8
 9def createConnection(databaseName):
10    """Create and open a database connection."""
11    connection = QSqlDatabase.addDatabase("QSQLITE")
12    connection.setDatabaseName(databaseName)
13
14    if not connection.open():
15        QMessageBox.warning(
16            None,
17            "RP Contact",
18            f"Database Error: {connection.lastError().text()}",
19        )
20        return False
21
22    return True
Her importerer du først nogle påkrævede PyQt-klasser. Derefter definerer du createConnection() . Denne funktion tager et argument:databaseName indeholder navnet eller stien til den fysiske SQLite-databasefil i dit filsystem.
Her er hvad koden inde i createConnection() gør:
- Linje 11 opretter databaseforbindelsen ved hjælp af
QSQLITEchauffør. - Linje 12 indstiller filnavnet eller stien til databasen.
- Linje 14 forsøger at åbne forbindelsen. Hvis der opstår et problem under opkaldet til
.open(), derefterifkodeblok viser en fejlmeddelelse og returnerer derefterFalsefor at angive, at forbindelsesforsøget mislykkedes. - Linje 22 returnerer
Truehvis forbindelsesforsøget lykkes.
Du har allerede kodet createConnection() . Nu kan du skrive koden for at oprette contacts tabeller i databasen.
Oprettelse af contacts Tabel
Med funktionen, der opretter og åbner forbindelsen til databasen på plads, kan du fortsætte med at kode en hjælpefunktion for at oprette contacts bord. Du skal bruge denne tabel til at gemme oplysningerne om dine kontakter.
Her er koden, der implementerer _createContactsTable() :
# -*- coding: utf-8 -*-
# rpcontacts/database.py

# Snip...
from PyQt5.QtSql import QSqlDatabase, QSqlQuery

def _createContactsTable():
    """Create the contacts table in the database."""
    createTableQuery = QSqlQuery()
    return createTableQuery.exec(
        """
        CREATE TABLE IF NOT EXISTS contacts (
            id INTEGER PRIMARY KEY AUTOINCREMENT UNIQUE NOT NULL,
            name VARCHAR(40) NOT NULL,
            job VARCHAR(50),
            email VARCHAR(40) NOT NULL
        )
        """
    )

def createConnection(databaseName):
    # Snip...
    _createContactsTable()
    return True
Her tilføjer du først en ny import. Du importerer QSqlQuery til at udføre og manipulere SQL-sætninger.
Inde i _createContactsTable() , opretter du en QSqlQuery eksempel. Derefter kalder du .exec() på forespørgselsobjektet med en streng-baseret SQL CREATE TABLE udsagn som argument. Denne erklæring opretter en ny tabel kaldet contacts i din database. Tabellen har følgende kolonner:
| Kolonne | Indhold |
|---|---|
id | Et heltal med tabellens primære nøgle |
name | En streng med navnet på en kontakt |
job | En streng med jobtitlen på en kontakt |
email | En streng med en kontakts e-mail |
contacts tabel i din database gemmer relevante oplysninger om dine kontakter.
Det sidste trin for at afslutte kodningen af database.py er at tilføje et kald til _createContactsTable() indefra createConnection() , lige før den sidste return udmelding. Dette sikrer, at applikationen opretter contacts tabel, før du udfører nogen handlinger på databasen.
Når du har oprettet contacts tabel, kan du køre nogle test på databasen og også tilføje nogle eksempeldata til yderligere test.
Test af kontaktbogens database
Indtil videre er du færdig med at skrive den nødvendige kode til at håndtere forbindelsen til kontaktbogens database. I dette afsnit skal du udføre nogle test for at sikre, at denne kode og selve databasen fungerer korrekt. Du vil også tilføje nogle eksempeldata til databasen for at udføre yderligere test senere i denne øvelse.
Åbn nu en terminal eller kommandolinje og flyt til projektets rodmappe, rpcontacts_project/ . Når du er der, skal du starte en interaktiv Python-session og indtaste følgende kode:
>>> from rpcontacts.database import createConnection

>>> # Create a connection
>>> createConnection("contacts.sqlite")
True

>>> # Confirm that contacts table exists
>>> from PyQt5.QtSql import QSqlDatabase
>>> db = QSqlDatabase.database()
>>> db.tables()
['contacts', 'sqlite_sequence']
Her importerer du først createConnection() fra database.py modul. Så kalder du denne funktion for at oprette og åbne en forbindelse til kontaktdatabasen. Databasens filnavn er contacts.sqlite . Da denne fil ikke findes i projektets rodmappe, opretter SQLite den for dig. Du kan tjekke dette ved at tage et kig på din nuværende mappe.
Dernæst bekræfter du, at databasen indeholder en tabel kaldet contacts . For at gøre det, kalder du .database() på QSqlDatabase . Denne klassemetode returnerer en pointer til den aktuelle databaseforbindelse. Med denne reference til forbindelsen kan du kalde .tables() for at få listen over tabeller i databasen. Bemærk, at den første tabel på listen er contacts , så nu er du sikker på, at alt fungerer godt.
Nu kan du forberede en SQL-forespørgsel for at indsætte eksempeldata i contacts tabel:
>>> # Prepare a query to insert sample data
>>> from PyQt5.QtSql import QSqlQuery

>>> insertDataQuery = QSqlQuery()
>>> insertDataQuery.prepare(
...     """
...     INSERT INTO contacts (
...         name,
...         job,
...         email
...     )
...     VALUES (?, ?, ?)
...     """
... )
True
Ovenstående forespørgsel giver dig mulighed for at indsætte specifikke værdier i name , job og email attributter og for at gemme disse værdier i databasen. Nedenfor er et eksempel på, hvordan du gør dette:
>>> # Sample data
>>> data = [
...     ("Linda", "Technical Lead", "linda@example.com"),
...     ("Joe", "Senior Web Developer", "joe@example.com"),
...     ("Lara", "Project Manager", "lara@example.com"),
...     ("David", "Data Analyst", "david@example.com"),
...     ("Jane", "Senior Python Developer", "jane@example.com"),
... ]

>>> # Insert sample data
>>> for name, job, email in data:
...     insertDataQuery.addBindValue(name)
...     insertDataQuery.addBindValue(job)
...     insertDataQuery.addBindValue(email)
...     insertDataQuery.exec()
...
True
True
True
True
True
I dette stykke kode definerer du først data at opbevare kontaktoplysningerne for en liste over personer. Dernæst bruger du en for loop for at indsætte dataene ved at kalde .addBindValue() . Derefter kalder du .exec() på forespørgselsobjektet for effektivt at køre SQL-forespørgslen på databasen.
Da alle opkald til .exec() returner True , kan du konkludere, at dataene blev indsat i databasen. Hvis du vil bekræfte dette, så kør følgende kode:
>>> query = QSqlQuery()
>>> query.exec("SELECT name, job, email FROM contacts")
True

>>> while query.next():
...     print(query.value(0), query.value(1), query.value(2))
...
Linda Technical Lead linda@example.com
Joe Senior Web Developer joe@example.com
Lara Project Manager lara@example.com
David Data Analyst david@example.com
Jane Senior Python Developer jane@example.com
Det er det! Din database fungerer fint! Nu har du nogle eksempeldata til at teste applikationen med, og du kan fokusere på, hvordan du indlæser og viser kontaktoplysningerne i din kontaktbogs hovedvindue.
Trin 4:Visning og opdatering af eksisterende kontakter
For at vise dine kontaktdata i programmets hovedvindue kan du bruge QTableView . Denne klasse er en del af PyQts Model-View-arkitektur og giver en robust og effektiv måde at vise elementer fra et PyQt-modelobjekt på.
Filerne og koden, du vil tilføje eller ændre i dette afsnit, er gemt under source_code_step_4/ vejviser. For at downloade dem, klik på linket nedenfor:
Hent kildekoden: Klik her for at få den kildekode, du skal bruge til at bygge en kontaktbog med Python, PyQt og SQLite i denne vejledning.
Når du har afsluttet dette trin, vil din kontaktbog se sådan ud:
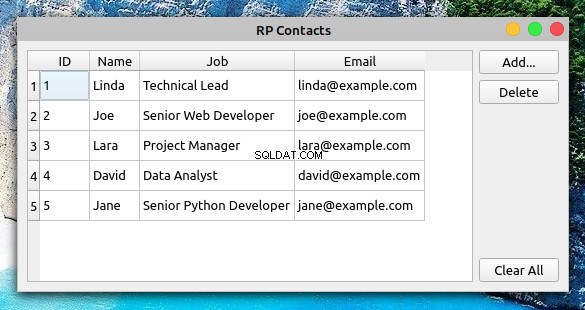
Tabelvisningsobjektet i hovedvinduet giver den nødvendige funktionalitet, så du hurtigt kan ændre og opdatere kontaktoplysningerne.
For at opdatere navnet på en kontaktperson kan du for eksempel dobbeltklikke på cellen, der indeholder navnet, opdatere navnet og derefter trykke på Enter for automatisk at gemme ændringerne i databasen. Men før du kan gøre dette, skal du oprette en model og forbinde den med tabelvisningen.
Oprettelse af en model til håndtering af kontaktdata
PyQt giver et rigt sæt klasser til at arbejde med SQL-databaser. Til din kontaktbogsapplikation skal du bruge QSqlTableModel , som giver en redigerbar datamodel for en enkelt databasetabel. Den er perfekt til jobbet, da din database har en enkelt tabel, contacts .
Gå tilbage til din kodeeditor og opret et nyt modul kaldet model.py inde i rpcontacts/ vejviser. Tilføj følgende kode til filen og gem den:
 1# -*- coding: utf-8 -*-
 2# rpcontacts/model.py
 3
 4"""This module provides a model to manage the contacts table."""
 5
 6from PyQt5.QtCore import Qt
 7from PyQt5.QtSql import QSqlTableModel
 8
 9class ContactsModel:
10    def __init__(self):
11        self.model = self._createModel()
12
13    @staticmethod
14    def _createModel():
15        """Create and set up the model."""
16        tableModel = QSqlTableModel()
17        tableModel.setTable("contacts")
18        tableModel.setEditStrategy(QSqlTableModel.OnFieldChange)
19        tableModel.select()
20        headers = ("ID", "Name", "Job", "Email")
21        for columnIndex, header in enumerate(headers):
22            tableModel.setHeaderData(columnIndex, Qt.Horizontal, header)
23        return tableModel
I denne kode udfører du først nogle nødvendige importer, derefter opretter du ContactsModel . In the class initializer, you define an instance attribute called .model to hold the data model.
Next, you add a static method to create and set up the model object. Here’s what the code in ._createModel() does:
- Line 16 creates an instance of
QSqlTableModel()calledtableModel. - Line 17 associates the model object with the
contactstable in your database. - Line 18 sets the
.editStrategyproperty of the model toQSqlTableModel.OnFieldChange. With this, you ensure that the changes on the model get saved into the database immediately. - Line 19 loads the table into the model by calling
.select(). - Lines 20 to 22 define and set user-friendly headers for the
contactstable’s columns. - Line 23 returns the newly created model.
At this point, you have your data model ready to use. Now you need to connect the table view widget to the model so you can present your users with the contact information.
Connecting the Model to the View
To display contact data in your contact book’s main window, you need to connect the table view with the data model. To perform this connection, you need to call .setModel() on the table view object and pass the model as an argument:
# -*- coding: utf-8 -*-
# rpcontacts/views.py

# Snip...
from .model import ContactsModel

class Window(QMainWindow):
    """Main Window."""
    def __init__(self, parent=None):
        # Snip...
        self.contactsModel = ContactsModel()
        self.setupUI()

    def setupUI(self):
        """Setup the main window's GUI."""
        # Create the table view widget
        self.table = QTableView()
        self.table.setModel(self.contactsModel.model)
        self.table.setSelectionBehavior(QAbstractItemView.SelectRows)
        # Snip...
In this code, you first import ContactsModel from model.py . This class provides the model that manages the data in your contact database.
In the initializer of Window , you create an instance of ContactsModel . Then inside .setupUI() , you call .setModel() on .table to connect the model with the table view. If you run the application after this update, then you’ll get the window you saw at the beginning of step 4.
Displaying and Updating Contacts
PyQt’s Model-View architecture provides a robust and user-friendly way to create GUI applications that manage databases. Models communicate with and access the data in the database. Any change in a model updates the database immediately. Views are responsible for displaying the data to the user and also for providing editable widgets to allow the user to modify the data directly in the view.
If the user modifies the data through the view, then the view internally communicates with and updates the model, which saves the changes to the physical database:
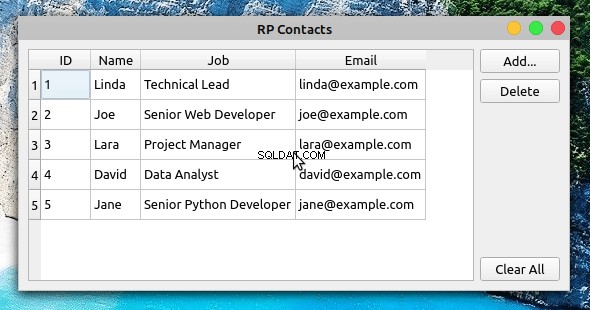
In this example, you double-click Joe’s Job Mark. This gives you access to an editable widget that allows you to modify the value in the cell. Then you update the job description from Senior Web Developer to Web Developer . When you hit Enter , the table view communicates the change to the model, and the model saves the change to the database immediately.
To confirm that the changes were successfully saved into the database, you can close the application and run it again. The table view should reflect your updates.
Step 5:Creating New Contacts
At this step, your contact book application provides functionality to load, display, and update the information about your contacts. Even though you’re able to modify and update the contact information, you can neither add nor remove contacts from the list.
All the files and the code you’ll add or modify in this section are collected in the source_code_step_5/ directory. To download them, click the link below:
Get the Source Code: Click here to get the source code you’ll use to build a contact book with Python, PyQt, and SQLite in this tutorial.
In this section, you’ll provide the required functionality to add new contacts to the database, using a pop-up dialog to enter the new information. The first step is to create the Add Contact dialog.
Creating the Add Contact Dialog
Dialogs are small windows that you can use to communicate with your users. In this section, you’ll code the contact book’s Add Contact dialog to allow your users add new contacts to their current list of contacts.
To code the Add Contact dialog, you’ll subclass QDialog . This class provides a blueprint to build dialogs for your GUI applications.
Now open the views.py module and update the import section like this:
# -*- coding: utf-8 -*-
# rpcontacts/views.py

# Snip...
from PyQt5.QtCore import Qt
from PyQt5.QtWidgets import (
    QAbstractItemView,
    QDialog,
    QDialogButtonBox,
    QFormLayout,
    QHBoxLayout,
    QLineEdit,
    QMainWindow,
    QMessageBox,
    QPushButton,
    QTableView,
    QVBoxLayout,
    QWidget,
)
The highlighted lines in the above code import the required classes to build the Add Contact dialog. With these classes in your namespace, add the following class at the end of views.py :
 1# -*- coding: utf-8 -*-
 2# rpcontacts/views.py
 3
 4# Snip...
 5class AddDialog(QDialog):
 6    """Add Contact dialog."""
 7    def __init__(self, parent=None):
 8        """Initializer."""
 9        super().__init__(parent=parent)
10        self.setWindowTitle("Add Contact")
11        self.layout = QVBoxLayout()
12        self.setLayout(self.layout)
13        self.data = None
14
15        self.setupUI()
16
17    def setupUI(self):
18        """Setup the Add Contact dialog's GUI."""
19        # Create line edits for data fields
20        self.nameField = QLineEdit()
21        self.nameField.setObjectName("Name")
22        self.jobField = QLineEdit()
23        self.jobField.setObjectName("Job")
24        self.emailField = QLineEdit()
25        self.emailField.setObjectName("Email")
26        # Lay out the data fields
27        layout = QFormLayout()
28        layout.addRow("Name:", self.nameField)
29        layout.addRow("Job:", self.jobField)
30        layout.addRow("Email:", self.emailField)
31        self.layout.addLayout(layout)
32        # Add standard buttons to the dialog and connect them
33        self.buttonsBox = QDialogButtonBox(self)
34        self.buttonsBox.setOrientation(Qt.Horizontal)
35        self.buttonsBox.setStandardButtons(
36            QDialogButtonBox.Ok | QDialogButtonBox.Cancel
37        )
38        self.buttonsBox.accepted.connect(self.accept)
39        self.buttonsBox.rejected.connect(self.reject)
40        self.layout.addWidget(self.buttonsBox)
There are a lot of things happening in this code. Here’s a summary:
- Line 5 defines a new class that inherits from
QDialog. - Lines 7 to 15 define the class initializer. In this case, the most relevant addition is
.data, which is an instance attribute that you’ll use to hold the data your users provide.
In .setupUI() , you define the dialog’s GUI:
- Lines 20 to 25 add three
QLineEditobjects:name,job, andemail. You’ll use these line edits to take the user’s input for the name, job description, and email of the contact to add. They represent the corresponding fields in the database. - Lines 27 to 30 create a
QFormLayoutinstance that arranges the line edits in a form. This layout manager also provides user-friendly labels for each line edit or field. - Lines 33 to 37 add a
QDialogButtonBoxobject that provides two standard buttons:OK and Cancel . The OK button accepts the user’s input and the Cancel button rejects it. - Lines 38 and 39 connect the dialog’s built-in
.accepted()and.rejected()signals with the.accept()andreject()slots, respectively. In this case, you’ll rely on the dialog’s built-in.reject()slot, which closes the dialog without processing the input. Other than that, you just need to code the.accept()slot.
To code the dialog’s .accept() slot, you need to consider that any user input needs validation to make sure that it’s correct and safe. This is especially true when you’re working with SQL databases because of the risk of an SQL injection attack.
In this example, you’ll add a minimal validation rule just to make sure that the user provides data for each input field in the dialog. However, adding your own, more robust validation rules would be a good exercise.
Without further ado, get back to AddDialog and add the following code for its .accept() slot:
 1# -*- coding: utf-8 -*-
 2# rpcontacts/views.py
 3
 4# Snip...
 5class AddDialog(QDialog):
 6    def __init__(self, parent=None):
 7        # Snip...
 8
 9    def setupUI(self):
10        # Snip...
11
12    def accept(self):
13        """Accept the data provided through the dialog."""
14        self.data = []
15        for field in (self.nameField, self.jobField, self.emailField):
16            if not field.text():
17                QMessageBox.critical(
18                    self,
19                    "Error!",
20                    f"You must provide a contact's {field.objectName()}",
21                )
22                self.data = None  # Reset .data
23                return
24
25            self.data.append(field.text())
26
27        if not self.data:
28            return
29
30        super().accept()
The code within .accept() does the following:
- Line 14 initializes
.datato an empty list ([]). This list will store the user’s input data. - Line 15 defines a
forloop that iterates over the three line edits, or fields, in the dialog. - Lines 16 to 23 define a conditional statement that checks if the user has provided data for each field in the dialog. If not, then the dialog shows an error message that warns the user about the missing data.
- Line 25 adds the user’s input for each field to
.data. - Line 30 calls the superclass’s
.accept()slot to provide the standard behavior that closes the dialog after the user clicks OK .
With this code, you’re ready to add a new slot to the contact book’s main window. This slot will launch the dialog, and if the user provides valid input, then the slot will use the model to save the newly added contact to the database.
Launching the Add Contact Dialog
Now that you’ve coded the Add Contact dialog, it’s time to add a new slot to Window so you can launch the dialog by clicking Add and process the user’s input once they click OK .
Go to the definition of Window and add the following code:
 1# -*- coding: utf-8 -*-
 2# rpcontacts/views.py
 3
 4# Snip...
 5class Window(QMainWindow):
 6    # Snip...
 7
 8    def setupUI(self):
 9        # Snip...
10        self.addButton = QPushButton("Add...")
11        self.addButton.clicked.connect(self.openAddDialog)
12        # Snip...
13
14    def openAddDialog(self):
15        """Open the Add Contact dialog."""
16        dialog = AddDialog(self)
17        if dialog.exec() == QDialog.Accepted:
18            self.contactsModel.addContact(dialog.data)
19            self.table.resizeColumnsToContents()
Here’s a summary of what’s happening in the above code:
- Line 11 connects the
.clicked()signal of the Add button to the newly created slot,.openAddDialog(). This way, a click on the button will automatically call the slot. - Line 14 defines the
.openAddDialog()slot. - Line 16 creates an instance of
AddDialog. - Lines 17 to 19 define a conditional statement to check if the dialog was accepted. If so, then line 14 calls
.addContact()on the data model with the dialog’s.dataattribute as an argument. The final statement in theifcode block resizes the table view to fit the size of its updated content.
Now that you have a way to launch the Add Contact dialog and to process its data, you need to provide the code for .addContact() in your data model. That’s a topic for the next section.
Processing the Add Dialog’s Data in the Model
In this section, you’ll add a method called .addContact() to your data model, ContactsModel . Open model.py in your code editor, go to the definition of ContactsModel , and add the following code:
 1# -*- coding: utf-8 -*-
 2# rpcontacts/model.py
 3
 4# Snip...
 5class ContactsModel:
 6    # Snip...
 7
 8    def addContact(self, data):
 9        """Add a contact to the database."""
10        rows = self.model.rowCount()
11        self.model.insertRows(rows, 1)
12        for column, field in enumerate(data):
13            self.model.setData(self.model.index(rows, column + 1), field)
14        self.model.submitAll()
15        self.model.select()
Inside .addContact() , the code does the following:
- Line 10 gets the current number of rows in the data model.
- Line 11 inserts a new row at the end of the data model.
- Lines 12 and 13 run a
forloop that inserts every item indatainto the corresponding cell in the data model. To do this, line 9 calls.setData()on the model, with the index of the cell and the current datafieldas arguments. - Line 14 submits the changes to the database by calling
.submitAll()on the model. - Line 15 reloads the data from the database into the model.
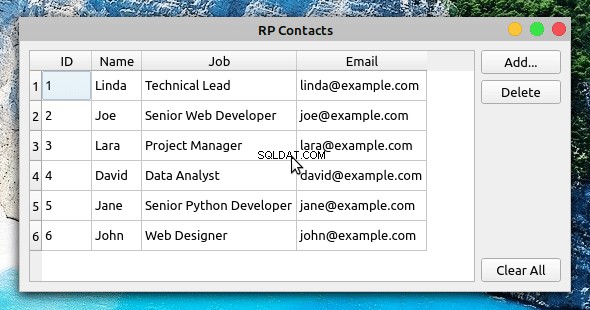
If you run the application with these new additions, then you’ll get the following behavior:
Now when you click Add , the Add Contact dialog appears on your screen. You can use the dialog to provide the required information for a new contact and to add the contact to the database by clicking OK .
Step 6:Deleting Existing Contacts
The final feature you’ll add to the contact book application is the ability to remove contacts from the database using the GUI.
Again, you’ll find all the files and the code added or modified in this section under the source_code_step_6/ directory. You can download them by clicking the link below:
Get the Source Code: Click here to get the source code you’ll use to build a contact book with Python, PyQt, and SQLite in this tutorial.
In this section, you’ll first add the capability to delete a single contact at a time. Then you’ll add code to remove all the contacts from the database.
Deleting Selected Contacts
To remove a single contact from the contact database, you need to select the desired contact in the table view on the contact book’s main window. Once you’ve selected the contact, you can click Delete to perform the operation on the database.
Go to the model.py module and add the following code to implement .deleteContact() inside ContactsModel :
# -*- coding: utf-8 -*-
# rpcontacts/model.py

# Snip...
class ContactsModel:
    # Snip...

    def deleteContact(self, row):
        """Remove a contact from the database."""
        self.model.removeRow(row)
        self.model.submitAll()
        self.model.select()
This method has three lines of code. The first line removes the selected row . The second line submits the change to the database. Finally, the third line reloads the data into the model.
Next, get back to the views.py module and add the code behind the Delete button in Window :
# -*- coding: utf-8 -*-
# rpcontacts/views.py

# Snip...
class Window(QMainWindow):
    # Snip...

    def setupUI(self):
        """Setup the main window's GUI."""
        # Snip...
        self.deleteButton = QPushButton("Delete")
        self.deleteButton.clicked.connect(self.deleteContact)
        # Snip...

    def deleteContact(self):
        """Delete the selected contact from the database."""
        row = self.table.currentIndex().row()
        if row < 0:
            return

        messageBox = QMessageBox.warning(
            self,
            "Warning!",
            "Do you want to remove the selected contact?",
            QMessageBox.Ok | QMessageBox.Cancel,
        )

        if messageBox == QMessageBox.Ok:
            self.contactsModel.deleteContact(row)
In the first highlighted line, you connect the .clicked() signal of the Delete button to the .deleteContact() slot. This connection triggers a call to .deleteContact() every time the user clicks the button.
In .deleteContact() , you first get the index of the currently selected row in the table view. The if statement checks if the index is lower than 0 , which would mean that there are no contacts in the table view. If so, then the method returns immediately without performing any further actions.
Then the method shows a warning message confirming that the user wants to delete the selected contact. If the user accepts the operation, then .deleteContact(row) gets called. In this case, row represents the index of the currently selected row in the table.
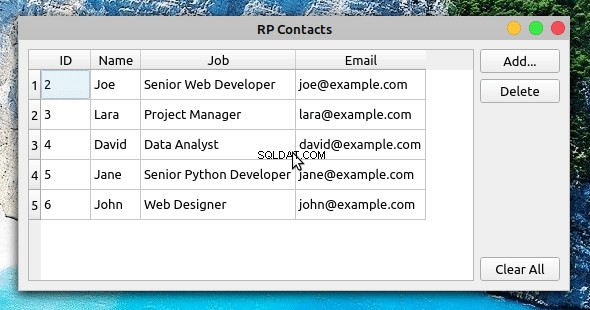
After these additions, you can run the application again to get the following behavior:
Now when you select a contact from the table view and click Delete , you’re presented with a warning message. If you click the message dialog’s OK button, then the application removes the selected contact from the database, updating the table view accordingly.
Clearing the Contact Database
To remove all the contacts from the database, you’ll start by adding a method called .clearContacts() to ContactsModel . Open your model.py module and add the following method at the end of the class:
 1# -*- coding: utf-8 -*-
 2# rpcontacts/model.py
 3
 4# Snip...
 5class ContactsModel:
 6    # Snip...
 7
 8    def clearContacts(self):
 9        """Remove all contacts in the database."""
10        self.model.setEditStrategy(QSqlTableModel.OnManualSubmit)
11        self.model.removeRows(0, self.model.rowCount())
12        self.model.submitAll()
13        self.model.setEditStrategy(QSqlTableModel.OnFieldChange)
14        self.model.select()
Here’s what each line of code does:
- Line 10 sets the data model’s
.editStrategyproperty toQSqlTableModel.OnManualSubmit. This allows you to cache all the changes until you call.submitAll()later on. You need to do this because you’re changing several rows at the same time. - Line 11 removes all the rows from the model.
- Line 12 saves changes to the database.
- Line 13 resets the model’s
.editStrategyproperty to its original value,QSqlTableModel.OnFieldChange. If you don’t reset this property to its original value, then you won’t be able to update the contacts directly in the table view. - Line 14 reloads the data into the model.
Once you’ve coded .clearContacts() , you can get back to the views.py file and update Window with the following code:
# -*- coding: utf-8 -*-
# rpcontacts/views.py

# Snip...
class Window(QMainWindow):
    # Snip...

    def setupUI(self):
        """Setup the main window's GUI."""
        # Snip...
        self.clearAllButton = QPushButton("Clear All")
        self.clearAllButton.clicked.connect(self.clearContacts)
        # Snip...

    def clearContacts(self):
        """Remove all contacts from the database."""
        messageBox = QMessageBox.warning(
            self,
            "Warning!",
            "Do you want to remove all your contacts?",
            QMessageBox.Ok | QMessageBox.Cancel,
        )

        if messageBox == QMessageBox.Ok:
            self.contactsModel.clearContacts()
The first highlighted line in this code connects the .clicked() signal of the Clear All button to the .clearContacts() slot below.
In .clearContacts() , you first create a message dialog, messageBox , to ask the user to confirm the removing operation. If the user confirms the operation by clicking OK , then .clearContacts() gets called on the model to remove all the contacts from the database:
Det er det! With this last piece of code, your contact book application is complete. The application provides features that allow your users to display, add, update, and remove contacts from the database.
Conclusion
Building a contact book GUI application with Python, PyQt, and SQLite is an excellent exercise for you to expand your skills with these tools and as a developer in general. Coding projects like this allows you to apply the knowledge and skills you already have and also pushes you to research and learn about new topics every time you encounter a new programming problem.
In this tutorial, you learned how to:
- Build the GUI for a contact book application using PyQt
- Use PyQt’s SQL support to connect the application to an SQLite database
- Use PyQt’s Model-View architecture to work with the application’s database
You can download the complete source code for the contact book application and also the code to complete each step in this tutorial by clicking the link below:
Get the Source Code: Click here to get the source code you’ll use to build a contact book with Python, PyQt, and SQLite in this tutorial.
Next Steps
At this point, you’ve completed a fully functional contact book project. The application provides minimal functionality, but it’s a good starting point to continue adding features and take your Python and PyQt skills to the next level. Here are some next step ideas that you can implement:
-
Add new data fields: Adding new data fields to store more information about your contacts would be great. For example, you can add the contact’s photo, phone number, web page, Twitter handle, and so on. To do this, you might need to create new tables and set up relations between them. PyQt provides the
QSqlRelationalTableModel, which defines an editable data model for a single table and provides foreign key support. -
Provide search capability: Giving your users a way to search for a contact in the database is arguably a must-have feature in this kind of application. To implement it, you can use PyQt’s
QSqlQueryandQSqlQueryModel. -
Add back-up capability: Providing a way of backing up contact information is another interesting feature. Users might face problems with their computers and lose their data. You can provide options to upload the data to a cloud service or to back it up to an external disk.
These are just a few ideas for how you can continue adding features to your contact book. Take the challenge and build something amazing on top of this!