Alle programmer behandler data i en eller anden form, og mange har brug for at kunne gemme og hente disse data fra den ene invokation til den næste. Python, SQLite og SQLAlchemy giver dine programmer databasefunktionalitet, så du kan gemme data i en enkelt fil uden behov for en databaseserver.
Du kan opnå lignende resultater ved at bruge flade filer i et vilkårligt antal formater, inklusive CSV, JSON, XML og endda brugerdefinerede formater. Flade filer er ofte menneskelæselige tekstfiler - selvom de også kan være binære data - med en struktur, der kan analyseres af et computerprogram. Nedenfor vil du udforske brugen af SQL-databaser og flade filer til datalagring og manipulation og lære, hvordan du beslutter, hvilken tilgang der er den rigtige for dit program.
I dette selvstudie lærer du, hvordan du bruger:
- Flade filer til datalagring
- SQL for at forbedre adgangen til vedvarende data
- SQLite til datalagring
- SQLAlchemy at arbejde med data som Python-objekter
Du kan få al den kode og alle data, du vil se i denne vejledning, ved at klikke på linket nedenfor:
Download prøvekoden: Klik her for at få den kode, du skal bruge til at lære om datahåndtering med SQLite og SQLAlchemy i denne øvelse.
Brug af flade filer til datalagring
En flad fil er en fil, der indeholder data uden internt hierarki og normalt uden referencer til eksterne filer. Flade filer indeholder mennesker, der kan læses, og er meget nyttige til at oprette og læse data. Fordi de ikke behøver at bruge faste feltbredder, bruger flade filer ofte andre strukturer for at gøre det muligt for et program at parse tekst.
For eksempel er CSV-filer (kommaseparerede værdier) linjer med almindelig tekst, hvor kommategnet adskiller dataelementerne. Hver tekstlinje repræsenterer en række data, og hver kommaseparerede værdi er et felt i denne række. Kommategnsadskilleren angiver grænsen mellem dataværdier.
Python udmærker sig ved at læse fra og gemme til filer. At kunne læse datafiler med Python giver dig mulighed for at gendanne en applikation til en nyttig tilstand, når du kører den igen på et senere tidspunkt. At være i stand til at gemme data i en fil giver dig mulighed for at dele information fra programmet mellem brugere og websteder, hvor applikationen kører.
Før et program kan læse en datafil, skal det være i stand til at forstå dataene. Normalt betyder det, at datafilen skal have en vis struktur, som applikationen kan bruge til at læse og parse teksten i filen.
Nedenfor er en CSV-fil med navnet author_book_publisher.csv , brugt af det første eksempelprogram i denne øvelse:
first_name,last_name,title,publisher
Isaac,Asimov,Foundation,Random House
Pearl,Buck,The Good Earth,Random House
Pearl,Buck,The Good Earth,Simon & Schuster
Tom,Clancy,The Hunt For Red October,Berkley
Tom,Clancy,Patriot Games,Simon & Schuster
Stephen,King,It,Random House
Stephen,King,It,Penguin Random House
Stephen,King,Dead Zone,Random House
Stephen,King,The Shining,Penguin Random House
John,Le Carre,"Tinker, Tailor, Soldier, Spy: A George Smiley Novel",Berkley
Alex,Michaelides,The Silent Patient,Simon & Schuster
Carol,Shaben,Into The Abyss,Simon & Schuster
Den første linje giver en kommasepareret liste over felter, som er kolonnenavnene for de data, der følger i de resterende linjer. Resten af linjerne indeholder dataene, hvor hver linje repræsenterer en enkelt post.
Bemærk: Selvom forfatterne, bøgerne og forlagene alle er virkelige, er forholdet mellem bøger og forlag fiktive og blev skabt til formålet med denne øvelse.
Dernæst vil du tage et kig på nogle af fordelene og ulemperne ved at bruge flade filer som ovenstående CSV til at arbejde med dine data.
Fordele ved flade filer
At arbejde med data i flade filer er overskueligt og ligetil at implementere. At have dataene i et format, der kan læses af mennesker, er ikke kun nyttigt til at oprette datafilen med en teksteditor, men også til at undersøge dataene og lede efter eventuelle uoverensstemmelser eller problemer.
Mange applikationer kan eksportere flad-fil-versioner af de data, der genereres af filen. For eksempel kan Excel importere eller eksportere en CSV-fil til og fra et regneark. Flade filer har også den fordel, at de er selvstændige og kan overføres, hvis du vil dele dataene.
Næsten alle programmeringssprog har værktøjer og biblioteker, der gør arbejdet med CSV-filer lettere. Python har den indbyggede csv modul og det kraftfulde panda-modul til rådighed, hvilket gør arbejdet med CSV-filer til en potent løsning.
Ulemper ved flade filer
Fordelene ved at arbejde med flade filer begynder at blive mindre, efterhånden som dataene bliver større. Store filer kan stadig læses af mennesker, men det bliver en sværere opgave at redigere dem for at skabe data eller lede efter problemer. Hvis din applikation vil ændre dataene i filen, så ville en løsning være at læse hele filen ind i hukommelsen, foretage ændringerne og skrive dataene ud til en anden fil.
Et andet problem med at bruge flade filer er, at du eksplicit skal oprette og vedligeholde enhver relation mellem dele af dine data og applikationsprogrammet inden for filsyntaksen. Derudover skal du generere kode i din applikation for at bruge disse relationer.
En sidste komplikation er, at personer, du vil dele din datafil med, også skal kende til og handle på de strukturer og relationer, du har skabt i dataene. For at få adgang til oplysningerne skal disse brugere ikke kun forstå strukturen af dataene, men også de programmeringsværktøjer, der er nødvendige for at få adgang til dem.
Eksempel på flad fil
Eksempelprogrammet examples/example_1/main.py bruger author_book_publisher.csv fil for at få data og relationer i den. Denne CSV-fil vedligeholder en liste over forfattere, de bøger, de har udgivet, og udgiverne for hver af bøgerne.
Bemærk: Datafilerne brugt i eksemplerne er tilgængelige i project/data vejviser. Der er også en programfil i project/build_data mappe, der genererer dataene. Denne applikation er nyttig, hvis du ændrer dataene og ønsker at vende tilbage til en kendt tilstand.
For at få adgang til de datafiler, der bruges i dette afsnit og i hele selvstudiet, skal du klikke på linket nedenfor:
Download prøvekoden: Klik her for at få den kode, du skal bruge til at lære om datahåndtering med SQLite og SQLAlchemy i denne øvelse.
CSV-filen præsenteret ovenfor er en ret lille datafil, der kun indeholder nogle få forfattere, bøger og udgivere. Du bør også bemærke nogle ting om dataene:
-
Forfatterne Stephen King og Tom Clancy optræder mere end én gang, fordi flere bøger, de har udgivet, er repræsenteret i dataene.
-
Forfatterne Stephen King og Pearl Buck har den samme bog udgivet af mere end ét forlag.
Disse duplikerede datafelter skaber relationer mellem andre dele af dataene. En forfatter kan skrive mange bøger, og et forlag kan arbejde med flere forfattere. Forfattere og forlag deler relationer med individuelle bøger.
Relationerne i author_book_publisher.csv fil er repræsenteret af felter, der vises flere gange i forskellige rækker af datafilen. På grund af denne dataredundans repræsenterer dataene mere end en enkelt todimensionel tabel. Du vil se mere af dette, når du bruger filen til at oprette en SQLite-databasefil.
Eksempelprogrammet examples/example_1/main.py bruger de relationer, der er indlejret i author_book_publisher.csv fil for at generere nogle data. Den præsenterer først en liste over forfatterne og antallet af bøger hver har skrevet. Den viser derefter en liste over forlag og antallet af forfattere, som hver har udgivet bøger for.
Den bruger også treelib modul for at vise et træhierarki af forfattere, bøger og udgivere.
Til sidst føjer den en ny bog til dataene og viser træhierarkiet igen med den nye bog på plads. Her er main() indgangspunktsfunktion for dette program:
 1def main():
 2    """The main entry point of the program"""
 3    # Get the resources for the program
 4    with resources.path(
 5        "project.data", "author_book_publisher.csv"
 6    ) as filepath:
 7        data = get_data(filepath)
 8
 9    # Get the number of books printed by each publisher
10    books_by_publisher = get_books_by_publisher(data, ascending=False)
11    for publisher, total_books in books_by_publisher.items():
12        print(f"Publisher: {publisher}, total books: {total_books}")
13    print()
14
15    # Get the number of authors each publisher publishes
16    authors_by_publisher = get_authors_by_publisher(data, ascending=False)
17    for publisher, total_authors in authors_by_publisher.items():
18        print(f"Publisher: {publisher}, total authors: {total_authors}")
19    print()
20
21    # Output hierarchical authors data
22    output_author_hierarchy(data)
23
24    # Add a new book to the data structure
25    data = add_new_book(
26        data,
27        author_name="Stephen King",
28        book_title="The Stand",
29        publisher_name="Random House",
30    )
31
32    # Output the updated hierarchical authors data
33    output_author_hierarchy(data)
Python-koden ovenfor tager følgende trin:
- Linje 4 til 7 læs
author_book_publisher.csvfil i en pandas DataFrame. - Linje 10 til 13 udskrive antallet af bøger udgivet af hvert forlag.
- Linje 16 til 19 udskrive antallet af forfattere, der er knyttet til hvert forlag.
- Linje 22 udlæser bogdataene som et hierarki sorteret efter forfattere.
- Linje 25 til 30 tilføje en ny bog til strukturen i hukommelsen.
- Linje 33 udlæser bogdataene som et hierarki sorteret efter forfattere, inklusive den nyligt tilføjede bog.
Kørsel af dette program genererer følgende output:
$ python main.py
Publisher: Simon & Schuster, total books: 4
Publisher: Random House, total books: 4
Publisher: Penguin Random House, total books: 2
Publisher: Berkley, total books: 2

Publisher: Simon & Schuster, total authors: 4
Publisher: Random House, total authors: 3
Publisher: Berkley, total authors: 2
Publisher: Penguin Random House, total authors: 1

Authors
├── Alex Michaelides
│   └── The Silent Patient
│       └── Simon & Schuster
├── Carol Shaben
│   └── Into The Abyss
│       └── Simon & Schuster
├── Isaac Asimov
│   └── Foundation
│       └── Random House
├── John Le Carre
│   └── Tinker, Tailor, Soldier, Spy: A George Smiley Novel
│       └── Berkley
├── Pearl Buck
│   └── The Good Earth
│       ├── Random House
│       └── Simon & Schuster
├── Stephen King
│   ├── Dead Zone
│   │   └── Random House
│   ├── It
│   │   ├── Penguin Random House
│   │   └── Random House
│   └── The Shining
│       └── Penguin Random House
└── Tom Clancy
    ├── Patriot Games
    │   └── Simon & Schuster
    └── The Hunt For Red October
        └── Berkley
Forfatterhierarkiet ovenfor præsenteres to gange i outputtet med tilføjelsen af Stephen Kings The Stand , udgivet af Random House. Det faktiske output ovenfor er blevet redigeret og viser kun det første hierarkioutput for at spare plads.
main() kalder andre funktioner til at udføre hovedparten af arbejdet. Den første funktion, den kalder, er get_data() :
def get_data(filepath):
    """Get book data from the csv file"""
    return pd.read_csv(filepath)
Denne funktion tager filstien til CSV-filen og bruger pandaer til at læse den ind i en pandas DataFrame, som den derefter sender tilbage til den, der ringer. Returværdien af denne funktion bliver den datastruktur, der overføres til de andre funktioner, der udgør programmet.
get_books_by_publisher() beregner antallet af bøger udgivet af hvert forlag. Den resulterende pandas-serie bruger pandas GroupBy-funktionaliteten til at gruppere efter udgiver og derefter sortere baseret på ascending flag:
def get_books_by_publisher(data, ascending=True):
    """Return the number of books by each publisher as a pandas series"""
    return data.groupby("publisher").size().sort_values(ascending=ascending)
get_authors_by_publisher() gør stort set det samme som den forrige funktion, men for forfattere:
def get_authors_by_publisher(data, ascending=True):
    """Returns the number of authors by each publisher as a pandas series"""
    return (
        data.assign(name=data.first_name.str.cat(data.last_name, sep=" "))
        .groupby("publisher")
        .nunique()
        .loc[:, "name"]
        .sort_values(ascending=ascending)
    )
add_new_book() opretter en ny bog i pandas DataFrame. Koden kontrollerer, om forfatteren, bogen eller udgiveren allerede eksisterer. Hvis ikke, så opretter den en ny bog og føjer den til pandas DataFrame:
def add_new_book(data, author_name, book_title, publisher_name):
    """Adds a new book to the system"""
    # Does the book exist?
    first_name, _, last_name = author_name.partition(" ")
    if any(
        (data.first_name == first_name)
        & (data.last_name == last_name)
        & (data.title == book_title)
        & (data.publisher == publisher_name)
    ):
        return data
    # Add the new book
    return data.append(
        {
            "first_name": first_name,
            "last_name": last_name,
            "title": book_title,
            "publisher": publisher_name,
        },
        ignore_index=True,
    )
output_author_hierarchy() bruger indlejret for sløjfer for at iterere gennem niveauerne af datastrukturen. Den bruger derefter treelib modul til at udsende en hierarkisk liste over forfatterne, de bøger, de har udgivet, og de udgivere, der har udgivet disse bøger:
def output_author_hierarchy(data):
    """Output the data as a hierarchy list of authors"""
    authors = data.assign(
        name=data.first_name.str.cat(data.last_name, sep=" ")
    )
    authors_tree = Tree()
    authors_tree.create_node("Authors", "authors")
    for author, books in authors.groupby("name"):
        authors_tree.create_node(author, author, parent="authors")
        for book, publishers in books.groupby("title")["publisher"]:
            book_id = f"{author}:{book}"
            authors_tree.create_node(book, book_id, parent=author)
            for publisher in publishers:
                authors_tree.create_node(publisher, parent=book_id)

    # Output the hierarchical authors data
    authors_tree.show()
Denne applikation fungerer godt og illustrerer den strøm, der er tilgængelig for dig med panda-modulet. Modulet giver fremragende funktionalitet til at læse en CSV-fil og interagere med dataene.
Lad os skubbe på og skabe et identisk fungerende program ved hjælp af Python, en SQLite-databaseversion af forfatter- og publikationsdata og SQLAlchemy til at interagere med disse data.
Brug af SQLite til at bevare data
Som du så tidligere, er der overflødige data i author_book_publisher.csv fil. For eksempel alle oplysninger om Pearl Bucks The Good Earth er opført to gange, fordi to forskellige forlag har udgivet bogen.
Forestil dig, hvis denne datafil indeholdt flere relaterede data, såsom forfatterens adresse og telefonnummer, udgivelsesdatoer og ISBN'er for bøger eller adresser, telefonnumre og måske årlige indtægter for udgivere. Disse data vil blive duplikeret for hvert roddataelement, såsom forfatter, bog eller udgiver.
Det er muligt at oprette data på denne måde, men det ville være usædvanligt uhåndterligt. Tænk på problemerne med at holde denne datafil opdateret. Hvad hvis Stephen King ville ændre sit navn? Du bliver nødt til at opdatere flere poster, der indeholder hans navn, og sikre dig, at der ikke var nogen tastefejl.
Værre end dataduplikeringen ville være kompleksiteten i at tilføje andre relationer til dataene. Hvad hvis du besluttede dig for at tilføje telefonnumre til forfatterne, og de havde telefonnumre til hjemmet, arbejdet, mobilen og måske mere? Hver ny relation, som du ønsker at tilføje for et rodelement, ville gange antallet af poster med antallet af elementer i det nye forhold.
Dette problem er en af grundene til, at der eksisterer relationer i databasesystemer. Et vigtigt emne inden for databaseteknik er databasenormalisering , eller processen med at adskille data for at reducere redundans og øge integriteten. Når en databasestruktur udvides med nye typer data, holdes ændringer i den eksisterende struktur på et minimum, hvis den er normaliseret på forhånd.
SQLite-databasen er tilgængelig i Python, og ifølge SQLite-hjemmesiden bruges den mere end alle andre databasesystemer tilsammen. Det tilbyder et fuldt udstyret relationelt databasestyringssystem (RDBMS), der arbejder med en enkelt fil for at vedligeholde al databasefunktionaliteten.
Det har også den fordel, at det ikke kræver en separat databaseserver for at fungere. Databasefilformatet er på tværs af platforme og tilgængeligt for ethvert programmeringssprog, der understøtter SQLite.
Alt dette er interessant information, men hvordan er det relevant for brugen af flade filer til datalagring? Du finder ud af det nedenfor!
Oprettelse af en databasestruktur
Den brute force-tilgang til at få author_book_publisher.csv data ind i en SQLite-database ville være at oprette en enkelt tabel, der matcher CSV-filens struktur. At gøre dette ville ignorere en hel del af SQLites magt.
Relationelle databaser give en måde at gemme strukturerede data i tabeller og etablere relationer mellem disse tabeller. De bruger normalt Structured Query Language (SQL) som den primære måde at interagere med dataene på. Dette er en overforenkling af, hvad RDBMS'er giver, men det er tilstrækkeligt til formålet med denne øvelse.
En SQLite-database understøtter interaktion med datatabellen ved hjælp af SQL. Ikke kun indeholder en SQLite-databasefil dataene, men den har også en standardiseret måde at interagere med dataene på. Denne støtte er indlejret i filen, hvilket betyder, at ethvert programmeringssprog, der kan bruge en SQLite-fil, også kan bruge SQL til at arbejde med det.
Interaktion med en database med SQL
SQL er et deklarativt sprog bruges til at oprette, administrere og forespørge om data indeholdt i en database. Et deklarativt sprog beskriver hvad skal opnås i stedet for hvordan det burde være gennemført. Du vil se eksempler på SQL-sætninger senere, når du kommer til at oprette databasetabeller.
Strukturering af en database med SQL
For at drage fordel af kraften i SQL skal du anvende en vis databasenormalisering til dataene i author_book_publisher.csv fil. For at gøre dette skal du adskille forfatterne, bøgerne og udgiverne i separate databasetabeller.
Begrebsmæssigt lagres data i databasen i todimensionelle tabelstrukturer. Hver tabel består af rækker af poster , og hver post består af kolonner eller felter , der indeholder data.
Dataene i felterne er af foruddefinerede typer, herunder tekst, heltal, flydende og mere. CSV-filer er forskellige, fordi alle felterne er tekst og skal parses af et program for at få tildelt en datatype til dem.
Hver post i tabellen har en primær nøgle defineret til at give en post en unik identifikator. Den primære nøgle ligner nøglen i en Python-ordbog. Selve databasemotoren genererer ofte den primære nøgle som en stigende heltalsværdi for hver post, der indsættes i databasetabellen.
Selvom den primære nøgle ofte genereres automatisk af databasemotoren, behøver den ikke at være det. Hvis de data, der er gemt i et felt, er unikke på tværs af alle andre data i tabellen i det felt, så kan det være den primære nøgle. For eksempel kan en tabel, der indeholder data om bøger, bruge bogens ISBN som den primære nøgle.
Oprettelse af tabeller med SQL
Sådan kan du oprette de tre tabeller, der repræsenterer forfatterne, bøgerne og udgiverne i CSV-filen ved hjælp af SQL-sætninger:
CREATE TABLE author (
    author_id INTEGER NOT NULL PRIMARY KEY,
    first_name VARCHAR,
    last_name VARCHAR
);

CREATE TABLE book (
    book_id INTEGER NOT NULL PRIMARY KEY,
    author_id INTEGER REFERENCES author,
    title VARCHAR
);

CREATE TABLE publisher (
    publisher_id INTEGER NOT NULL PRIMARY KEY,
    name VARCHAR
);
Bemærk, at der ikke er nogen filoperationer, ingen oprettede variabler og ingen strukturer til at holde dem. Udsagnene beskriver kun det ønskede resultat:oprettelsen af en tabel med særlige attributter. Databasemotoren bestemmer, hvordan dette skal gøres.
Når du har oprettet og udfyldt denne tabel med forfatterdata fra author_book_publisher.csv fil, kan du få adgang til den ved hjælp af SQL-sætninger. Følgende sætning (også kaldet en forespørgsel ) bruger jokertegnet (* ) for at få alle data i author tabel og output den:
SELECT * FROM author;
Du kan bruge sqlite3 kommandolinjeværktøj til at interagere med author_book_publisher.db databasefil i project/data mappe:
$ sqlite3 author_book_publisher.db
Når SQLite-kommandolinjeværktøjet kører med databasen åben, kan du indtaste SQL-kommandoer. Her er ovenstående SQL-kommando og dens output, efterfulgt af .q kommando for at afslutte programmet:
sqlite> SELECT * FROM author;
1|Isaac|Asimov
2|Pearl|Buck
3|Tom|Clancy
4|Stephen|King
5|John|Le Carre
6|Alex|Michaelides
7|Carol|Shaben

sqlite> .q
Bemærk, at hver forfatter kun eksisterer én gang i tabellen. I modsætning til CSV-filen, som havde flere poster for nogle af forfatterne, er her kun én unik post pr. forfatter nødvendig.
Vedligeholdelse af en database med SQL
SQL giver måder at arbejde med eksisterende databaser og tabeller på ved at indsætte nye data og opdatere eller slette eksisterende data. Her er et eksempel på en SQL-sætning til at indsætte en ny forfatter i author tabel:
INSERT INTO author
    (first_name, last_name)
VALUES ('Paul', 'Mendez');
Denne SQL-sætning indsætter værdierne 'Paul ' og 'Mendez ' i de respektive kolonner first_name og last_name af author bord.
Bemærk, at author_id kolonne er ikke angivet. Fordi denne kolonne er den primære nøgle, genererer databasemotoren værdien og indsætter den som en del af sætningsudførelsen.
Opdatering af poster i en databasetabel er en ukompliceret proces. Antag for eksempel, at Stephen King ønskede at blive kendt under sit pennenavn, Richard Bachman. Her er en SQL-sætning til at opdatere databaseposten:
UPDATE author
SET first_name = 'Richard', last_name = 'Bachman'
WHERE first_name = 'Stephen' AND last_name = 'King';
SQL-sætningen lokaliserer den enkelte post for 'Stephen King' ved at bruge den betingede sætning WHERE first_name = 'Stephen' AND last_name = 'King' og opdaterer derefter first_name og last_name felter med de nye værdier. SQL bruger lighedstegnet (= ) som både sammenligningsoperatør og tildelingsoperatør.
Du kan også slette poster fra en database. Her er et eksempel på en SQL-sætning til at slette en post fra author tabel:
DELETE FROM author
WHERE first_name = 'Paul'
AND last_name = 'Mendez';
Denne SQL-sætning sletter en enkelt række fra author tabel hvor first_name er lig med 'Paul' og last_name er lig med 'Mendez' .
Vær forsigtig, når du sletter poster! De betingelser, du stiller, skal være så specifikke som muligt. En betingelse, der er for bred, kan føre til sletning af flere poster, end du har tænkt dig. For eksempel, hvis betingelsen kun var baseret på linjen first_name = 'Paul' , så ville alle forfattere med fornavnet Paul blive slettet fra databasen.
Bemærk: For at undgå utilsigtet sletning af poster tillader mange applikationer slet ikke sletninger. I stedet har posten en anden kolonne til at angive, om den er i brug eller ej. Denne kolonne kan have navnet active og indeholder en værdi, der evalueres til enten True eller False, hvilket angiver, om posten skal inkluderes, når der forespørges i databasen.
For eksempel vil SQL-forespørgslen nedenfor få alle kolonner for alle aktive poster i some_table :
SELECT
  *
FROM some_table
WHERE active = 1;
SQLite har ikke en boolsk datatype, så den active kolonne er repræsenteret af et heltal med værdien 0 eller 1 for at angive status for posten. Andre databasesystemer kan have eller ikke have native booleske datatyper.
Det er fuldt ud muligt at bygge databaseapplikationer i Python ved hjælp af SQL-sætninger direkte i koden. Hvis du gør det, returneres data til applikationen som en liste over lister eller en liste over ordbøger.
Brug af rå SQL er en helt acceptabel måde at arbejde med de data, der returneres af forespørgsler til databasen. Men i stedet for at gøre det, vil du gå direkte til at bruge SQLAlchemy til at arbejde med databaser.
Opbygning af relationer
En anden egenskab ved databasesystemer, som du måske finder endnu mere kraftfuld og nyttig end datavedholdenhed og -hentning, er relationer . Databaser, der understøtter relationer, giver dig mulighed for at opdele data i flere tabeller og etablere forbindelser mellem dem.
Dataene i author_book_publisher.csv fil repræsenterer data og relationer ved at duplikere data. En database håndterer dette ved at dele dataene op i tre tabeller—author , book , og publisher —og etablere relationer mellem dem.
Efter at have fået alle de data, du ønsker, på ét sted i CSV-filen, hvorfor skulle du dele dem op i flere tabeller? Ville det ikke være mere arbejde at skabe og sætte sammen igen? Det er til en vis grad sandt, men fordelene ved at opdele dataene og sætte dem sammen igen ved hjælp af SQL kan vinde dig!
En-til-mange-forhold
En en-til-mange forholdet er som det med en kunde, der bestiller varer online. En kunde kan have mange ordrer, men hver ordre tilhører én kunde. author_book_publisher.db databasen har en en-til-mange relation i form af forfattere og bøger. Hver forfatter kan skrive mange bøger, men hver bog er skrevet af én forfatter.
Som du så i tabeloprettelsen ovenfor, er implementeringen af disse separate entiteter at placere hver i en databasetabel, en for forfattere og en for bøger. Men hvordan implementeres en-til-mange-forholdet mellem disse to tabeller?
Husk, at hver tabel i en database har et felt, der er udpeget som den primære nøgle for den pågældende tabel. Hver tabel ovenfor har et primært nøglefelt navngivet ved hjælp af dette mønster:<table name>_id .
book tabel vist ovenfor indeholder et felt, author_id , der refererer til author bord. author_id felt etablerer et en-til-mange forhold mellem forfattere og bøger, der ser sådan ud:
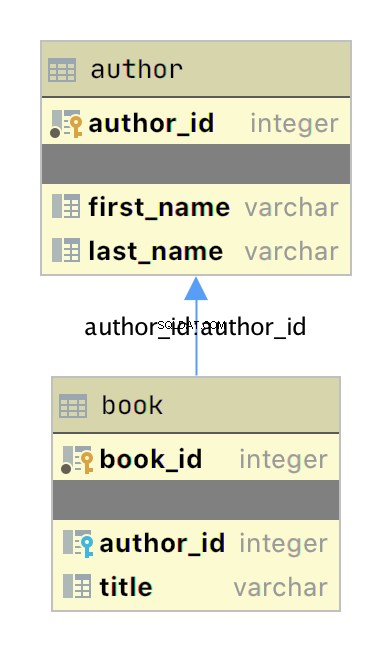
Diagrammet ovenfor er et simpelt entity-relationship diagram (ERD) oprettet med JetBrains DataGrip-applikationen, der viser tabellerne author og book som bokse med deres respektive primære nøgle- og datafelter. To grafiske elementer tilføjer information om forholdet:
-
De små gule og blå nøgleikoner angiver henholdsvis primær- og fremmednøgler for tabellen.
-
Pilen, der forbinder
booktilauthorangiver forholdet mellem tabellerne baseret påauthor_idfremmednøgle ibooktabel.
Når du tilføjer en ny bog til book tabel, indeholder dataene en author_id værdi for en eksisterende forfatter i author bord. På denne måde har alle bøger skrevet af en forfatter et opslagsforhold tilbage til den unikke forfatter.
Nu hvor du har separate tabeller for forfattere og bøger, hvordan bruger du så forholdet mellem dem? SQL understøtter det, der kaldes en JOIN operation, som du kan bruge til at fortælle databasen, hvordan man forbinder to eller flere tabeller.
SQL-forespørgslen nedenfor forbinder author og book tabel sammen ved hjælp af SQLite-kommandolinjeapplikationen:
sqlite> SELECT
   ...> a.first_name || ' ' || a.last_name AS author_name,
   ...> b.title AS book_title
   ...> FROM author a
   ...> JOIN book b ON b.author_id = a.author_id
   ...> ORDER BY a.last_name ASC;
Isaac Asimov|Foundation
Pearl Buck|The Good Earth
Tom Clancy|The Hunt For Red October
Tom Clancy|Patriot Games
Stephen King|It
Stephen King|Dead Zone
Stephen King|The Shining
John Le Carre|Tinker, Tailor, Soldier, Spy: A George Smiley Novel
Alex Michaelides|The Silent Patient
Carol Shaben|Into The Abyss
SQL-forespørgslen ovenfor indsamler information fra både forfatter- og bogtabellen ved at forbinde tabellerne ved hjælp af forholdet etableret mellem de to. SQL-strengsammenkædning tildeler forfatterens fulde navn til aliasset author_name . Dataene indsamlet af forespørgslen er sorteret i stigende rækkefølge efter last_name felt.
Der er et par ting at bemærke i SQL-sætningen. For det første præsenteres forfattere med deres fulde navne i en enkelt kolonne og sorteret efter deres efternavne. Desuden optræder forfattere i outputtet flere gange på grund af en-til-mange-forholdet. En forfatters navn duplikeres for hver bog, de har skrevet i databasen.
Ved at oprette separate tabeller for forfattere og bøger og etablere forholdet mellem dem, har du reduceret redundans i dataene. Nu skal du kun redigere en forfatters data ét sted, og den ændring vises i enhver SQL-forespørgsel, der får adgang til dataene.
Mange-til-mange forhold
Mange-til-mange relationer findes i author_book_publisher.db database mellem forfattere og forlag samt mellem bøger og forlag. Én forfatter kan arbejde med mange forlag, og ét forlag kan arbejde med mange forfattere. På samme måde kan én bog udgives af mange forlag, og ét forlag kan udgive mange bøger.
Håndtering af denne situation i databasen er mere involveret end et en-til-mange forhold, fordi forholdet går begge veje. Many-to-many relationships are created by an association table acting as a bridge between the two related tables.
The association table contains at least two foreign key fields, which are the primary keys of each of the two associated tables. This SQL statement creates the association table relating the author and publisher tables:
CREATE TABLE author_publisher (
    author_id INTEGER REFERENCES author,
    publisher_id INTEGER REFERENCES publisher
);
The SQL statements create a new author_publisher table referencing the primary keys of the existing author and publisher tabeller. The author_publisher table is an association table establishing relationships between an author and a publisher.
Because the relationship is between two primary keys, there’s no need to create a primary key for the association table itself. The combination of the two related keys creates a unique identifier for a row of data.
As before, you use the JOIN keyword to connect two tables together. Connecting the author table to the publisher table is a two-step process:
JOINtheauthortable with theauthor_publisherbord.JOINtheauthor_publishertable with thepublishertable.
The author_publisher association table provides the bridge through which the JOIN connects the two tables. Here’s an example SQL query returning a list of authors and the publishers publishing their books:
 1sqlite> SELECT
 2   ...> a.first_name || ' ' || a.last_name AS author_name,
 3   ...> p.name AS publisher_name
 4   ...> FROM author a
 5   ...> JOIN author_publisher ap ON ap.author_id = a.author_id
 6   ...> JOIN publisher p ON p.publisher_id = ap.publisher_id
 7   ...> ORDER BY a.last_name ASC;
 8Isaac Asimov|Random House
 9Pearl Buck|Random House
10Pearl Buck|Simon & Schuster
11Tom Clancy|Berkley
12Tom Clancy|Simon & Schuster
13Stephen King|Random House
14Stephen King|Penguin Random House
15John Le Carre|Berkley
16Alex Michaelides|Simon & Schuster
17Carol Shaben|Simon & Schuster
The statements above perform the following actions:
-
Line 1 starts a
SELECTstatement to get data from the database. -
Line 2 selects the first and last name from the
authortable using theaalias for theauthortable and concatenates them together with a space character. -
Line 3 selects the publisher’s name aliased to
publisher_name. -
Line 4 uses the
authortable as the first source from which to retrieve data and assigns it to the aliasa. -
Line 5 is the first step of the process outlined above for connecting the
authortable to thepublisherbord. It uses the aliasapfor theauthor_publisherassociation table and performs aJOINoperation to connect theap.author_idforeign key reference to thea.author_idprimary key in theauthortabel. -
Line 6 is the second step in the two-step process mentioned above. It uses the alias
pfor thepublishertable and performs aJOINoperation to relate theap.publisher_idforeign key reference to thep.publisher_idprimary key in thepublishertabel. -
Line 7 sorts the data by the author’s last name in ascending alphabetical order and ends the SQL query.
-
Lines 8 to 17 are the output of the SQL query.
Note that the data in the source author and publisher tables are normalized, with no data duplication. Yet the returned results have duplicated data where necessary to answer the SQL query.
The SQL query above demonstrates how to make use of a relationship using the SQL JOIN keyword, but the resulting data is a partial re-creation of the author_book_publisher.csv CSV data. What’s the win for having done the work of creating a database to separate the data?
Here’s another SQL query to show a little bit of the power of SQL and the database engine:
 1sqlite> SELECT
 2   ...> a.first_name || ' ' || a.last_name AS author_name,
 3   ...> COUNT(b.title) AS total_books
 4   ...> FROM author a
 5   ...> JOIN book b ON b.author_id = a.author_id
 6   ...> GROUP BY author_name
 7   ...> ORDER BY total_books DESC, a.last_name ASC;
 8Stephen King|3
 9Tom Clancy|2
10Isaac Asimov|1
11Pearl Buck|1
12John Le Carre|1
13Alex Michaelides|1
14Carol Shaben|1
The SQL query above returns the list of authors and the number of books they’ve written. The list is sorted first by the number of books in descending order, then by the author’s name in alphabetical order:
-
Line 1 begins the SQL query with the
SELECTkeyword. -
Line 2 selects the author’s first and last names, separated by a space character, and creates the alias
author_name. -
Line 3 counts the number of books written by each author, which will be used later by the
ORDER BYclause to sort the list. -
Line 4 selects the
authortable to get data from and creates theaalias. -
Line 5 connects to the related
booktable through aJOINto theauthor_idand creates thebalias for thebooktabel. -
Line 6 generates the aggregated author and total number of books data by using the
GROUP BYsøgeord.GROUP BYis what groups eachauthor_nameand controls what books are tallied byCOUNT()for that author. -
Line 7 sorts the output first by number of books in descending order, then by the author’s last name in ascending alphabetical order.
-
Lines 8 to 14 are the output of the SQL query.
In the above example, you take advantage of SQL to perform aggregation calculations and sort the results into a useful order. Having the database perform calculations based on its built-in data organization ability is usually faster than performing the same kinds of calculations on raw data sets in Python. SQL offers the advantages of using set theory embedded in RDBMS databases.
Entity Relationship Diagrams
An entity-relationship diagram (ERD) is a visual depiction of an entity-relationship model for a database or part of a database. The author_book_publisher.db SQLite database is small enough that the entire database can be visualized by the diagram shown below:
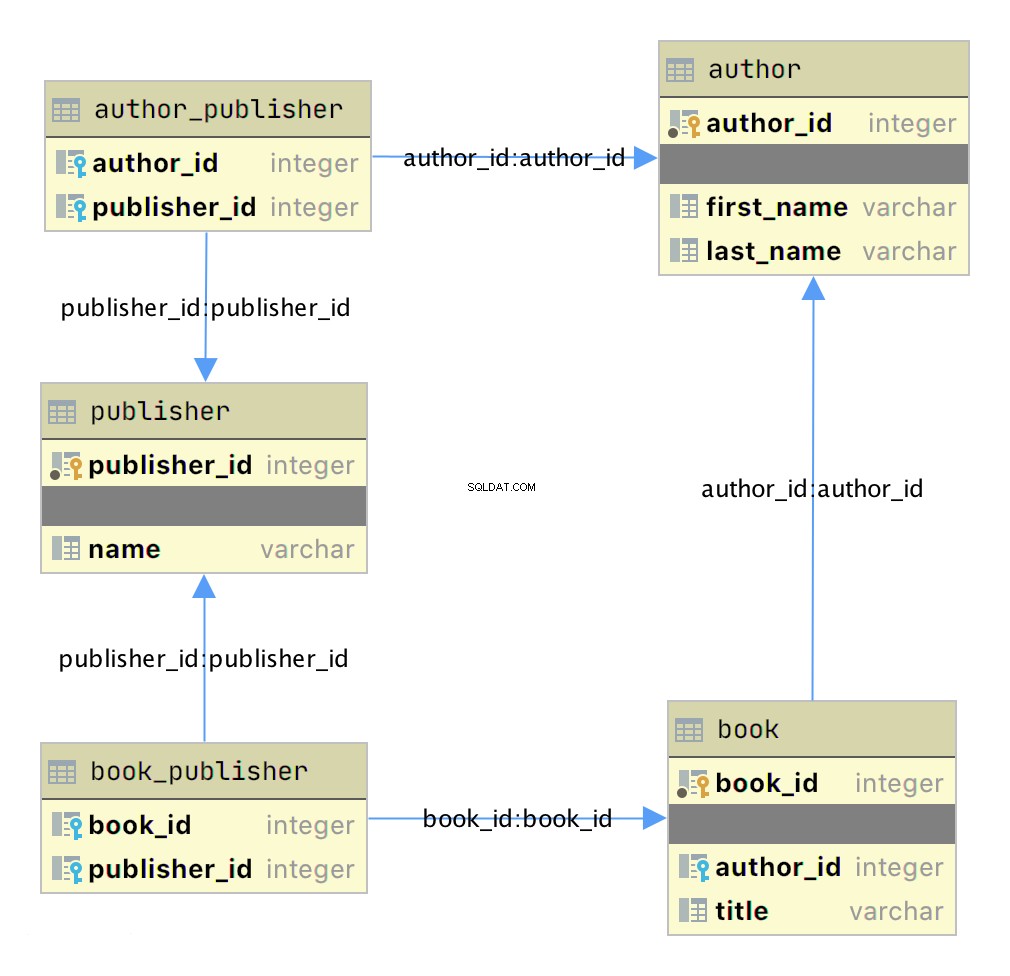
This diagram presents the table structures in the database and the relationships between them. Each box represents a table and contains the fields defined in the table, with the primary key indicated first if it exists.
The arrows show the relationships between the tables connecting a foreign key field in one table to a field, often the primary key, in another table. The table book_publisher has two arrows, one connecting it to the book table and another connecting it to the publisher bord. The arrow indicates the many-to-many relationship between the book and publisher tabeller. The author_publisher table provides the same relationship between author and publisher .
Working With SQLAlchemy and Python Objects
SQLAlchemy is a powerful database access tool kit for Python, with its object-relational mapper (ORM) being one of its most famous components, and the one discussed and used here.
When you’re working in an object-oriented language like Python, it’s often useful to think in terms of objects. It’s possible to map the results returned by SQL queries to objects, but doing so works against the grain of how the database works. Sticking with the scalar results provided by SQL works against the grain of how Python developers work. This problem is known as object-relational impedance mismatch.
The ORM provided by SQLAlchemy sits between the SQLite database and your Python program and transforms the data flow between the database engine and Python objects. SQLAlchemy allows you to think in terms of objects and still retain the powerful features of a database engine.
The Model
One of the fundamental elements to enable connecting SQLAlchemy to a database is creating a model . The model is a Python class defining the data mapping between the Python objects returned as a result of a database query and the underlying database tables.
The entity-relationship diagram displayed earlier shows boxes connected with arrows. The boxes are the tables built with the SQL commands and are what the Python classes will model. The arrows are the relationships between the tables.
The models are Python classes inheriting from an SQLAlchemy Base klasse. The Base class provides the interface operations between instances of the model and the database table.
Below is the models.py file that creates the models to represent the author_book_publisher.db database:
 1from sqlalchemy import Column, Integer, String, ForeignKey, Table
 2from sqlalchemy.orm import relationship, backref
 3from sqlalchemy.ext.declarative import declarative_base
 4
 5Base = declarative_base()
 6
 7author_publisher = Table(
 8    "author_publisher",
 9    Base.metadata,
10    Column("author_id", Integer, ForeignKey("author.author_id")),
11    Column("publisher_id", Integer, ForeignKey("publisher.publisher_id")),
12)
13
14book_publisher = Table(
15    "book_publisher",
16    Base.metadata,
17    Column("book_id", Integer, ForeignKey("book.book_id")),
18    Column("publisher_id", Integer, ForeignKey("publisher.publisher_id")),
19)
20
21class Author(Base):
22    __tablename__ = "author"
23    author_id = Column(Integer, primary_key=True)
24    first_name = Column(String)
25    last_name = Column(String)
26    books = relationship("Book", backref=backref("author"))
27    publishers = relationship(
28        "Publisher", secondary=author_publisher, back_populates="authors"
29    )
30
31class Book(Base):
32    __tablename__ = "book"
33    book_id = Column(Integer, primary_key=True)
34    author_id = Column(Integer, ForeignKey("author.author_id"))
35    title = Column(String)
36    publishers = relationship(
37        "Publisher", secondary=book_publisher, back_populates="books"
38    )
39
40class Publisher(Base):
41    __tablename__ = "publisher"
42    publisher_id = Column(Integer, primary_key=True)
43    name = Column(String)
44    authors = relationship(
45        "Author", secondary=author_publisher, back_populates="publishers"
46    )
47    books = relationship(
48        "Book", secondary=book_publisher, back_populates="publishers"
49    )
Here’s what’s going on in this module:
-
Line 1 imports the
Column,Integer,String,ForeignKey, andTableclasses from SQLAlchemy, which are used to help define the model attributes. -
Line 2 imports the
relationship()andbackrefobjects, which are used to create the relationships between objects. -
Line 3 imports the
declarative_baseobject, which connects the database engine to the SQLAlchemy functionality of the models. -
Line 5 creates the
Baseclass, which is what all models inherit from and how they get SQLAlchemy ORM functionality. -
Lines 7 to 12 create the
author_publisherassociation table model. -
Lines 14 to 19 create the
book_publisherassociation table model. -
Lines 21 to 29 define the
Authorclass model to theauthordatabase table. -
Lines 31 to 38 define the
Bookclass model to thebookdatabase table. -
Lines 40 to 49 define the
Publisherclass model to thepublisherdatabase table.
The description above shows the mapping of the five tables in the author_book_publisher.db database. But it glosses over some SQLAlchemy ORM features, including Table , ForeignKey , relationship() , and backref . Let’s get into those now.
Table Creates Associations
author_publisher and book_publisher are both instances of the Table class that create the many-to-many association tables used between the author and publisher tables and the book and publisher tables, respectively.
The SQLAlchemy Table class creates a unique instance of an ORM mapped table within the database. The first parameter is the table name as defined in the database, and the second is Base.metadata , which provides the connection between the SQLAlchemy functionality and the database engine.
The rest of the parameters are instances of the Column class defining the table fields by name, their type, and in the example above, an instance of a ForeignKey .
ForeignKey Creates a Connection
The SQLAlchemy ForeignKey class defines a dependency between two Column fields in different tables. A ForeignKey is how you make SQLAlchemy aware of the relationships between tables. For example, this line from the author_publisher instance creation establishes a foreign key relationship:
Column("author_id", Integer, ForeignKey("author.author_id"))
The statement above tells SQLAlchemy that there’s a column in the author_publisher table named author_id . The type of that column is Integer , and author_id is a foreign key related to the primary key in the author tabel.
Having both author_id and publisher_id defined in the author_publisher Table instance creates the connection from the author table to the publisher table and vice versa, establishing a many-to-many relationship.
relationship() Establishes a Collection
Having a ForeignKey defines the existence of the relationship between tables but not the collection of books an author can have. Take a look at this line in the Author class definition:
books = relationship("Book", backref=backref("author"))
The code above defines a parent-child collection. The books attribute being plural (which is not a requirement, just a convention) is an indication that it’s a collection.
The first parameter to relationship() , the class name Book (which is not the table name book ), is the class to which the books attribute is related. The relationship informs SQLAlchemy that there’s a relationship between the Author and Book classes. SQLAlchemy will find the relationship in the Book class definition:
author_id = Column(Integer, ForeignKey("author.author_id"))
SQLAlchemy recognizes that this is the ForeignKey connection point between the two classes. You’ll get to the backref parameter in relationship() in a moment.
The other relationship in Author is to the Publisher klasse. This is created with the following statement in the Author class definition:
publishers = relationship(
    "Publisher", secondary=author_publisher, back_populates="authors"
)
Like books , the attribute publishers indicates a collection of publishers associated with an author. The first parameter, "Publisher" , informs SQLAlchemy what the related class is. The second and third parameters are secondary=author_publisher and back_populates="authors" :
-
secondarytells SQLAlchemy that the relationship to thePublisherclass is through a secondary table, which is theauthor_publisherassociation table created earlier inmodels.py. Thesecondaryparameter makes SQLAlchemy find thepublisher_idForeignKeydefined in theauthor_publisherassociation table. -
back_populatesis a convenience configuration telling SQLAlchemy that there’s a complementary collection in thePublisherclass calledauthors.
backref Mirrors Attributes
The backref parameter of the books collection relationship() creates an author attribute for each Book instance. This attribute refers to the parent Author that the Book instance is related to.
For example, if you executed the following Python code, then a Book instance would be returned from the SQLAlchemy query. The Book instance has attributes that can be used to print out information about the book:
book = session.query(Book).filter_by(Book.title == "The Stand").one_or_none()
print(f"Authors name: {book.author.first_name} {book.author.last_name}")
The existence of the author attribute in the Book above is because of the backref definition. A backref can be very handy to have when you need to refer to the parent and all you have is a child instance.
Queries Answer Questions
You can make a basic query like SELECT * FROM author; in SQLAlchemy like this:
results = session.query(Author).all()
The session is an SQLAlchemy object used to communicate with SQLite in the Python example programs. Here, you tell the session you want to execute a query against the Author model and return all records.
At this point, the advantages of using SQLAlchemy instead of plain SQL might not be obvious, especially considering the setup required to create the models representing the database. The results returned by the query is where the magic happens. Instead of getting back a list of lists of scalar data, you’ll get back a list of instances of Author objects with attributes matching the column names you defined.
The books and publishers collections maintained by SQLAlchemy create a hierarchical list of authors and the books they’ve written as well as the publishers who’ve published them.
Behind the scenes, SQLAlchemy turns the object and method calls into SQL statements to execute against the SQLite database engine. SQLAlchemy transforms the data returned by SQL queries into Python objects.
With SQLAlchemy, you can perform the more complex aggregation query shown earlier for the list of authors and the number of books they’ve written like this:
author_book_totals = (
    session.query(
        Author.first_name,
        Author.last_name,
        func.count(Book.title).label("book_total")
    )
    .join(Book)
    .group_by(Author.last_name)
    .order_by(desc("book_total"))
    .all()
)
The query above gets the author’s first and last name, along with a count of the number of books that the author has written. The aggregating count used by the group_by clause is based on the author’s last name. Finally, the results are sorted in descending order based on the aggregated and aliased book_total .
Example Program
The example program examples/example_2/main.py has the same functionality as examples/example_1/main.py but uses SQLAlchemy exclusively to interface with the author_book_publisher.db SQLite database. The program is broken up into the main() function and the functions it calls:
 1def main():
 2    """Main entry point of program"""
 3    # Connect to the database using SQLAlchemy
 4    with resources.path(
 5        "project.data", "author_book_publisher.db"
 6    ) as sqlite_filepath:
 7        engine = create_engine(f"sqlite:///{sqlite_filepath}")
 8    Session = sessionmaker()
 9    Session.configure(bind=engine)
10    session = Session()
11
12    # Get the number of books printed by each publisher
13    books_by_publisher = get_books_by_publishers(session, ascending=False)
14    for row in books_by_publisher:
15        print(f"Publisher: {row.name}, total books: {row.total_books}")
16    print()
17
18    # Get the number of authors each publisher publishes
19    authors_by_publisher = get_authors_by_publishers(session)
20    for row in authors_by_publisher:
21        print(f"Publisher: {row.name}, total authors: {row.total_authors}")
22    print()
23
24    # Output hierarchical author data
25    authors = get_authors(session)
26    output_author_hierarchy(authors)
27
28    # Add a new book
29    add_new_book(
30        session,
31        author_name="Stephen King",
32        book_title="The Stand",
33        publisher_name="Random House",
34    )
35    # Output the updated hierarchical author data
36    authors = get_authors(session)
37    output_author_hierarchy(authors)
This program is a modified version of examples/example_1/main.py . Let’s go over the differences:
-
Lines 4 to 7 first initialize the
sqlite_filepathvariable to the database file path. Then they create theenginevariable to communicate with SQLite and theauthor_book_publisher.dbdatabase file, which is SQLAlchemy’s access point to the database. -
Line 8 creates the
Sessionclass from the SQLAlchemy’ssessionmaker(). -
Line 9 binds the
Sessionto the engine created in line 8. -
Line 10 creates the
sessioninstance, which is used by the program to communicate with SQLAlchemy.
The rest of the function is similar, except for the replacement of data with session as the first parameter to all the functions called by main() .
get_books_by_publisher() has been refactored to use SQLAlchemy and the models you defined earlier to get the data requested:
 1def get_books_by_publishers(session, ascending=True):
 2    """Get a list of publishers and the number of books they've published"""
 3    if not isinstance(ascending, bool):
 4        raise ValueError(f"Sorting value invalid: {ascending}")
 5
 6    direction = asc if ascending else desc
 7
 8    return (
 9        session.query(
10            Publisher.name, func.count(Book.title).label("total_books")
11        )
12        .join(Publisher.books)
13        .group_by(Publisher.name)
14        .order_by(direction("total_books"))
15    )
Here’s what the new function, get_books_by_publishers() , is doing:
-
Line 6 creates the
directionvariable and sets it equal to the SQLAlchemydescorascfunction depending on the value of theascendingparameter. -
Lines 9 to 11 query the
Publishertable for data to return, which in this case arePublisher.nameand the aggregate total ofBookobjects associated with an author, aliased tototal_books. -
Line 12 joins to the
Publisher.bookssamling. -
Line 13 aggregates the book counts by the
Publisher.nameattribute. -
Line 14 sorts the output by the book counts according to the operator defined by
direction. -
Line 15 closes the object, executes the query, and returns the results to the caller.
All the above code expresses what is wanted rather than how it’s to be retrieved. Now instead of using SQL to describe what’s wanted, you’re using Python objects and methods. What’s returned is a list of Python objects instead of a list of tuples of data.
get_authors_by_publisher() has also been modified to work exclusively with SQLAlchemy. Its functionality is very similar to the previous function, so a function description is omitted:
def get_authors_by_publishers(session, ascending=True):
    """Get a list of publishers and the number of authors they've published"""
    if not isinstance(ascending, bool):
        raise ValueError(f"Sorting value invalid: {ascending}")

    direction = asc if ascending else desc

    return (
        session.query(
            Publisher.name,
            func.count(Author.first_name).label("total_authors"),
        )
        .join(Publisher.authors)
        .group_by(Publisher.name)
        .order_by(direction("total_authors"))
    )
get_authors() has been added to get a list of authors sorted by their last names. The result of this query is a list of Author objects containing a collection of books. The Author objects already contain hierarchical data, so the results don’t have to be reformatted:
def get_authors(session):
    """Get a list of author objects sorted by last name"""
    return session.query(Author).order_by(Author.last_name).all()
Like its previous version, add_new_book() is relatively complex but straightforward to understand. It determines if a book with the same title, author, and publisher exists in the database already.
If the search query finds an exact match, then the function returns. If no book matches the exact search criteria, then it searches to see if the author has written a book using the passed in title. This code exists to prevent duplicate books from being created in the database.
If no matching book exists, and the author hasn’t written one with the same title, then a new book is created. The function then retrieves or creates an author and publisher. Once instances of the Book , Author and Publisher exist, the relationships between them are created, and the resulting information is saved to the database:
 1def add_new_book(session, author_name, book_title, publisher_name):
 2    """Adds a new book to the system"""
 3    # Get the author's first and last names
 4    first_name, _, last_name = author_name.partition(" ")
 5
 6    # Check if book exists
 7    book = (
 8        session.query(Book)
 9        .join(Author)
10        .filter(Book.title == book_title)
11        .filter(
12            and_(
13                Author.first_name == first_name, Author.last_name == last_name
14            )
15        )
16        .filter(Book.publishers.any(Publisher.name == publisher_name))
17        .one_or_none()
18    )
19    # Does the book by the author and publisher already exist?
20    if book is not None:
21        return
22
23    # Get the book by the author
24    book = (
25        session.query(Book)
26        .join(Author)
27        .filter(Book.title == book_title)
28        .filter(
29            and_(
30                Author.first_name == first_name, Author.last_name == last_name
31            )
32        )
33        .one_or_none()
34    )
35    # Create the new book if needed
36    if book is None:
37        book = Book(title=book_title)
38
39    # Get the author
40    author = (
41        session.query(Author)
42        .filter(
43            and_(
44                Author.first_name == first_name, Author.last_name == last_name
45            )
46        )
47        .one_or_none()
48    )
49    # Do we need to create the author?
50    if author is None:
51        author = Author(first_name=first_name, last_name=last_name)
52        session.add(author)
53
54    # Get the publisher
55    publisher = (
56        session.query(Publisher)
57        .filter(Publisher.name == publisher_name)
58        .one_or_none()
59    )
60    # Do we need to create the publisher?
61    if publisher is None:
62        publisher = Publisher(name=publisher_name)
63        session.add(publisher)
64
65    # Initialize the book relationships
66    book.author = author
67    book.publishers.append(publisher)
68    session.add(book)
69
70    # Commit to the database
71    session.commit()
The code above is relatively long. Let’s break the functionality down to manageable sections:
-
Lines 7 to 18 set the
bookvariable to an instance of aBookif a book with the same title, author, and publisher is found. Otherwise, they setbooktoNone. -
Lines 20 and 21 determine if the book already exists and return if it does.
-
Lines 24 to 37 set the
bookvariable to an instance of aBookif a book with the same title and author is found. Otherwise, they create a newBookeksempel. -
Lines 40 to 52 set the
authorvariable to an existing author, if found, or create a newAuthorinstance based on the passed-in author name. -
Lines 55 to 63 set the
publishervariable to an existing publisher, if found, or create a newPublisherinstance based on the passed-in publisher name. -
Line 66 sets the
book.authorinstance to theauthorinstance. This creates the relationship between the author and the book, which SQLAlchemy will create in the database when the session is committed. -
Line 67 adds the
publisherinstance to thebook.publisherskollektion. This creates the many-to-many relationship between thebookandpublishertabeller. SQLAlchemy will create references in the tables as well as in thebook_publisherassociation table that connects the two. -
Line 68 adds the
Bookinstance to the session, making it part of the session’s unit of work. -
Line 71 commits all the creations and updates to the database.
There are a few things to take note of here. First, there’s is no mention of the author_publisher or book_publisher association tables in either the queries or the creations and updates. Because of the work you did in models.py setting up the relationships, SQLAlchemy can handle connecting objects together and keeping those tables in sync during creations and updates.
Second, all the creations and updates happen within the context of the session objekt. None of that activity is touching the database. Only when the session.commit() statement executes does the session then go through its unit of work and commit that work to the database.
For example, if a new Book instance is created (as in line 37 above), then the book has its attributes initialized except for the book_id primary key and author_id foreign key. Because no database activity has happened yet, the book_id is unknown, and nothing was done in the instantiation of book to give it an author_id .
When session.commit() is executed, one of the things it will do is insert book into the database, at which point the database will create the book_id primary key. The session will then initialize the book.book_id value with the primary key value created by the database engine.
session.commit() is also aware of the insertion of the Book instance in the author.books kollektion. The author object’s author_id primary key will be added to the Book instance appended to the author.books collection as the author_id foreign key.
Providing Access to Multiple Users
To this point, you’ve seen how to use pandas, SQLite, and SQLAlchemy to access the same data in different ways. For the relatively straightforward use case of the author, book, and publisher data, it could still be a toss-up whether you should use a database.
One deciding factor when choosing between using a flat file or a database is data and relationship complexity. If the data for each entity is complicated and contains many relationships between the entities, then creating and maintaining it in a flat file might become more difficult.
Another factor to consider is whether you want to share the data between multiple users. The solution to this problem might be as simple as using a sneakernet to physically move data between users. Moving data files around this way has the advantage of ease of use, but the data can quickly get out of sync when changes are made.
The problem of keeping the data consistent for all users becomes even more difficult if the users are remote and want to access the data across networks. Even when you’re limited to a single language like Python and using pandas to access the data, network file locking isn’t sufficient to ensure the data doesn’t get corrupted.
Providing the data through a server application and a user interface alleviates this problem. The server is the only application that needs file-level access to the database. By using a database, the server can take advantage of SQL to access the data using a consistent interface no matter what programming language the server uses.
The last example program demonstrates this by providing a web application and user interface to the Chinook sample SQLite database. Peter Stark generously maintains the Chinook database as part of the SQLite Tutorial site. If you’d like to learn more about SQLite and SQL in general, then the site is a great resource.
The Chinook database provides artist, music, and playlist information along the lines of a simplified Spotify. The database is part of the example code project in the project/data mappe.
Using Flask With Python, SQLite, and SQLAlchemy
The examples/example_3/chinook_server.py program creates a Flask application that you can interact with using a browser. The application makes use of the following technologies:
-
Flask Blueprint is part of Flask and provides a good way to follow the separation of concerns design principle and create distinct modules to contain functionality.
-
Flask SQLAlchemy is an extension for Flask that adds support for SQLAlchemy in your web applications.
-
Flask_Bootstrap4 packages the Bootstrap front-end tool kit, integrating it with your Flask web applications.
-
Flask_WTF extends Flask with WTForms, giving your web applications a useful way to generate and validate web forms.
-
python_dotenv is a Python module that an application uses to read environment variables from a file and keep sensitive information out of program code.
Though not necessary for this example, a .env file holds the environment variables for the application. The .env file exists to contain sensitive information like passwords, which you should keep out of your code files. However, the content of the project .env file is shown below since it doesn’t contain any sensitive data:
SECRET_KEY = "you-will-never-guess"
SQLALCHEMY_TRACK_MODIFICATIONS = False
SQLAlCHEMY_ECHO = False
DEBUG = True
The example application is fairly large, and only some of it is relevant to this tutorial. For this reason, examining and learning from the code is left as an exercise for the reader. That said, you can take a look at an animated screen capture of the application below, followed by the HTML that renders the home page and the Python Flask route that provides the dynamic data.
Here’s the application in action, navigating through various menus and features:
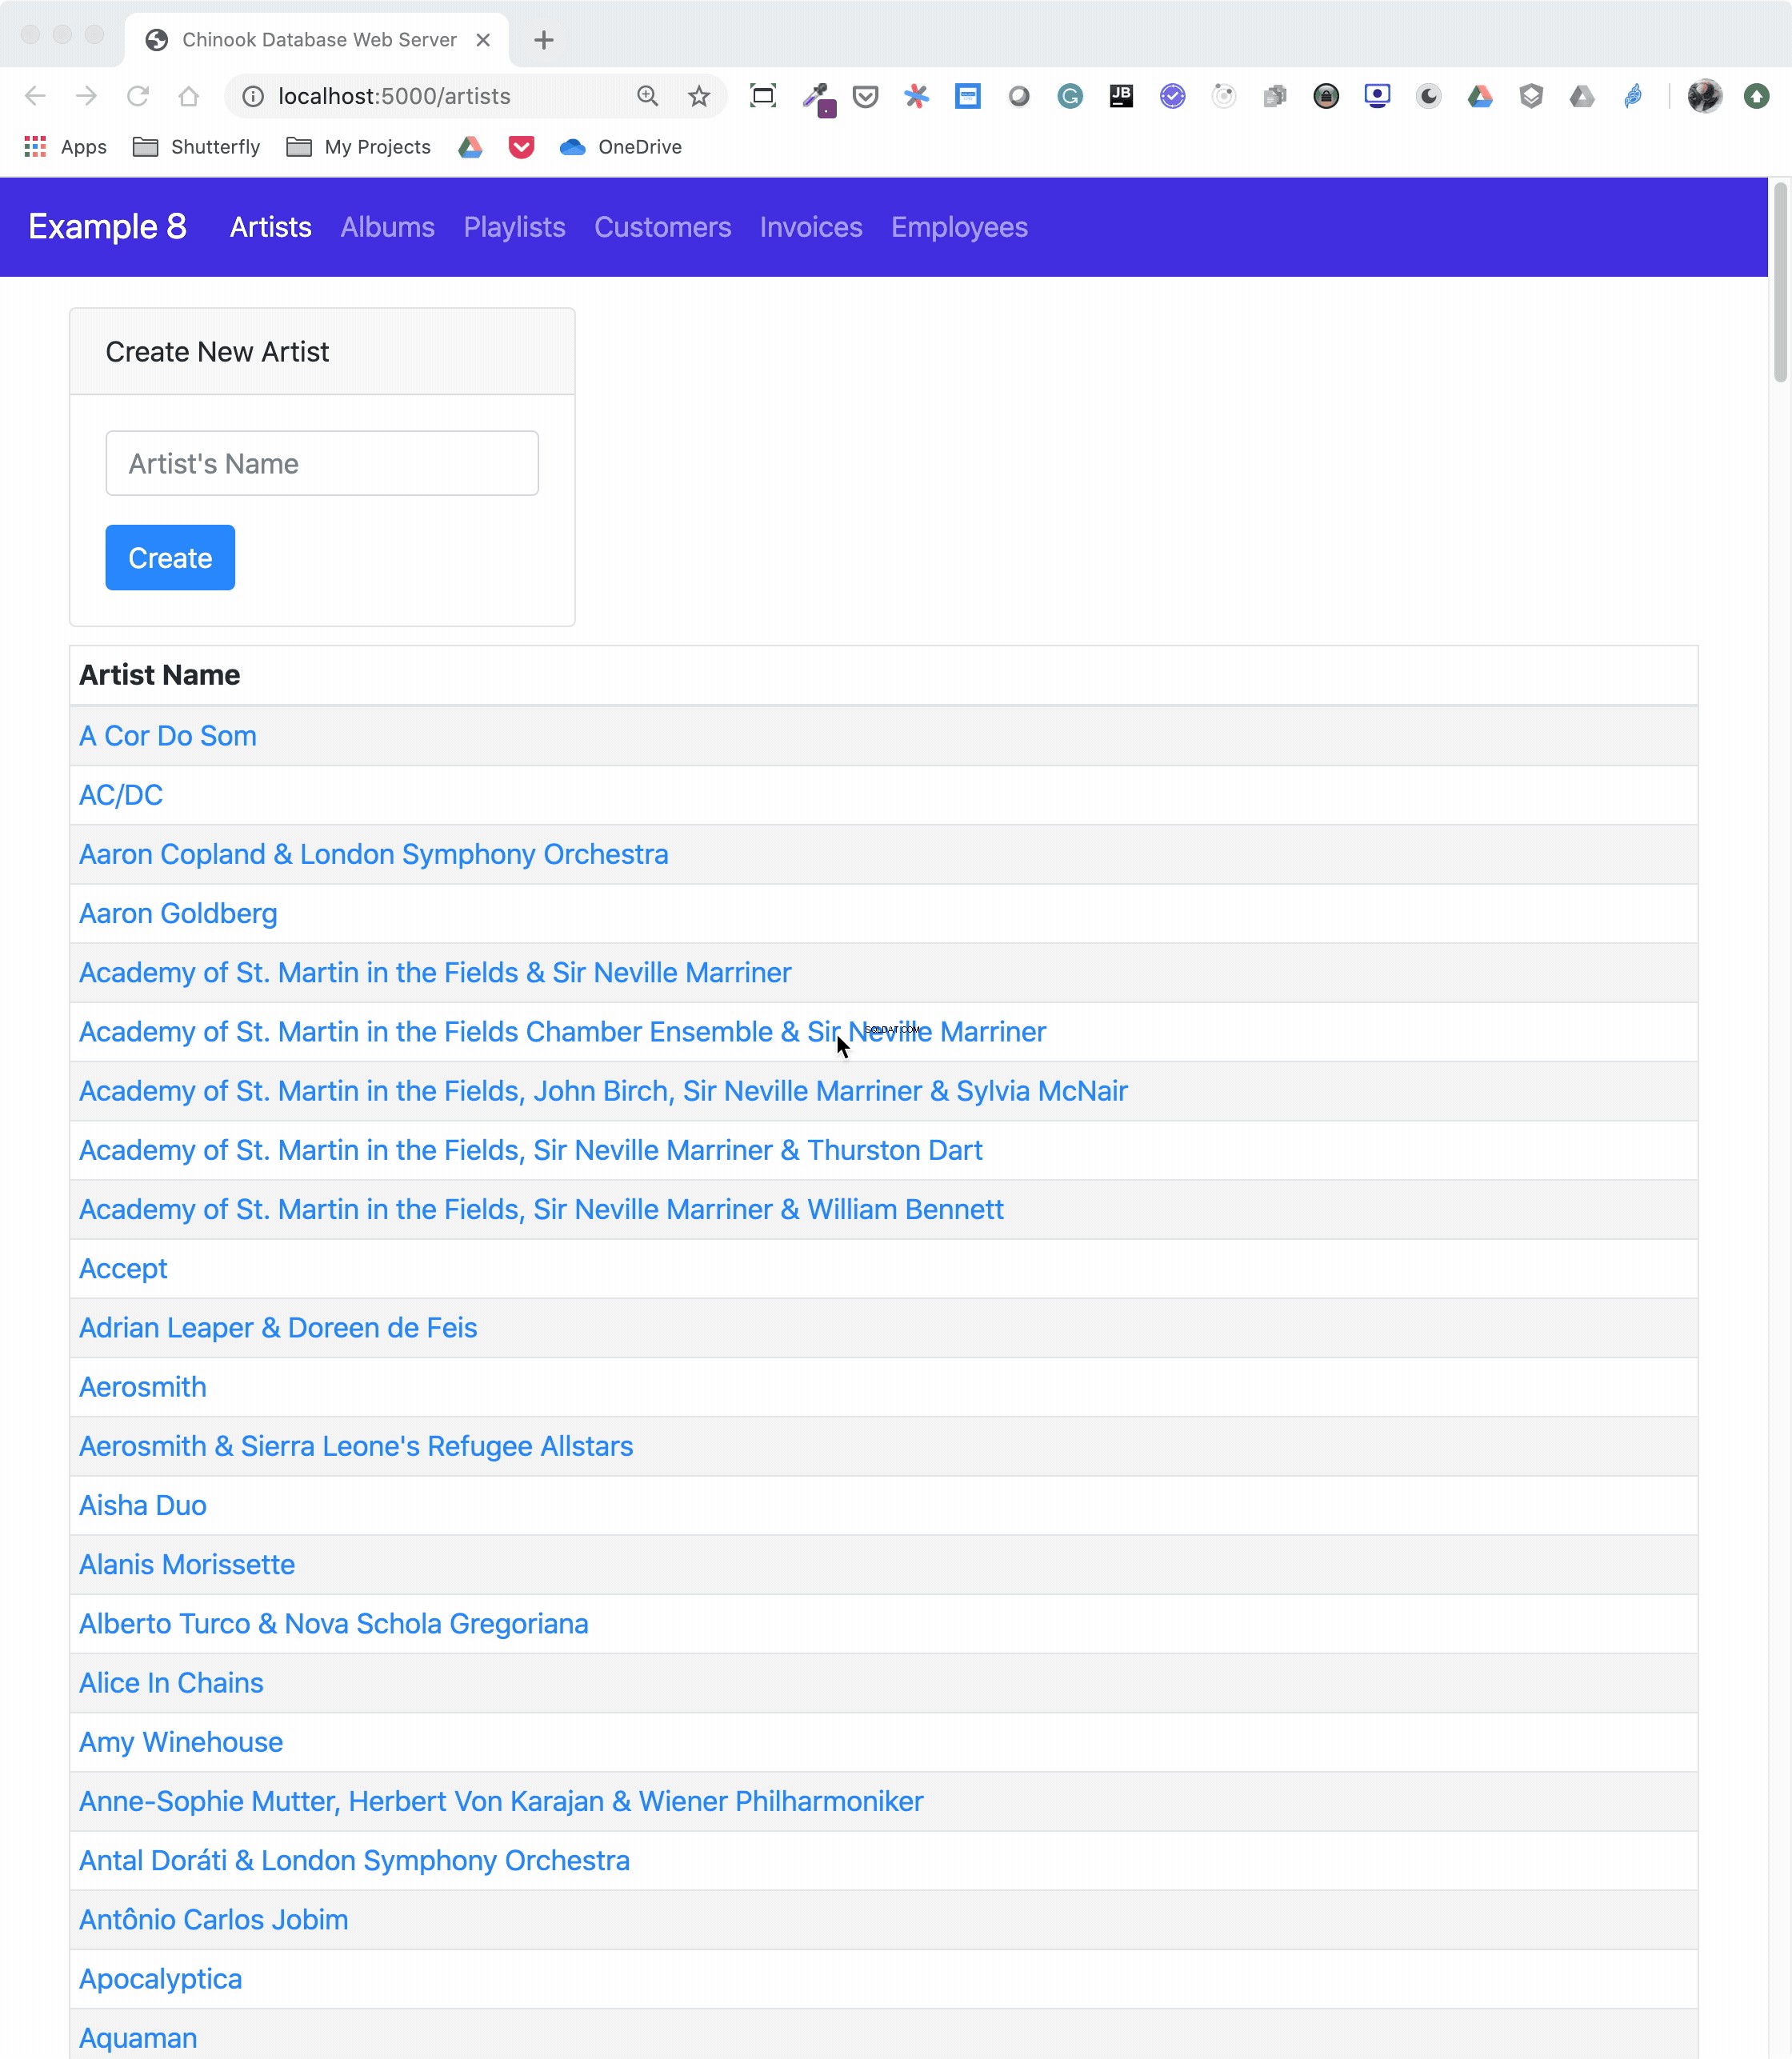
The animated screen capture starts on the application home page, styled using Bootstrap 4. The page displays the artists in the database, sorted in ascending order. The remainder of the screen capture presents the results of clicking on the displayed links or navigating around the application from the top-level menu.
Here’s the Jinja2 HTML template that generates the home page of the application:
 1{% extends "base.html" %}
 2
 3{% block content %}
 4<div class="container-fluid">
 5  <div class="m-4">
 6    <div class="card" style="width: 18rem;">
 7      <div class="card-header">Create New Artist</div>
 8      <div class="card-body">
 9        <form method="POST" action="{{url_for('artists_bp.artists')}}">
10          {{ form.csrf_token }}
11          {{ render_field(form.name, placeholder=form.name.label.text) }}
12          <button type="submit" class="btn btn-primary">Create</button>
13        </form>
14      </div>
15    </div>
16    <table class="table table-striped table-bordered table-hover table-sm">
17      <caption>List of Artists</caption>
18      <thead>
19        <tr>
20          <th>Artist Name</th>
21        </tr>
22      </thead>
23      <tbody>
24        {% for artist in artists %}
25        <tr>
26          <td>
27            <a href="{{url_for('albums_bp.albums', artist_id=artist.artist_id)}}">
28              {{ artist.name }}
29            </a>
30          </td>
31        </tr>
32        {% endfor %}
33      </tbody>
34    </table>
35  </div>
36</div>
37{% endblock %}
Here’s what’s going on in this Jinja2 template code:
-
Line 1 uses Jinja2 template inheritance to build this template from the
base.htmltemplate. Thebase.htmltemplate contains all the HTML5 boilerplate code as well as the Bootstrap navigation bar consistent across all pages of the site. -
Lines 3 to 37 contain the block content of the page, which is incorporated into the Jinja2 macro of the same name in the
base.htmlbase template. -
Lines 9 to 13 render the form to create a new artist. This uses the features of Flask-WTF to generate the form.
-
Lines 24 to 32 create a
forloop that renders the table of artist names. -
Lines 27 to 29 render the artist name as a link to the artist’s album page showing the songs associated with a particular artist.
Here’s the Python route that renders the page:
 1from flask import Blueprint, render_template, redirect, url_for
 2from flask_wtf import FlaskForm
 3from wtforms import StringField
 4from wtforms.validators import InputRequired, ValidationError
 5from app import db
 6from app.models import Artist
 7
 8# Set up the blueprint
 9artists_bp = Blueprint(
10    "artists_bp", __name__, template_folder="templates", static_folder="static"
11)
12
13def does_artist_exist(form, field):
14    artist = (
15        db.session.query(Artist)
16        .filter(Artist.name == field.data)
17        .one_or_none()
18    )
19    if artist is not None:
20        raise ValidationError("Artist already exists", field.data)
21
22class CreateArtistForm(FlaskForm):
23    name = StringField(
24        label="Artist's Name", validators=[InputRequired(), does_artist_exist]
25    )
26
27@artists_bp.route("/")
28@artists_bp.route("/artists", methods=["GET", "POST"])
29def artists():
30    form = CreateArtistForm()
31
32    # Is the form valid?
33    if form.validate_on_submit():
34        # Create new artist
35        artist = Artist(name=form.name.data)
36        db.session.add(artist)
37        db.session.commit()
38        return redirect(url_for("artists_bp.artists"))
39
40    artists = db.session.query(Artist).order_by(Artist.name).all()
41    return render_template("artists.html", artists=artists, form=form,)
Let’s go over what the above code is doing:
-
Lines 1 to 6 import all the modules necessary to render the page and initialize forms with data from the database.
-
Lines 9 to 11 create the blueprint for the artists page.
-
Lines 13 to 20 create a custom validator function for the Flask-WTF forms to make sure a request to create a new artist doesn’t conflict with an already existing artist.
-
Lines 22 to 25 create the form class to handle the artist form rendered in the browser and provide validation of the form field inputs.
-
Lines 27 to 28 connect two routes to the
artists()function they decorate. -
Line 30 creates an instance of the
CreateArtistForm()class. -
Line 33 determines if the page was requested through the HTTP methods GET or POST (submit). If it was a POST, then it also validates the fields of the form and informs the user if the fields are invalid.
-
Lines 35 to 37 create a new artist object, add it to the SQLAlchemy session, and commit the artist object to the database, persisting it.
-
Line 38 redirects back to the artists page, which will be rerendered with the newly created artist.
-
Line 40 runs an SQLAlchemy query to get all the artists in the database and sort them by
Artist.name. -
Line 41 renders the artists page if the HTTP request method was a GET.
You can see that a great deal of functionality is created by a reasonably small amount of code.
Creating a REST API Server
You can also create a web server providing a REST API. This kind of server offers URL endpoints responding with data, often in JSON format. A server providing REST API endpoints can be used by JavaScript single-page web applications through the use of AJAX HTTP requests.
Flask is an excellent tool for creating REST applications. For a multi-part series of tutorials about using Flask, Connexion, and SQLAlchemy to create REST applications, check out Python REST APIs With Flask, Connexion, and SQLAlchemy.
If you’re a fan of Django and are interested in creating REST APIs, then check out Django Rest Framework – An Introduction and Create a Super Basic REST API with Django Tastypie.
Bemærk: It’s reasonable to ask if SQLite is the right choice as the database backend to a web application. The SQLite website states that SQLite is a good choice for sites that serve around 100,000 hits per day. If your site gets more daily hits, the first thing to say is congratulations!
Beyond that, if you’ve implemented your website with SQLAlchemy, then it’s possible to move the data from SQLite to another database such as MySQL or PostgreSQL. For a comparison of SQLite, MySQL, and PostgreSQL that will help you make decisions about which one will serve your application best, check out Introduction to Python SQL Libraries.
It’s well worth considering SQLite for your Python application, no matter what it is. Using a database gives your application versatility, and it might create surprising opportunities to add additional features.
Konklusion
You’ve covered a lot of ground in this tutorial about databases, SQLite, SQL, and SQLAlchemy! You’ve used these tools to move data contained in flat files to an SQLite database, access the data with SQL and SQLAlchemy, and provide that data through a web server.
In this tutorial, you’ve learned:
- Why an SQLite database can be a compelling alternative to flat-file data storage
- How to normalize data to reduce data redundancy and increase data integrity
- How to use SQLAlchemy to work with databases in an object-oriented manner
- How to build a web application to serve a database to multiple users
Working with databases is a powerful abstraction for working with data that adds significant functionality to your Python programs and allows you to ask interesting questions of your data.
You can get all of the code and data you saw in this tutorial at the link below:
Download the sample code: Click here to get the code you’ll use to learn about data management with SQLite and SQLAlchemy in this tutorial.
Further Reading
This tutorial is an introduction to using databases, SQL, and SQLAlchemy, but there’s much more to learn about these subjects. These are powerful, sophisticated tools that no single tutorial can cover adequately. Here are some resources for additional information to expand your skills:
-
If your application will expose the database to users, then avoiding SQL injection attacks is an important skill. For more information, check out Preventing SQL Injection Attacks With Python.
-
Providing web access to a database is common in web-based single-page applications. To learn how, check out Python REST APIs With Flask, Connexion, and SQLAlchemy – Part 2.
-
Preparing for data engineering job interviews gives you a leg up in your career. To get started, check out Data Engineer Interview Questions With Python.
-
Migrating data and being able to roll back using Flask with Postgres and SQLAlchemy is an integral part of the Software Development Life Cycle (SDLC). You can learn more about it by checking out Flask by Example – Setting up Postgres, SQLAlchemy, and Alembic.