Denne vejledning indeholder alle de nødvendige trin for at installere MySQL 8 på Ubuntu 18.04 LTS. De samme trin kunne følges for andre versioner af Ubuntu.
Noter :For at følge dette indlæg skal du helt fjerne den tidligere installation af MySQL-serveren installeret ved hjælp af installationsprogrammet, hvis det allerede er installeret på systemet. Du kan følge Sådan fjerner du MySQL fuldstændigt fra Ubuntu for fuldstændigt at fjerne den tidligere installation udført ved hjælp af installationsprogrammet.
Du kan også være interesseret i andre MySQL-specifikke selvstudier, herunder Sådan installeres MySQL 8 på
Trin 1 - Download MySQL APT Repository
Siden MySQL 8 er ikke inkluderet i de officielle arkiver i Ubuntu 18.04 , vi skal downloade dens Debian-pakke . Den nuværende officielt tilgængelige version af MySQL på Ubuntu 18.04 er 5.7.26 . Brug nedenstående kommando til at downloade det seneste APT-lager.
# Download MySQL APT Repository
wget –c https://dev.mysql.com/get/mysql-apt-config_0.8.13-1_all.deb
Det vil downloade den officielle Debian-pakke for at installere MySQL 8.
Trin 2 - Installer MySQL Repository
Brug nedenstående kommando til at begynde at installere MySQL-depotet ved hjælp af det depot, der blev downloadet af os i det forrige trin.
sudo dpkg -i mysql-apt-config_0.8.13-1_all.deb
Den vil bede om at vælge mellem de tilgængelige muligheder som vist i Fig. 1. Hold standardindstillingen valgt, og tryk på Enter-tasten for at starte installationen.

Fig. 1
På den næste skærm vil installationsprogrammet bede om at vælge den MySQL-version, der skal installeres som vist i Fig. 2. Behold mysql-8 valgt, og tryk på Enter-tasten.
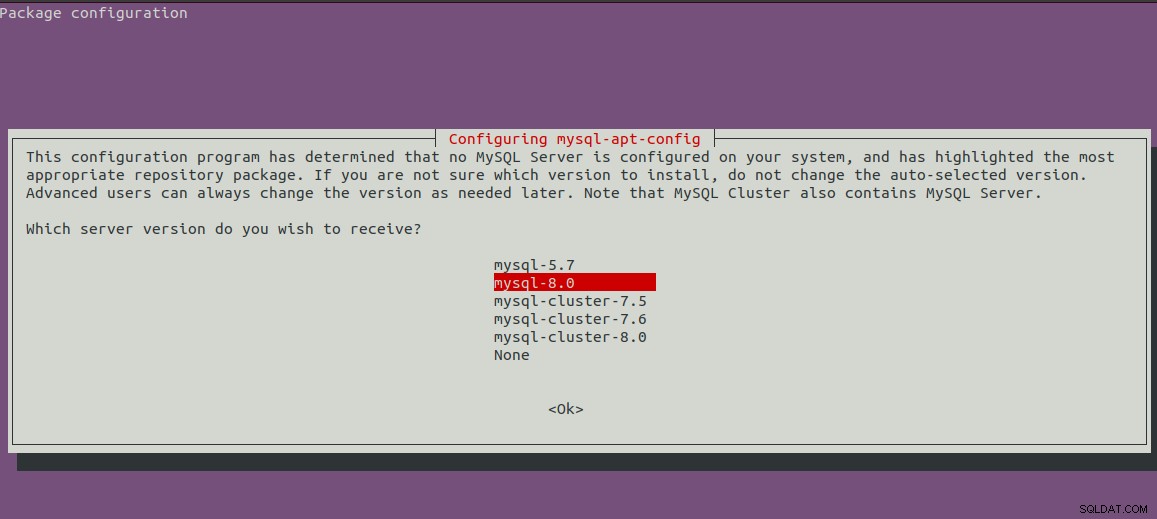
Fig. 2
Det vil vise den første skærm med den valgte version af MySQL. Tryk nu på pil ned-tasten og næste piletast for at gå til OK-indstillingerne som vist i fig. 3.
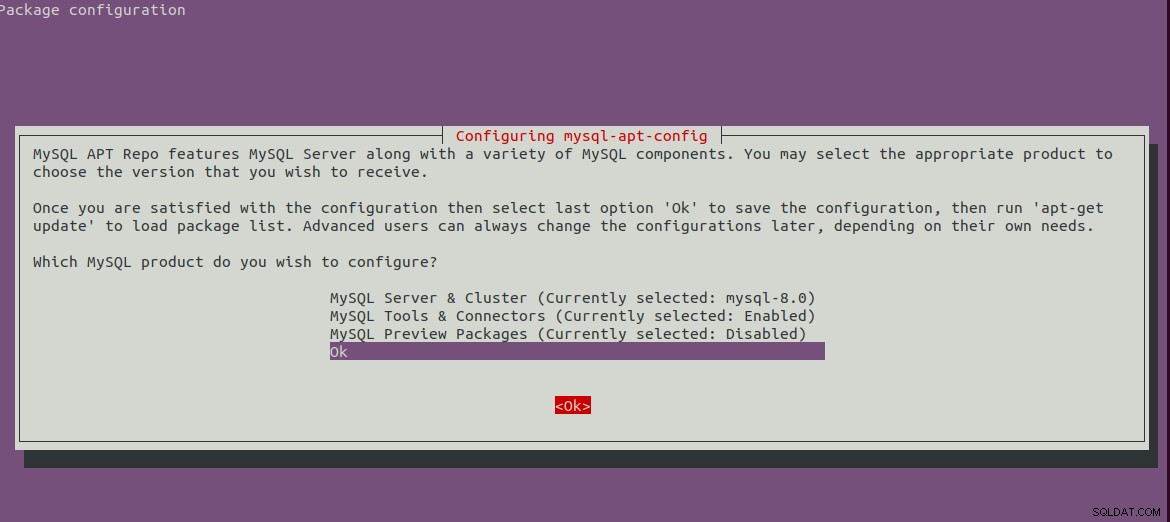
Fig. 3
Tryk på Enter-tasten for at starte installationen. Det vil vise nedenstående meddelelser efter fuldførelse af installationen.
bravo@pc1:/setups/database$ sudo dpkg -i mysql-apt-config_0.8.13-1_all.deb
Selecting previously unselected package mysql-apt-config.
(Reading database ... 200223 files and directories currently installed.)
Preparing to unpack mysql-apt-config_0.8.13-1_all.deb ...
Unpacking mysql-apt-config (0.8.13-1) ...
Setting up mysql-apt-config (0.8.13-1) ...
Warning: apt-key should not be used in scripts (called from postinst maintainerscript of the package mysql-apt-config)
Trin 3 - Opdater systemlagre
Opdater nu systemlagrene ved at bruge kommandoen som nævnt nedenfor.
sudo apt-get update

# It must show MySQL 8 repos
bravo@pc1:/setups/database$ sudo apt-get update
Hit:1 https://repo.mysql.com/apt/ubuntu bionic InRelease
Hit:2 https://in.archive.ubuntu.com/ubuntu bionic InRelease
Hit:3 https://in.archive.ubuntu.com/ubuntu bionic-updates InRelease
Hit:4 https://in.archive.ubuntu.com/ubuntu bionic-backports InRelease
Hit:5 https://security.ubuntu.com/ubuntu bionic-security InRelease
Get:6 https://repo.mysql.com/apt/ubuntu bionic/mysql-8.0 Sources [962 B]
Get:7 https://repo.mysql.com/apt/ubuntu bionic/mysql-8.0 i386 Packages [7,472 B]
Get:8 https://repo.mysql.com/apt/ubuntu bionic/mysql-8.0 amd64 Packages [7,463 B]
Fetched 15.9 kB in 3s (5,556 B/s)
Reading package lists... Done
Det vil opdatere systemcachen for at få opdateringer om de seneste versioner af de tilgængelige pakker.
Trin 4 - Installer MySQL Server
Efter opdatering af systemcachen kan vi begynde at installere MySQL-serveren og klienten ved hjælp af kommandoen som nævnt nedenfor.
# Install MySQL Server 8
sudo apt-get install mysql-server mysql-client
Tryk på Y for at bekræfte og fortsætte med installationen. Med dette bliver MySQL installeret, som vi gør med standardpakken, der er tilgængelig på Ubuntu-lagre. Installationen vil også bede om at vælge
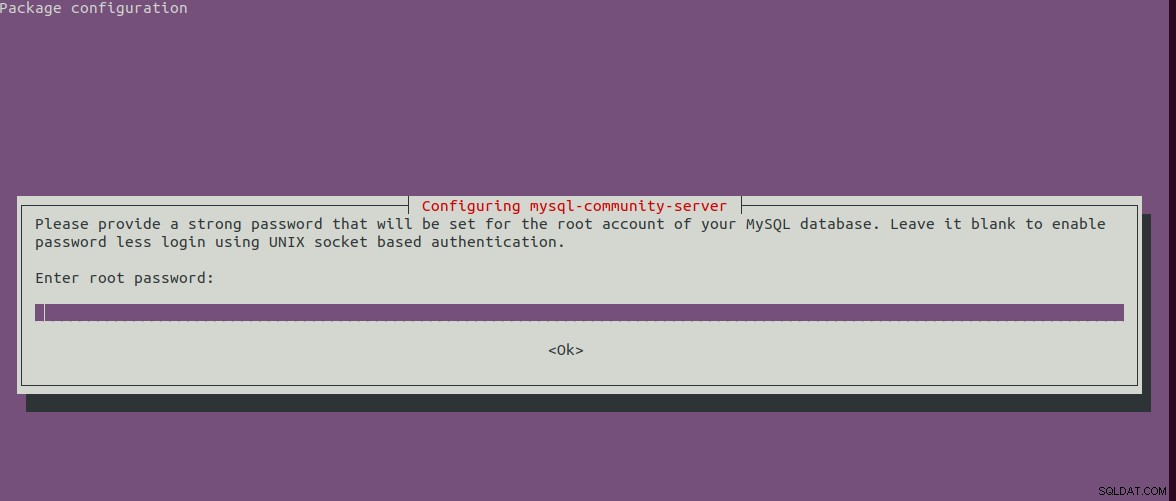
Fig. 4
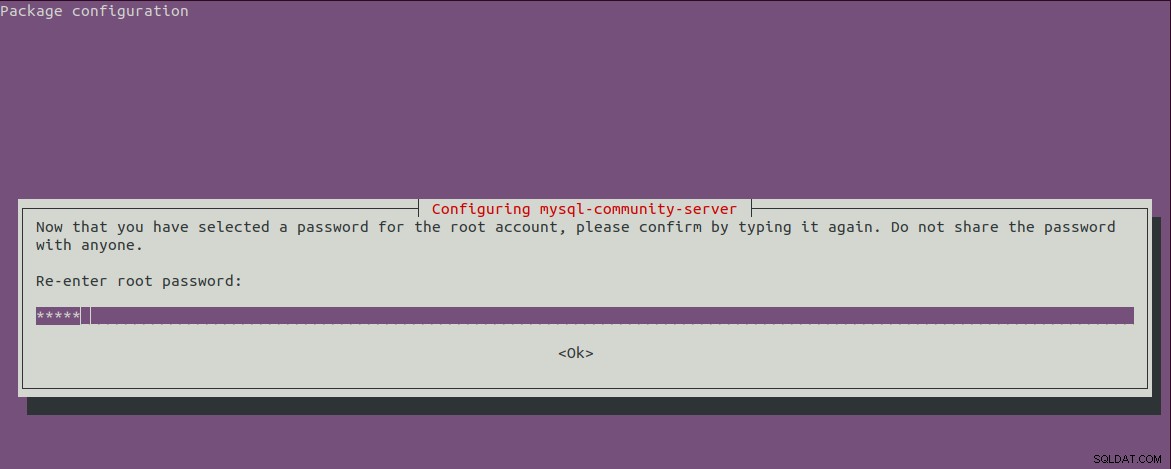
Fig. 5
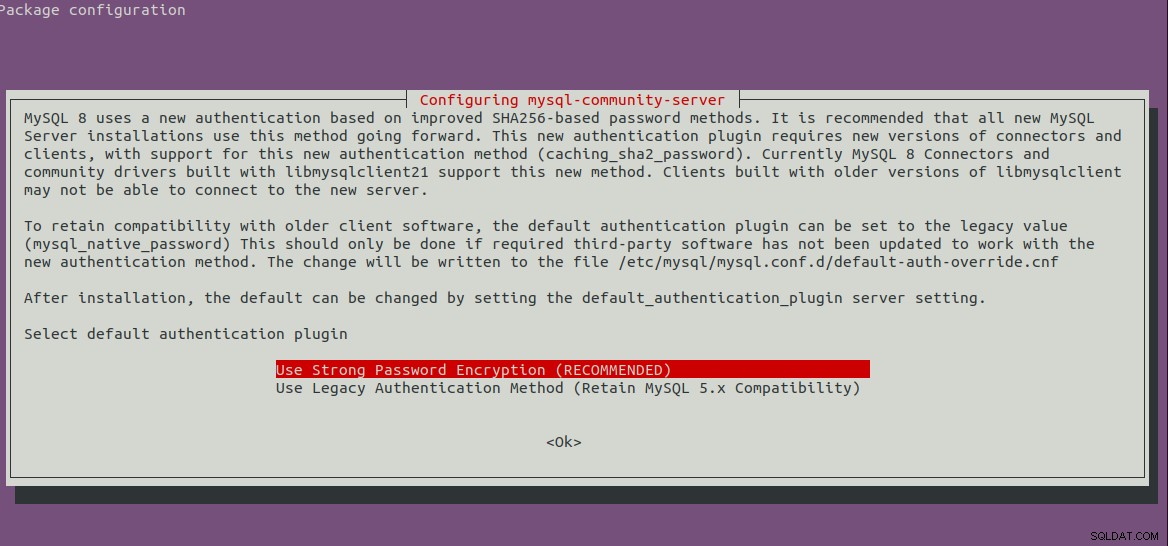
Fig. 6
Trin 5 - Sikker MySQL-installation
Vi skal også sikre installationen ved hjælp af kommandoen som nævnt nedenfor.
sudo mysql_secure_installation
Det vil bede om at indstille root-adgangskoden og et par sikkerhedsspørgsmål. De komplette trin, jeg følger, er som vist nedenfor.
bravo@pc1:/setups/database$ sudo mysql_secure_installation

Securing the MySQL server deployment.

Enter password for user root:

VALIDATE PASSWORD COMPONENT can be used to test passwords
and improve security. It checks the strength of password
and allows the users to set only those passwords which are
secure enough. Would you like to setup VALIDATE PASSWORD component?

Press y|Y for Yes, any other key for No: y

There are three levels of password validation policy:

LOW    Length >= 8
MEDIUM Length >= 8, numeric, mixed case, and special characters
STRONG Length >= 8, numeric, mixed case, special characters and dictionary                  file

Please enter 0 = LOW, 1 = MEDIUM and 2 = STRONG: 1
Using existing password for root.

Estimated strength of the password: 25
Change the password for root ? ((Press y|Y for Yes, any other key for No) : n

 ... skipping.
By default, a MySQL installation has an anonymous user,
allowing anyone to log into MySQL without having to have
a user account created for them. This is intended only for
testing, and to make the installation go a bit smoother.
You should remove them before moving into a production
environment.

Remove anonymous users? (Press y|Y for Yes, any other key for No) : y
Success.


Normally, root should only be allowed to connect from
'localhost'. This ensures that someone cannot guess at
the root password from the network.

Disallow root login remotely? (Press y|Y for Yes, any other key for No) : y
Success.

By default, MySQL comes with a database named 'test' that
anyone can access. This is also intended only for testing,
and should be removed before moving into a production
environment.


Remove test database and access to it? (Press y|Y for Yes, any other key for No) : y
 - Dropping test database...
Success.

 - Removing privileges on test database...
Success.

Reloading the privilege tables will ensure that all changes
made so far will take effect immediately.

Reload privilege tables now? (Press y|Y for Yes, any other key for No) : y
Success.

All done!
bravo@pc1:/setups/database$
Ovenstående trin fjerner testdatabasen og anonyme brugere. Det tillader også fjernlogin for at sikre, at serveren er tilgængelig lokalt enten ved hjælp af 127.0.0.1 eller localhost .
Brug nedenstående kommando til at kontrollere, om MySQL-serveren kører.
bravo@pc1:/setups/database$ systemctl status mysql
● mysql.service - MySQL Community Server
   Loaded: loaded (/lib/systemd/system/mysql.service; enabled; vendor preset: enabled)
   Active: active (running) since Thu 2019-08-15 10:40:47 IST; 4min 45s ago
     Docs: man:mysqld(8)
           https://dev.mysql.com/doc/refman/en/using-systemd.html
  Process: 28669 ExecStartPre=/usr/share/mysql-8.0/mysql-systemd-start pre (code=exited, status=0/SUCCESS)
 Main PID: 28708 (mysqld)
   Status: "Server is operational"
    Tasks: 38 (limit: 4915)
   CGroup: /system.slice/mysql.service
           └─28708 /usr/sbin/mysqld

Aug 15 10:40:45 bravo systemd[1]: Starting MySQL Community Server...
Aug 15 10:40:47 bravo systemd[1]: Started MySQL Community Server.
Trin 6 - Tjek version og adgang
Tjek versionen af serveren, der er installeret af os, og sørg også for, at serveren er tilgængelig ved hjælp af root-adgangskoden, som er konfigureret af os.
# Check version
sudo mysql --version
mysql  Ver 8.0.17 for Linux on x86_64 (MySQL Community Server - GPL)

# Login
sudo mysql -u root -p
Trin 7 - Vigtige kommandoer
Dette afsnit viser nogle af de vigtige kommandoer til at starte, stoppe og genstarte serveren.
# Check server status
sudo service mysql status

# Stop server
sudo service mysql stop

# Start server
sudo service mysql start

# Restart server
sudo service mysql restart
Trin 8 - Brug af adgangskodeplugins
I tilfælde af at du har valgt at bruge adgangskode-plugin-muligheden til backword-kompatibilitet med version 5.7, kan det være nødvendigt at oprette forbindelse til MySQL-serveren ved hjælp af kontoen med
# Login to MySQL

# Check password plugin of root user
SELECT user,authentication_string,plugin,host FROM mysql.user;

# Note the password plugin of root user
+------------------+-------------------------------------------+-----------------------+-----------+
| user             | authentication_string                     | plugin                | host      |
+------------------+-------------------------------------------+-----------------------+-----------+
| root             |                                           | auth_socket           | localhost |
+------------------+-------------------------------------------+-----------------------+-----------+

# Change password plugin of root user to native
ALTER USER 'root'@'localhost' IDENTIFIED WITH mysql_native_password BY '<pw>';

# Apply changes
flush privileges;

# Check password scheme of user
SELECT user,authentication_string,plugin,host FROM mysql.user;

# Note the password plugin of root user
+------------------+-------------------------------------------+-----------------------+-----------+
| user             | authentication_string                     | plugin                | host      |
+------------------+-------------------------------------------+-----------------------+-----------+
| root             | *E5C4F73D963132CEF9BB4PA79LA818C08BAQC300 | mysql_native_password | localhost |
+------------------+-------------------------------------------+-----------------------+-----------+

# Change to new and recommended password plugin
ALTER USER 'root'@'localhost' IDENTIFIED WITH caching_sha2_password BY '<pw>';

# Apply changes
flush privileges;

# Check password scheme of user
SELECT user,authentication_string,plugin,host FROM mysql.user;

+------------------+------------------------------------------------------------------------+-----------------------+-----------+
| user             | authentication_string                                                  | plugin                | host      |
+------------------+------------------------------------------------------------------------+-----------------------+-----------+
| root             | $A$005$THISISACOMBINATIONOFINVALIDSALTANDPASSWORDTHATMUSTNEVERBRBEUSED | caching_sha2_password | localhost |
+------------------+------------------------------------------------------------------------+-----------------------+-----------+
Sådan kan vi installere den seneste version af MySQL-serveren, dvs. MySQL 8 på Ubuntu 18.04 LTS.
